Throwback Thursday: Terrain Retrospective
In this post, I take a look back at some of my favorite (and most memorable) terrain projects from the past, and what I got out of them.
Rivet Wars Diorama, 2013
For one of my earliest scenery commissions, this was a pretty ambitious build. I had a lot of fun working on it because "setting the scene" is the main reason I got into miniature wargaming in the first place. I think I have more fun painting models and scenery and setting up a nice-looking battlefield than I do playing the game. So the opportunity to set up a bunch of toy soldiers in a large diorama was very appealing.
And the Rivet Wars troops were so cute and characterful! It was a lot of fun to arrange them in little scenes that (hopefully) told a story. I had to develop a process for to quickly paint them, using sprays, drybrushed highlights, and washes. Picking out the trim and details took a little more time, and it was all done with an "assembly line" of batch painting. Very useful when painting lots of troops.
When I worked at GW back in 2004, I made a "No-Man's-Land" table for Games Day. I drew on that experience when it came to mass-producing rows of sandbags and making blast craters.
The airship was the centerpiece of it all, and that was probably the most challenging (and time-consuming build. I made a core shape out of insulation foam, skinned it with fabric soaked in wood glue, and added the framing with balsa wood strips. Stenciling the Rivet Wars logo and painting it by hand was a nightmare, but the end result was worth all the effort.
This was also one of my earliest attempts at incorporating LED lights into the scenery. (This was so long ago, I was still able to get supplies at the local Radio Shack!) I incorporated three large LEDs into each of the explosions, all wired under the table. I can't remember if I used a battery pack, or had it wired to an AC power adapter (plug). I learned that battery packs really aren't the best power source for tables that will be "on" all day at a convention, because the battery will likely die by the end of the day, and the lights can slowly dim over time, reducing their visual impact.
I've got several posts about the construction of this board, which you can see under the label "Rivet Wars Diorama." (Or just click that link.)
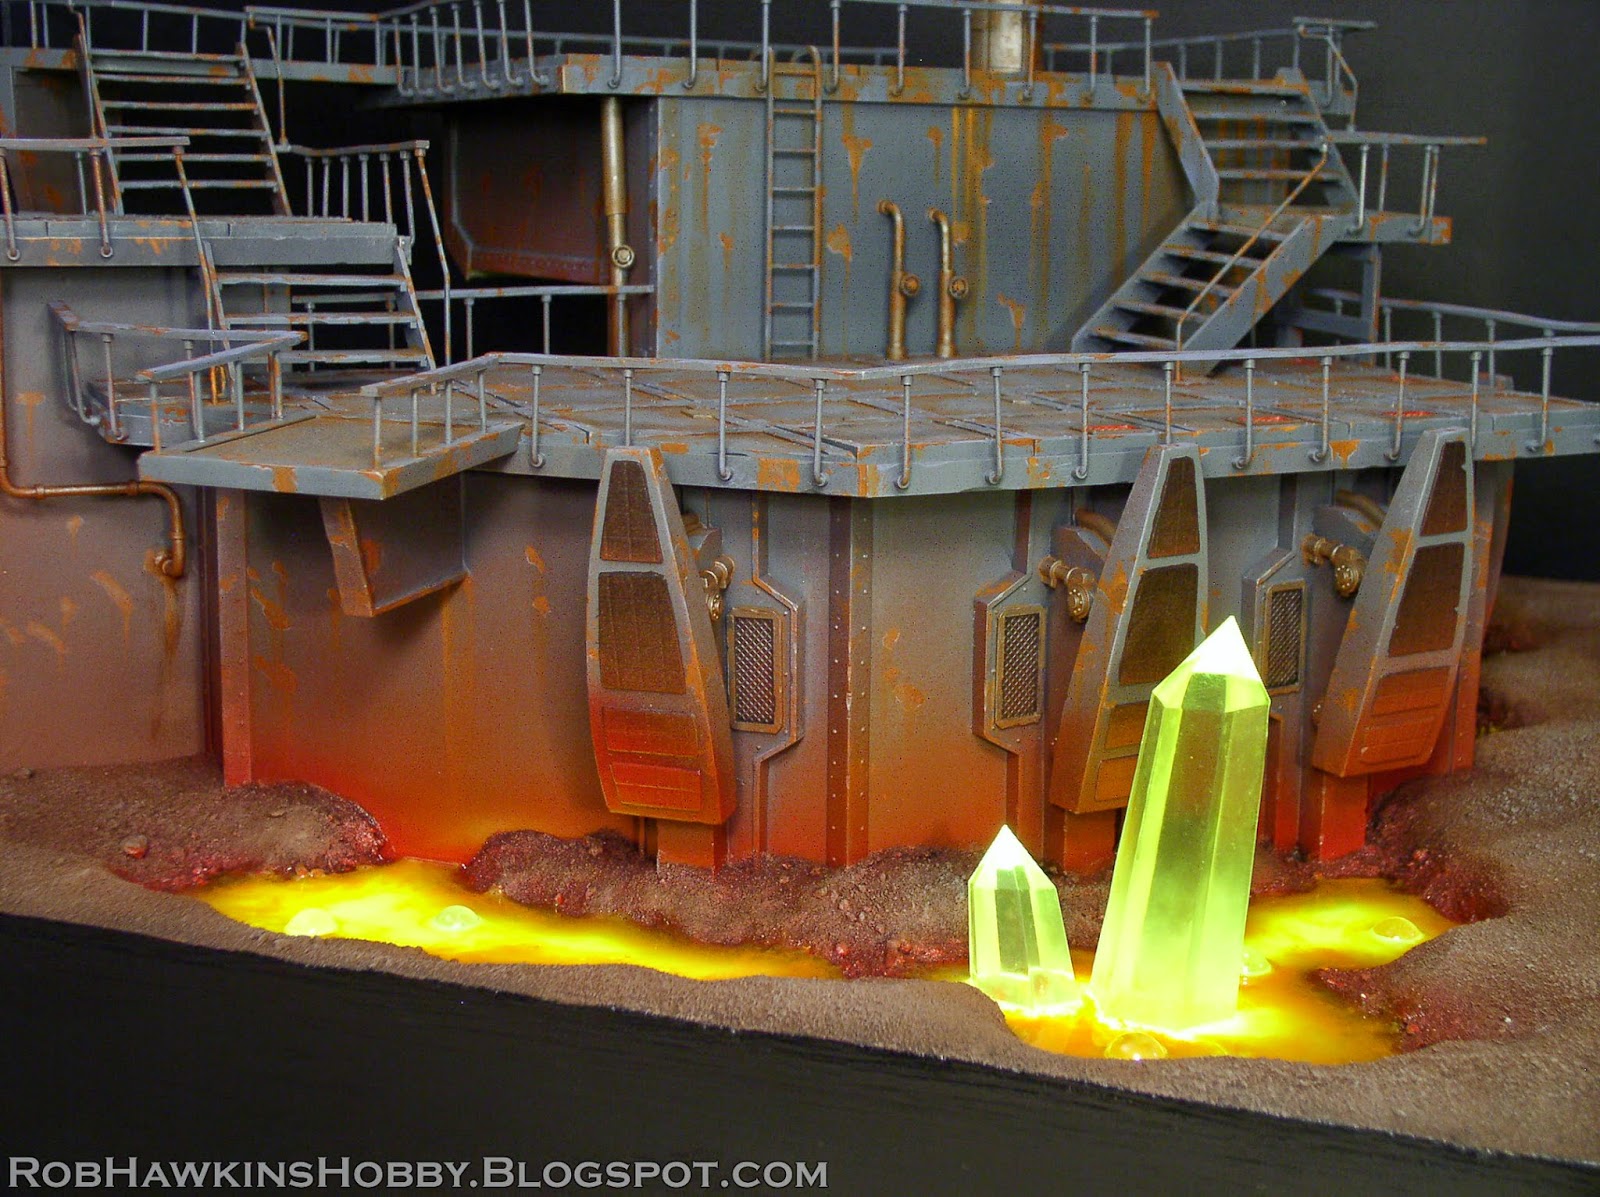
Dark Age Demo Table, 2014
This is one of the scenery projects that I remember most fondly. Cool Mini Or Not wanted me to build a set of four 2' x 2' boards that could tile together into a square 4' x 4' arrangement, or into a long row, end to end. I needed to design the layout of the platforms so the connecting walkways could line up in different configurations. Quite the challenge! Oh, it also needed to have glowing lava on the base! The result was one of the most striking boards I've ever made.
No Radio Shack, individually soldered LEDs this time– I bought a roll of strip LEDs online, complete with built-in resistors, connector plugs, and AC power adapters.
I also resin cast a ton of components for this board– The floor panels, and the "heat dampeners" around the sides of the platforms. This was a few years before I started my resin casting business, so I was able to work out some bugs that would save me a lot of hassle later on (things like the type of resin and silicone for mold making). And I've learned so much since then, as well.
Speaking of which, all the chips were hand painted; I hadn't yet discovered the sponge technique for adding chipping. That would have saved so much time...
The lava itself was a fun experiment, too. I used a textured panel for a ceiling light as the base, with the foam "ground" over that creating the lava pools. I was sent the large yellow crystals, and hot glued them around the pools. The lava was made from Envirotex Lite "Pour-on" epoxy, tinted with yellow paint. I poured that into the pools, and then used a cotton swab to swirl in the orange paint around the edge. The bubbles were made by dropping a few glass beads into it. The LEDs were arranged underneath the clear plastic, and shone up through the epoxy and crystals.
The red glow was achieved by spraying the platforms from below with dark red primer. This was one of the first projects I worked on in our (at the time) new house. One of my earliest memories of our new place is spraying all the components in the back yard... And ruining my carpet almost immediately by knocking over a pot of orange paint while tinting the lava.
Check out the label "Dark Age" to see the posts for this build.
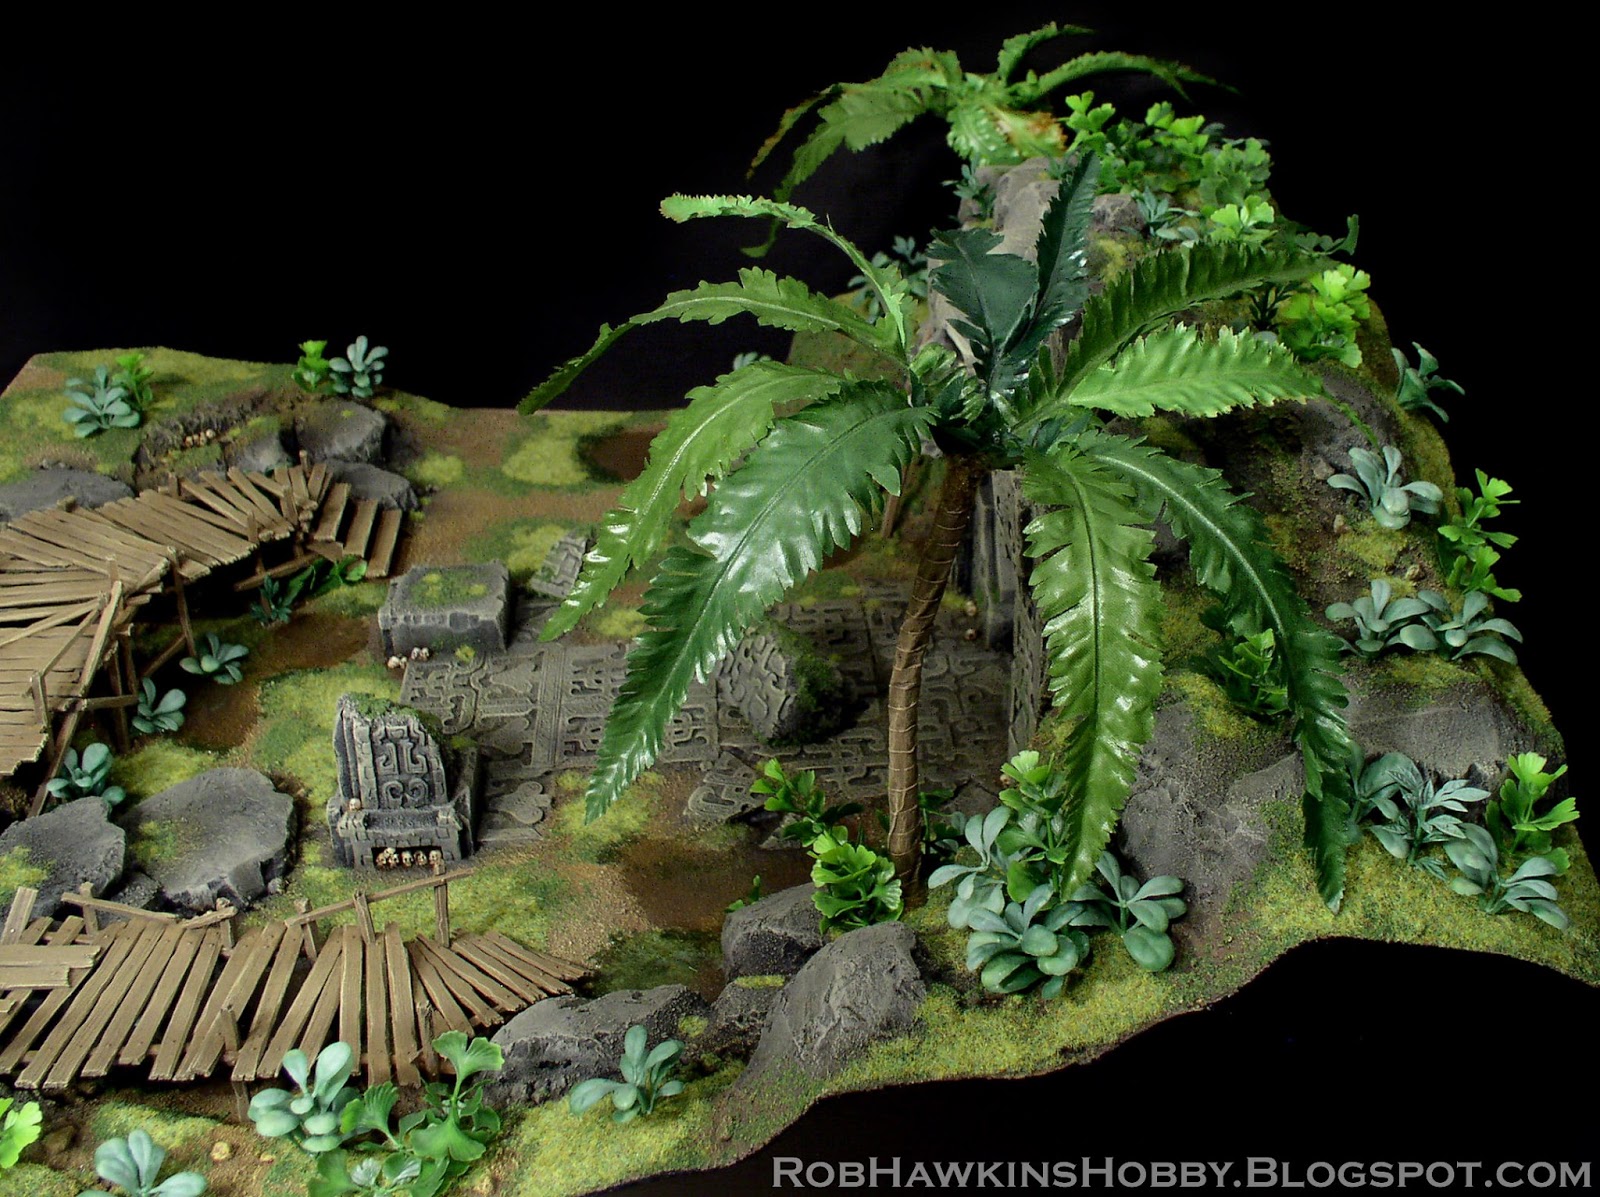
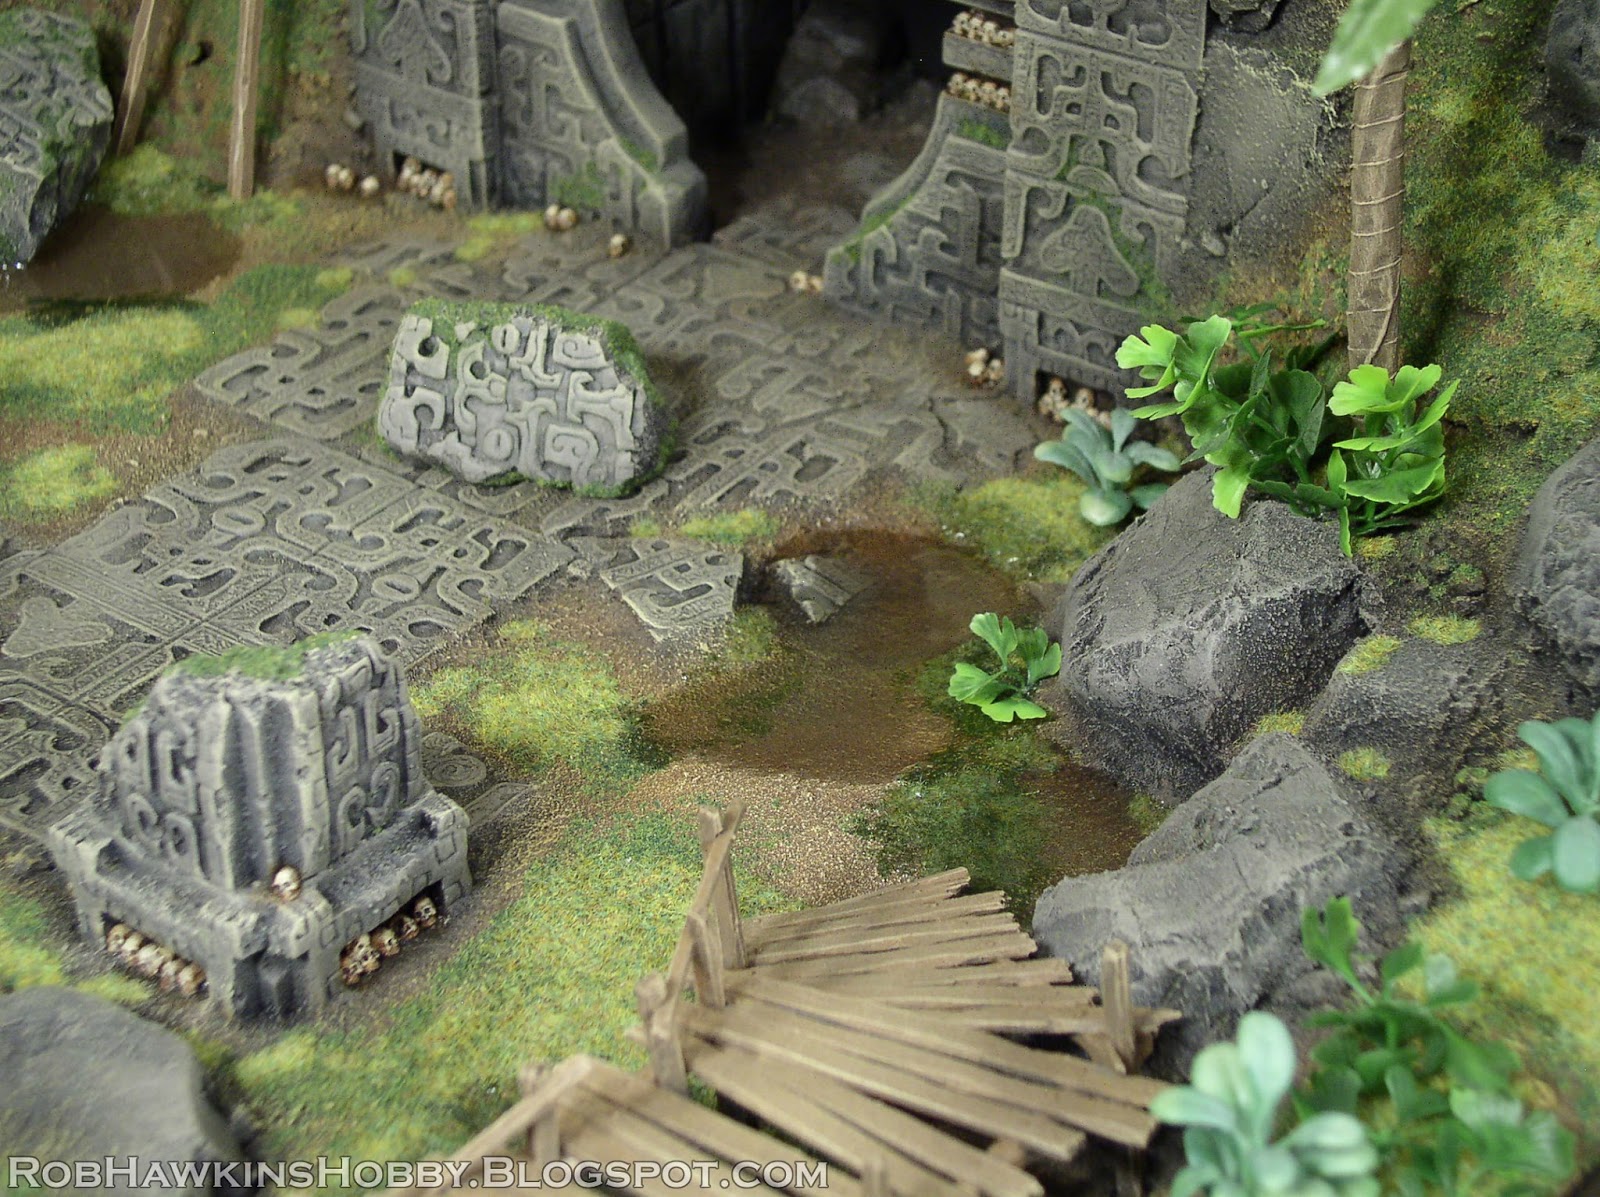
Conan: Rise of Monsters Demo Board, 2015
It's always nice to take a step back and work on some "regular' terrain that doesn't involve lighting, a metric ton of styrene plastic, or mass-producing resin components. But these smaller projects can be just as rewarding. I made a pair of demo boards for the Conan: Rise of Monsters game (one desert-themed, and one jungle-themed.
This project gave me the opportunity to experiment with other materials, like these Cellfoam sheets. I based the carvings on some concept art that I was given. I thought the Cellfoam would allow me to essentially "draw" the design into it. It was a little difficult to use, and it didn't take glue or paint very well. I made it work in the end, but if I had to do it over, I would have chosen a different material.
Jungle foliage is something I don't always get to work with– I think the last time was back in 2004 when I made the "Lustria Revisited" Games Day table.
I used a bunch of plastic plants and silk fern leaves to build the palm trees. I don't think static grass tufts had really caught on yet (I certainly hadn't seen them around), and I think that's the only thing really missing here. Some tufts and different colors of grass would definitely add a lot.
The most fun I had with this was adding all the skulls. They were all painted separately by washing them with brown ink. After all the scenery was painted, I glued each little skull into the recessed channels.
You can see more progress shots and the other board under the "Conan" label.
Wild West Exodus Harbor, 2018
I still love this table. I did a ton of scenery and boards for Wild West Exodus, and I think this one tops them all.
This project was the first of my "Project Log" series, where I go step-by-step through an entire build over the course of several posts. Definitely worth checking out if you want to see how everything came together on this table. ("Project Log: WWX Harbor" under the labels.)
There's a little bit of everything on this one– Water effects, foam stonework, textured styrene brickwork, scratch-built buildings and machinery, and even a bit of faux-painted neon light signs.
The centerpiece of it all is the three-foot-long ship berthed in the harbor. Easily one of the most complicated pieces I've ever done– It's all scratch-built with styrene sheets formed over an insulation foam under structure. Translating the concept sketch into a scaled-up, fully-realized model required a lot of problem solving to get the shapes and curves correct.
I highly recommend checking out my older posts for these (and other) scenery projects.
'Til next time!


Fantastic - some real inspirational stuff!
ReplyDeleteThank you!
Deleteamazing, so much talent
ReplyDeleteThank you! :)
DeleteGood job, these posts are a great idea because a lot of people haven't been loyally following your blog like me. I gave you another shoutout recently. I'm long overdue for an anniversary blog post, but I'm just too busy at work. I think I will be working today, but this morning I'll try to slap some paint on was I have good sun right now in Calgary. Keep up the good work.
ReplyDeleteThank you so much! Yeah, I've got 10 years-worth of posts. The labels on the right sidebar are a great resource for finding specific projects. (Unfortunately, they don't show up on the mobile-version of the page, so readers need to switch to view the "web version" to see the list.)
DeleteFantastic recap, Rob. Great work.
ReplyDeleteThank you! :)
Delete