Morghast Armor
The issue with the Morghasts' helmets has been resolved. I drilled a hole in the back of the skull, aligning it along the angle of the helmet plate.

With a drop of glue, I attached the pin to the helmet. Once the glue set, I covered the pin with a layer of putty.

The putty conceals the pin, and adds a little more stability to the attachment point. Viola! Removable helmets!


The shoulder and chest armor are all attached to a painting stick so they can be sprayed and painted in a single batch.

All that remains is the wings and feet. I'm currently working on a couple scenic pieces to use as perches. The Morghasts' toes will be modified to fit around the perch and the spirits will be removed from the wings.
Dread Abyssal Assembly
Because the Dread Abyssal that Nagash's Mortarchs ride has an anatomy similar to the Morghasts, I am assembling it, so they can all be painted as a single batch. Despite the complexity of this model, it goes together pretty well.
I don't rememer if I've brought it up on this blog before, but I think the days of simply assembling a GW model and painting it as a single piece are over (for the larger ones, at least). There are so many overlapping pieces used to create the depth of detail that it is impossible to paint the visible areas in the interior once fully assembled.
The tail and pelvis and the two body halves will need to be kept separate so I can get at all the little skulls inside.

The legs have three main parts, the interior and the outer covers. Again, the covers need to be left off so the inner skulls can be painted. At the end of the day, I think this model will be in nine pieces when I paint it, and that's not even counting the spirits, heads, armor, and rider.

One neat feature is that the forelimbs of the monster offer a lot of posing options. The upper arm attaches with a peg which allows the shoulder to rotate...

And the elbow joins are a working hinge.

So, even though the monster's back legs are locked in a single position it's front legs can have a wide range of poses, and it looks like the head can swivel a bit on the ball-and-socket joint. If you're fortunate enough to have three kits so you can field all three Mortarchs, you can make subtle changes in the pose so they don't all look like they're riding identical monsters.

I'm still debating how to attach this guy to his base– whether to use the spirits he comes with to hold him aloft, or to use some gothic scenery as a monster perch. I guess we'll see how things shape up as the project continues to evolve.
--Til next time!
Corpsemasters
Last week I discussed the chassis and spirits, since then I've been working on the corpsemasters who will be riding atop the Mortis Engine. When I bought the kit, the keys on the master's staff weren't formed properly. I got a replacement part from GW, so now I had a spare front half of the master. I decided to make two riders:
The first is a "normal" corpsemaster. The stock model has a face with a blindfold, which I have other plans for. Instead, I used one of the faces from the Corpse Cart. A little putty work was necessary to fill out the hood and hair.

The other rider is Korak the wraith. To make the back of the model, I used one of the bodies from the Empire wizard kit. The mismatched join was smoothed over with putty, and his back and shoulders built up a little. The hood was taken from the Corpse Cart rider, and a classic skeleton head (also known as a "skull") was trimmed down to fit inside the hood.

I built up the top of the hood and "shawl" on his back with another layer of putty, and filled out the bottom of his hood around the front.

The scythe that normally goes at the top of the Coven Throne will be added in place of the staff. Then, I'll need to either find or sculpt a suitable skeletal hand.

Having the two corpsemasters will allow me to field Korak as part of the Mortis Engine if he's not on the table as a wraith hero. Perhaps the artifact in the reliquary might be the earthly remains of Korak himself, and maybe the "normal" corpsemaster could be the manifestation of his human form?
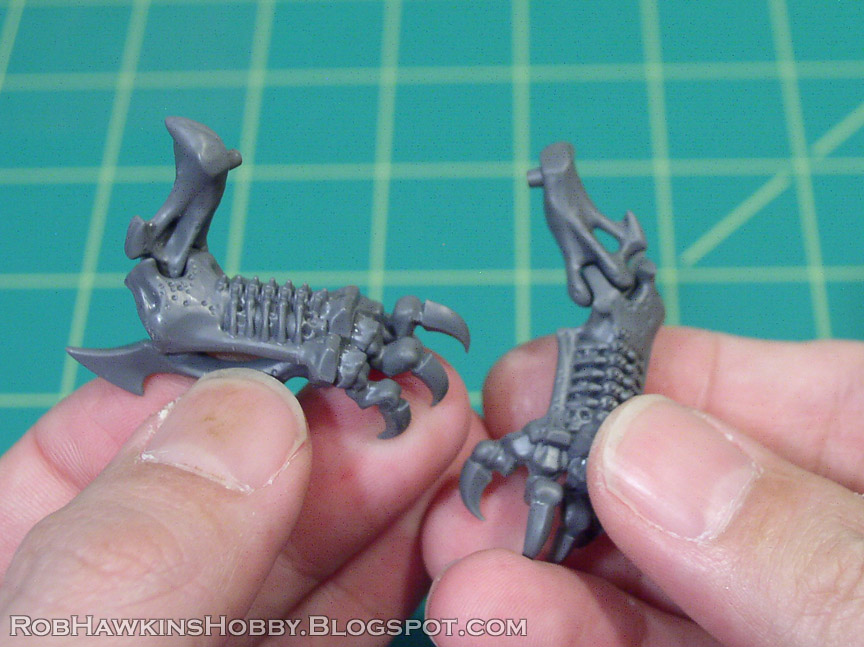
Morghasts
I've also been playing around with the Morghasts. I have four, and I'm building them with interchangeable weapon options. The body assembly, while complex, was relatively easy; there were a few spots where the parts didn't look like they were going to fit properly, but it was just a matter of "popping" the parts into position.
I have to say that the attachment points on this kit are less than stellar. A lot of the joins don't provide a definite, locking fit, so it's possible to build things misaligned if you're not careful. The shoulders, for example, have a ball join with a peg that will attach the arm in a fixed position so that the halberd hands align properly. It's a neat feature, because the pegs can be cut off to allow more freedom in the pose (and the instructions point this out when assembling for the hand weapon option). The problem is that the pegs are so small they don't really snap into position, and have a lot of play that can cause the arms to be misaligned anyway.


I changed the legs around to create more variety in the poses. In the two unit options, one has the chest armor and a helmet, and the other a bare rib cage and skull. I'm planning to build the models with the chest armor glued in place, because even the unarmored version still has shoulder and arm armor, and it seems silly to have armored arms, but not the body. I'll leave the helmets removable.
The kit comes with four hand weapon designs, so you can build up to four models before repeating any of the weapon styles. That's a nice feature.

The more I looked at them, the more I felt the sword blades were a little bland and cleaver-like. Since I had spares in case I messed up, I decided to cut some "bat-wing" scallops into the blades.

I'm very happy with the results, and the blades are much more wicked and menacing now.

Now begins the arduous task of pinning all the weapon hands. I'm attempting to make a universal configuration so all the sword hands will fit all the arms and I won't need to keep track of which of the 16 sword hands goes with which body. I'm using a double pin so the hands won't rotate, either.


Once these guys are built, I plan to assemble the Dread Abyssal mount for the Mortarchs and paint all of these monsters in one batch. Before that happens, I need to work out the basing and finish the Mortis Engine.
'Til next time!
Happy New Year, everyone! I can't believe it's been four years since I started this blog. Thanks to everyone for following along. Extra kudos to you if you've been following since the beginning. Hopefully I've kept things new and interesting for you.
The project log this week is something from the "I bought this years ago and I'm just getting to it now" file– The Mortis Engine.
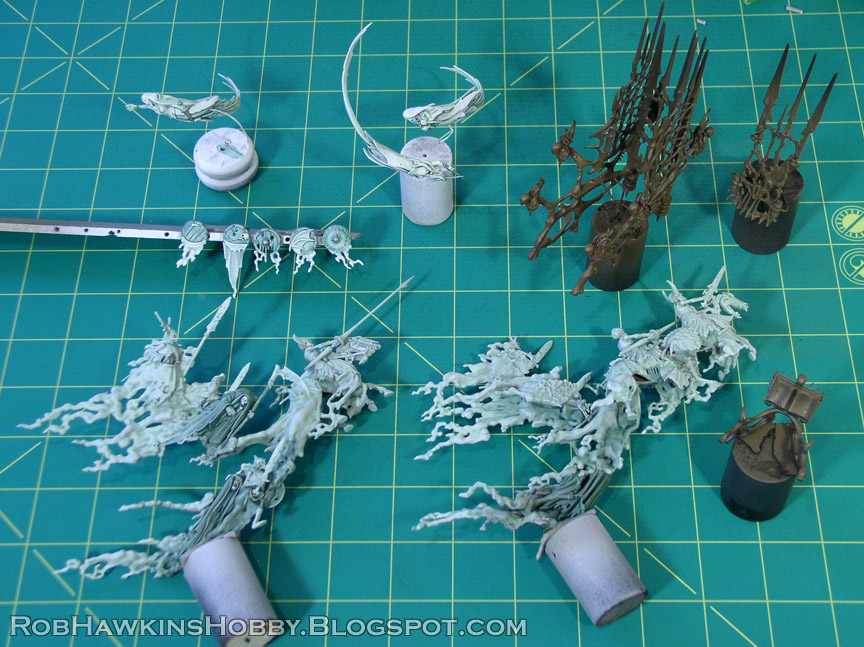
I had held off on this for a number of reasons, mainly because I wasn't sure how I was going to paint the ethereal swarm, and because the whole kit seemed pretty intimidating. Once I began assembling it, however, the parts went together fairly easily. Cleaning the mold line on the spirits was probably the most time-consuming aspect. All the pieces fit together pretty simply to form two halves of the spirit horde:

I kept the halves of the horse bodies and the weapon arms separate so I could spray the undersides. Then I glued the horses together and the riders' arms in place and re-sprayed everything with grey and white.

The banshees that swirl around the top of the Mortis Engine were also assembled and pinned onto dowels for priming and painting. The attachment points for these are really flimsy, so I may have to get creative when it comes time to attach them.


The bone cage around the blasphemous tome also went together easily. The sculpted flame on the skeleton braziers was a bit two-dimensional, so I embellished it with some putty.


The real work went into the base. The "chariot" frame of the Mortis Engine is a stone stairway with roses and thorns sculpted onto the steps. I wanted the Mortis Engine to be a monument to the legacy of my wraith Korak the Grim, a floating funerary barge where all the souls he's taken are bound in eternal torment. No living thing should be able to exist in its presence, so I removed all the roses and thorns where I could, and covered the rest with piles of skulls.

These are a combination of Secret Weapon Miniatures resin skulls and a few plastic GW skulls.


The skulls were all carefully positioned to fit around the robes of the Corpsemaster figure. This model will perhaps represent Korak himself, riding his chariot of death across the field of battle.

'Til next time!