As I was working on the Wrath of Kings table, questions were popping up in the comments section that I wasn't able to get to. I mentioned a few weeks back that I'd address them in a Q&A post, so here we go. Feel free to add to the questions in the comments section at the end, and I'll get to them as well.
Questions and Answers
Neil Hubbard asks: "Could you explain how you get a nice finish with the static grass please?"
The trick to getting a consistent finish is thinning the wood glue just a little with water. It should be the consistency of melted ice cream. Then paint it on evenly, thick enough to not have any dry spots, but not so thick that it runs or drips. Then pour the grass overtop. Pile it on so it completely covers the glue. (I'll use an entire shaker of grass on a table but once dry, most of it gets collected back up.)
Then gently press the grass down with your hand. This ensures that the grass really gets into the glue, and isn't just sitting on top. Let it dry overnight, and then dump off the excess. If you've got a vacuum it will help get any stray grass fibers out of the nooks and crannies.
I'll mix a few colors to get some variation, like on the Wrath of Kings table, or apply a layer of flock, let that dry and then add patches of grass in the center for a more layered appearance. Most of the terrain I made at Privateer Press used the latter technique.
Anonymous wants to know: "Where do you buy your pink foam at?"
My pink foam comes from Home Depot. Funny story about it: Not too long ago Owens Corning sold insulation foam boards that were a lighter shade of pink. Now all I can find is the darker pink foam, the one with the big picture of the Pink Panther on it. This foam seems denser than the old stuff, and it doesn't model as well in my opinion. But it's got the same serial number, so maybe it's a change in formula to save costs and we're all out of luck. I can't find the light blue foam anywhere. I've been to every Home Depot and Lowes in my area and no one has it.
There are also different styles of the boards, some have a flat edge, some have a tongue-and-groove edge. One store only carries boards with a 2-inch alternating lip cut out of each side, useless for making modular tables! Lowes only seems to carry its own brand of awful foam, covered with a peel-away film and only in a 1-inch thickness.
If anyone has a line on where to find the blue foam, I'd be very grateful.
Mananarepublic asks: "What did you make the "walls" for that mold in and do you have to coat the mold with something before you cast it?"
Luka pretty much covered it in the comments, but I'll just clarify– The mold box is made out of PVC card. It's a little lighter than styrene, but still thick enough that it doesn't bow under the RTV. It glues pretty well with super glue (in fact so well I had to destroy the walls to get the box apart).
I don't coat the mold with any release agent; the RTV pulls out pretty smoothly. When we made molds like this at GW, I believe we sprayed a release agent on the part just to be safe. When the piece I'm casting has foam or wood parts, I will coat them with a thinned layer of wood glue to seal them so the RTV doesn't bond to the porous surface.
Something else I learned: Make sure your rubber spatula is actually plastic, and not silicone, or the RTV will bond to it. Usually I just peel the excess RTV right out of the mixing bucket, and off the stir stick and spatula. Now my spatula has a blue skin hanging off of it!
Luka added: "It certainly looks like there's tape on the outside, but the inside corners appear shiny. I can't tell whether that's tape as well, or if he's glued them to prevent the silicone from escaping between the strips."
Both, actually. I super glued the walls together, and then put packing tape around the outside to make sure nothing popped apart under the pressure of the RTV or leaked out of a tiny crack. If you look closely, you'll see that I started to add a bead of hot glue around the inside, but quit because it was difficult to get the glue gun in there, and it was overkill anyway.
I don't use Legos to build the walls mainly because I'd be afraid of the RTV leaking through the tiny cracks between bricks. I think Legos might be more expensive than the card, as well.
On July 15, redmanphill asked: "How long did it take you to make this much progress?"
That was after "Part 2" so this was two weeks into the build, probably close to 80 hours. Most of the first week was spent gathering supplies, planning, and building the crate, with minimal time spent on actual table construction.
The entire project (including the miniature painting) took around 200 hours. The blog posts were up to date with the construction each week, so you were watching this get built in (sort of) real time.
TheBugKing asks: "A question on the commission process: How do you decide on cost? I've done a few pieces where I tried to estimate each section of a board and it got prohibitively complex."
I estimate the cost of the materials and supplies and how much time it will take to complete the piece. I try to work out a quote so I'll earn a respectable "doller-per-hour" rate after deducting the material costs.
For me this works better than billing at an hourly rate that could wind up costing the client more than they were expecting if a project runs long. They get the piece at the price quoted and the responsibility is then on me to work efficiently to keep my time and budget in check.
I went a little long on this project, but I kept track of the expenses and time involved, so I'll have a better analog for next time. The more work you do, the better you get at estimating time and costs.
Mr Saturday ased: "Maybe I missed it in the post, but how did you do the foam stones? Are they individual bits?!"
If you mean the rocky cliff on the back side, yeah I sort of glossed over that. Here's a little more explanation on how the stones stones shaped up:
The trick to making effective rocks, cliffs, and such is in hiding the separation between individual chunks of foam. Each "boulder" is not a separate piece (that would take forever), rather the rocks are cut into a piece of 2-inch foam. They are built up in layers, and each piece of foam is angled or turned so there's no recognizable "stair-stepping" effect.
These are colored photos from the previous blogs. Each colored section is a single piece of foam, to give you an idea of how the pieces layer and jigsaw-puzzle fit together. The blue rocks are single stones that I glue in to fill gaps and break up any straight lines.
I cut away the layers of base foam and replaced them with chunks of sculpted 2-inch foam.
And finally, Rob Akins asks: "So, when can we expect to see your own line of resin scenery hitting your online store?"
Someday, Rob. Someday. Who'd buy it?
That's all for now. I've got some commission models to work on, and a weekend of Blood Bowl coming up. Got to re-read those rules because I haven't played in years. The last time I rolled a block die was in 2004!
Thanks to everyone for the questions and for following along!
'Til next time!
There was no time to post last week as I geared up to deliver my tables to Gencon. This week I'll show you the final diorama shots of the Wrath of Kings Goritsi City, and I'll give you a look at how a commissioned table like the Von Drakk Manor gets developed, from concept art to construction.
Both of these tables have been added to my terrain gallery with a slew of photos, so check 'em out!
Gencon
Kevin at Cool Mini Or Not was nice enough to put me up for the show, so I was able to meet everyone and walk around the hall.
In addition to the Wrath of Kings Diorama, I finished off Von Drakk Manor, a haunted mansion for the upcoming Super Dungeon Explore expansion from Sodapop Miniatures. There was a lot of positive feedback for both of the tables (although I think the Sodapop booth babes got more attention!) and I really appreciate all the kind words.
I hung out at the show Thursday and Friday. Saw a lot of old faces and met some new ones as well. I even got to play a game of Warmaster. Good times!
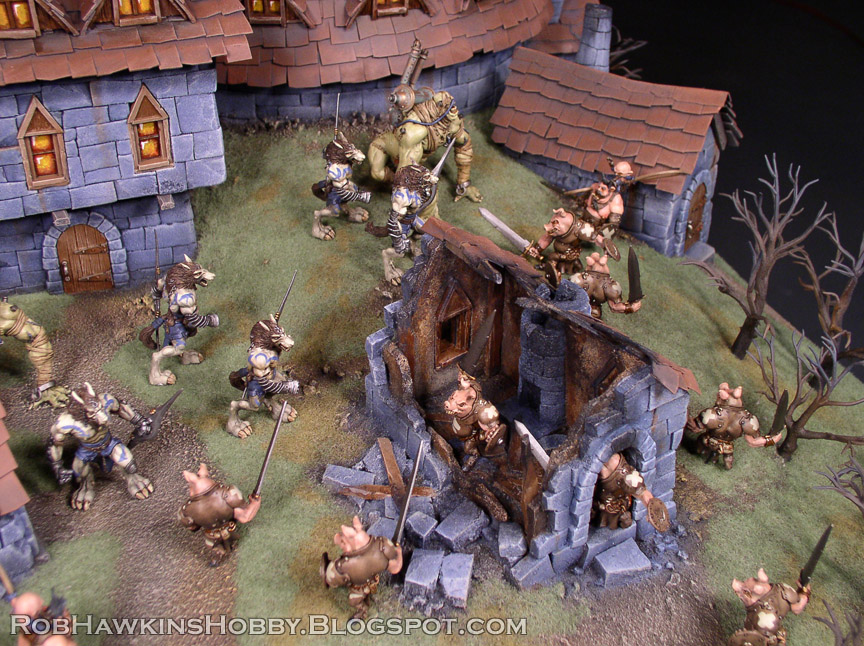
Wrath of Kings Diorama
The miniatures for the Wrath of Kings diorama were painted over the course of a week, and pinned in place with wire. I think the Union Workers (pig men) with their Master-Blaster-like Union Bosses are my favorite.

Von Drakk Manor
The second table I'd been secretly working on is for an upcoming Super Dungeon Explore expansion. I got to see the figures for the new set at Gencon, and they look really sweet– skeletons, spiders, a giant werewolf and vampire bat, and new heroes. John at Sodapop commissioned me to build this haunted mansion, Von Drakk Manor, to demo the game at shows:
So, how does a table evolve from an idea to the final product?
Concept Art
After getting the initial idea of 'a haunted mansion demo table' I worked up a concept for a 2'x3' board. This first piece has a few levels, multiple rooms, and is pretty involved.
That was a bit large for what he wanted, so I dialed things back a bit and gave John a few different options for a table that was visually appealing and would be suitable for a quick run through of the game basics.
John settled on design "B" and I tightened up the concept, complete with the floorplan, details, and exterior elevations so he could visualize what it would look like from the front, side, and rear.
Construction
Once those designs were approved, it was time to start building. I didn't really document the construction the way I did for the Wrath of Kings table, but I took a few pictures to keep John up to date on the progress.
The toughest part was working out the stairs and tile spacing. Each tile is 1-inch square, and the stairs needed to align properly and carry through to the second story without the railing interfering with gameplay. Consequently, there is a 1-inch row of "dead space" along the wall and railing. The other tiles make up the playable area.
The torn wallpaper was made by slicing the card covering off of a sheet of foam core, and using the foam 'core' to shape the stonework. The hanging tatters were sculpted onto the board with modeling putty. The skulls are Verlinden Productions resin skulls, and the doors are my own resin doors, modified with styrene strips. The railings were scratch-built using ship parts for the balusters and layered basswood dowels and strips for the handrail.
The window frames were resin cast, and I added some decorative plastic columns.
These next shots show the table nearing completion. The bookshelves were assembled using thick cardstock.
The draperies were made by soaking a length of paper towel in wood glue and laying it out on a piece of foam to dry. I folded and twisted it into the desired shape while it was still wet. If you try this technique, I highly recommend latex gloves; my fingertips were yellow for days!
I cannibalized some tea lights to make the torches. Everything but the bulb and battery housing was trimmed away and this was then covered with strips of card cut with decorative scissors to create a fixture that would sit atop the shorter columns.
The exterior towers and stonework were made much the same as the towers on the Wrath of Kings city.
Painting
I don't usually get to paint a lot of blue or purple, so this table was a nice change of pace. Nearly every piece of furniture and detail was painted separately and then glued together on the finished table. John sent me an illustration which I was able to print and place in a small frame.
I matched the tile pattern on the carpet using a gold pen to draw the grid and add a bit of decoration.
The windows all have a piece of card behind the frame with either a warm glow (for the exterior) or the moonlight shining through (for the interior). The frames were then glued overtop.
I think the tea lights turned out pretty well! The batteries are removable so they don't burn out. With a little more time or budget I'd run wires underneath and add a switch.
The client was very satisfied, which is always a good thing. (Actually, it's the most important thing!) All that remained was the 12-hour drive to Indianapolis to deliver it!
You can see more detail shots of Von Drakk Manor and the Goritsi City in my terrain gallery.
'Til next time!
This week was a painting marathon for me, but the Goritsi City is finally finished. I'm going to run through my painting process, and then I've got to get back to work. The miniatures still need to be added to make this a proper "diorama" and this ain't the only table I've been working on...
Remember– I'm putting together a Q&A blog for this table, so feel free to ask any questions in the comments section, and I'll address them all in the coming weeks.
Painting the City
All of the parts for the table have been kept separate for priming and painting. I began by painting black latex paint over all of the exposed foam areas like the stones and bricks. The ground was also painted with the latex to help seal the sand and gravel. After that, I used black spray primer on the rooftops.
To speed up the painting of the stonework, I sprayed Model Masters Panzer Grey lightly over the stone surfaces, including the rocky cliff. Then I hit the rocks and ground in a few places with Model Masters Light Earth spray.
To finish off the stonework I use the following series of drybrushes and washes:
1. Drybrush the stones with GW Shadow Grey.
2. Mix in some GW Bleached Bone, and add another layer of drybrushing.
3. Take this mix to almost straight Bleached Bone, and apply a very light drybrush to highlight the stones.
4. Mix a wash of Shadow Grey, P3 Thamar Black, P3 Coal Black, and water, and paint this into the shadowed areas under the roofs, around the bases and anywhere the highlights are too harsh. Wipe and blot the majority of the wash away with a paper towel to soften the color a little.
5. Once the wash is dry, add a final drybrush of P3 Frostbite on the most raised edges. Apply rust streaks running down from the windows, and rooftops by painting thinned P3 Bloodstone or GW Bestial Brown, and wiping it in a downward motion with your finger.
Here is the table with all of its stonework finished. (This was probably the most time-consuming portion of the painting.)
Next, I painted the doors. This was a simple matter of basecoating the wood with P3 Gun Corps Brown, and the metal with P3 Pig Iron. Once that was dry I washed it all with a mix of GW Brown Ink and P3 Battlefield Brown. A tiny dab of P3 Bloodstone was added to the hinges for a bit of rust.
As I mentioned last time, the holes for the windows were all cut out of the foam, and the resin windows themselves kept separate. This allowed me to liberally drybrush the stones without fear of gumming up the window details, and to paint the windows together in a single batch.
They were hot-glued to a piece of foam core, primed black, and then sprayed with Light Earth. Bleached Bone was drybrushed over them, and then I went through and painted each pane with P3 Khador Red Highlight (or as I like to call it, "orange") and P3 Cygnus Yellow. Some Brown ink was used for shading around the frames, and a final highlight of P3 Menoth White Highlight was added in the corner.
It took a few hours to paint all of the windows, and I was very glad I had the foresight to do it this way rather than painting each one individually while hunched over the table!
The ground was painted with three stages of drybrushing: P3 Bloodstone, P3 Moldy Ochre, and finally Bleached Bone. When painting the ground like this, any streaks or imperfections in the sand can be covered up with static grass and flock but take care around the areas that will be left exposed, like the paths and roadways.
The rocks were drybrushed with a mix of black and Bleached Bone, going successively lighter for the final highlights. The brown spray was allowed to show through in a few places to create some color variety in the rocks.
The timbers on the undersides of the rooftops were basecoated with a 50/50 mix of Bloodstone and Shadow Grey, then lightly drybrushed with Bleached Bone.
The Rooftops were Basecoated with the same mix, but about 60/40 Shadow Grey to Bloodstone. The rooftops were then drybrushed with straight Bloodstone, leaving the darker undercoat showing in the recesses and shadows, and then a final drybrush highlight of Bloodstone and Bleached Bone was applied.
Woodland Scenics static grass was added using wood glue. The grass colors are Medium Green with a few patches of Burnt Grass.
The trees, which had been removed prior to painting, were primed black and then sprayed with a light dusting of Light Earth and Panzer Grey. They were then set in place with hot-glue and dab of super glue after the static grass was set.
The windows were secured in their cut-outs with a hot glue gun.
Final Details
For the clock, I used a clock face from the local craft store (Michael's and A.C. Moore carry these if you happen to have one in your town). I removed all of the gears, and sanded the faux-chrome finish on the frame.
Some rust streaks and weathering were added to the clock face with Brown Ink, and the frame was basecoated with Thamar Black.
Chips in the finish were painted on using Pig Iron, and a bit of rust added with a wash of Bloodstone. The hands were super glued in place.
The clock face was set into the wall in the same manner as the windows.
The elemental's head was sanded and recesses for the eyes were cut out. I wanted it to appear as though the head was rising out of the smoke, so I added some Great Stuff expanding foam around the base and trailing up the sides. Some other smoky tendrils were created as well. All of this work is done on a sheet of insulation foam, making it easy to peel the foam off when dry. (On cardboard or wood, the foam would bond to it and be difficult to remove.)
Once the foam dried, I trimmed it down to fit in the recessed rooftop, and painted it with black latex. This was then sprayed with flat black primer and then given a dusting of Panzer Grey. The eyes were carefully painted with multiple layers of white.
The ominous Goritsi city stands ready to repel all invaders!
I had toyed with the idea of not showing the finished table at all to preserve the surprise for anyone going to Gencon, but decided I just couldn't do that. I will, however, save the majority of the detail shots I took. They will be added to my terrain gallery after Gencon and you'll be able to see every nook and cranny of the table.
If you're going to Gencon, you can see the full display (with miniatures on it) in person at the Cool Mini Or Not booth (1431, 1531, 1631).