Back in the day, before all these new-fangled plastic kits with 3D-modeled flags and totems, metal miniatures came with empty banner poles that needed to be filled out with a paper banner of sorts. There were images of banners in the books that could be photocopied and glued to the models (or one could bring his army to the table fielding naked flagpoles like some kind of savage).
Having a background in art, I decided to draw and color my own banners, specially themed for the Legion of the Infernal Skull. My original banners were colored with prismacolor markers, but these days I color them in Photoshop.
I still draw all of my Vampire Counts banners by hand, using the same process as for my comic work. In this tutorial, I'll show you the techniques to make your own unique banners.
Drawing the Banner
The first step is to measure the length of the banner pole, and transfer this measurement onto your paper. This will serve as your starting point and insure that it fits properly.
Start by sketching out the banner and hold it next to the model to make sure it's the size you want. Then draw the image in pencil. Don't forget to account for the tabs that will wrap around the pole. I'm drawing this one a little smaller than the available pole length so it will match the original version.
When you are satisfied with the pencils, go over the lines with ink. I use Koh-i-noor India ink, and either a Windsor & Newton Series 7 sable brush or Hunt 107 crow quill nib for my inking. Brush pens and Pilot Pens are fine too, and white out can be used to correct mistakes. I use Pentel Presto! Jumbo Correction Pens with a fine point. The idea is to get solid black lines in the final art. If you prefer a rougher "sketchy" appearance, or have really tight pencil lines, you may opt to not ink the banner at all.
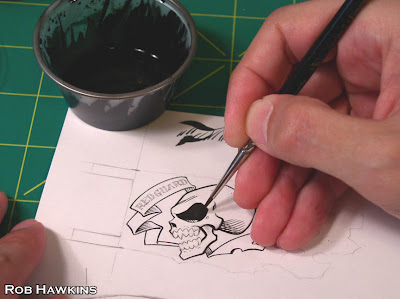
When the ink is dry (doesn't take more than a minute), you can erase the pencil, leaving the sharp black lines. The ink doesn't erase, but different types of pens may smudge, so always make a test piece before going onto your final banner. (Those black squiggles at the top of the page are where I twist the brush to a point before putting down the line. They are in the margin, and won't appear in the final image.) Notice that I haven't inked the edges of the banner. I'll show you why further down.
Coloring the Banner
With the line art finalized, scan the image at 300 dpi (greyscale) and import it into Photoshop (I'm using PS Elements, here). Adjust the Levels to balance out the white and black and eliminate any grey "fuzz." If your pencil lines were tight enough, you could skip the inking step and use the Levels to darken the pencil lines (and somewhere another comic book inker dies). Switch the image mode from "greyscale" to "RGB" or "CMYK" so you can add color.
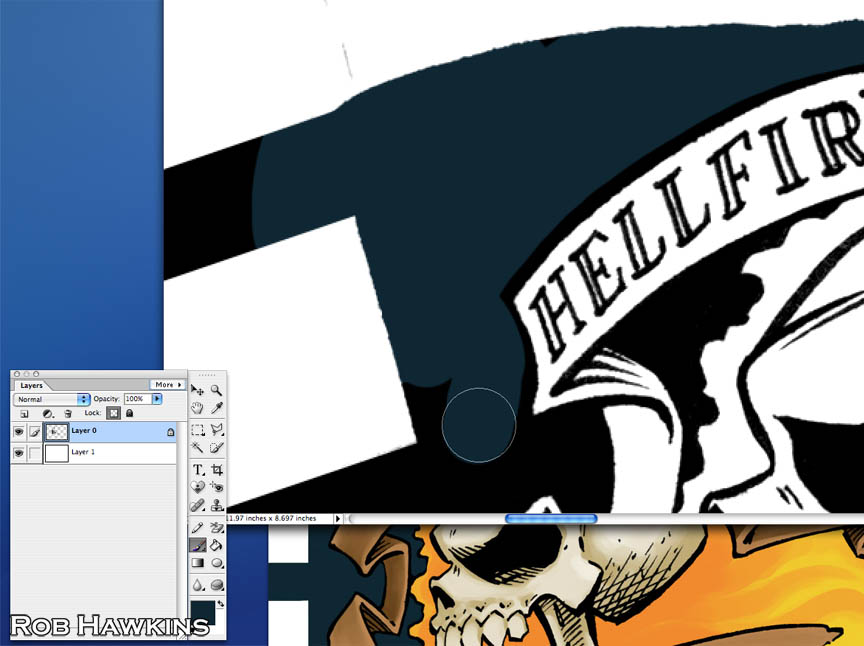
I'm working on two different designs to replace my older marker-colored banners. One for the Red Guard skeletons, and a flaming banner for the Hellfire Knights. They are both based on the original designs. The Hellfire Knights banner is drawn at an angle because the poles are thrust forward, as you'll see when I attach it to the model.
Different comic colorists have different ways of applying colors and making line adjustments, but here's how I do it: Select the "Background Eraser" tool and make it as large as it will go. Then mouse click in the white area to erase the white background, leaving the black lines. (If you're unfamiliar with or new to Photoshop, the checkerboard pattern is the transparent negative space.)
If your black lines appear as though they have some transparent spots, it's because they weren't black enough. Undo back to the Leveling step, zoom in really close, and adjust the leveling sliders until the white is white, and you can't see any grey specks in the black areas.
Next, create a new layer below the lines, and fill it with white. Then lock the transparency of the line layer. This does two things: It allows you to color "under" the lines on the white layer below, and it allows you to color on the line layer itself to add color to the line art without your brush bleeding out into the background space. Here, I'm adding a Shadow Grey-ish tone to the black part of the Hellfire Knights flag. (The other banner peeking out from underneath is the file for my Grave Guard banners, which I'm using for color reference.)
On the white layer, paint in the base color for the flag. The Skeleton flag will just be Scab Red, and the Hellfire Knights flag has a yellow base for the flames. Color the background a little larger than you think you'll need. The excess will be trimmed away when cutting out the flag.
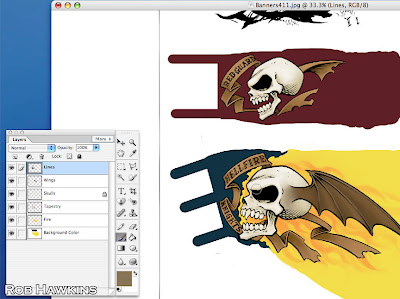
Create multiple layers above the background color layer as you work. One for each element of the banner. This will allow you to color freely on the separate layers (even going outside the lines) without marring the work on the layer below. Since the line art is always the top layer, your coloring won't obscure the lines.
As you can see here, I have the orange flames, tapestries, skulls, and wings each on their own layers. When I colored the skull, for example, I painted it in with a bone color using a hard brush, and then rendered the shadows and highlights with a softer edged brush, similar to the way you would apply shading and highlights to a model. Then I erased the stray color marks outside of the skull's line art.
This final step is a bit tricky– Duplicate the line layer, turn off the layer transparency lock, and erase any text on the layer. Merge this new line layer (without text) with all of the color layers, leaving the original line layer separate. Duplicate the merged color layer and flip it horizontally. Then slide it over to the side so both the original banner and the flipped banner are visible. If the image is bleeding off the canvas, select "Resize, Reveal All" to extend the canvas to fit the art. You now have both sides of the banner, one side with the readable text, and one side with no text.
On my banners, I lassoed the readable text, copied it, and used the rotation and transformation tools to fit it onto the other side. If you don't want to bother with that, you can just write the text onto the banner by hand after it's printed. In fact, you could leave the text boxes blank altogether and do all the writing at the end. That would make duplicating and flipping the banner much easier.
At this point, you can flatten the file and save it for printing. If you're lucky, you've got a quality printer at home. Or, if you are like me, you can take it to Kinkos where they will give you the runaround about why they cannot match basic colors like red and yellow despite presenting themselves as a professional printing center. (Having worked at a Kinkos, I know that's BS. So if you hit any snags, try talking to different staff members because someone there will know how to use the machines properly.)
Be sure to print the image at 100% and uncheck the "scale to fit" box. If the printer scales it even a little, the banner will be the wrong size and won't fit on the model.
Attaching the Banners
With the banners printed, it's time to glue them on the model! Make sure you have a brand new, sharp blade in your hobby knife so you can get precise cuts without the paper tearing. Use a steel ruler to cut straight lines around the front end and tabs. The rest of the banner can be loosely cut, because it will be trimmed after gluing the two halves together. One side should keep its tabs, but cut them off of the other side (it doesn't matter which).
Before gluing the tabs, paint the white edges of the paper with a matching color (in this case, GW Scab/ Khorne Red with a little P3 Sanguine Base. Thin the paint a little and run the flat of the brush along the edge, making sure any white is covered.
Then paint some white glue on the ends of the tabs.
Wrap the tabs around the banner pole and glue them to the inner side of the flag. For taller banners, you'll want to add more tabs for security.
While the tabs dry, lightly draw the tattered edge of the flag on the side without the tabs. Keep the lines light. (Mine are so light the camera can't pick them up.)
This is the reason the edges weren't drawn in the first place– If there was a black outline around the flag, it would be difficult to cut out the rough edge, and ensure they were both perfectly aligned so no black would show. By having plenty of background color, the outline can be cut anywhere and both sides will appear properly aligned even if they are off by a few millimeters.
Coat the back of the banner with thinned white glue and attach it to the opposite side. Make sure the front edge is lined up, and smooth the paper toward the back of the banner.
While the glue is still wet, a slight curve can be given to the banner, and it will hold the shape once dry. The two layers of glued paper will be very sturdy. Careful not to add too much curve, or it will be difficult to cut the outline.
Once the glue has completely dried, cut out the edge, using your pencil line as a guide. Try your best to cut on the inside of the line so no pencil marks will appear on the flag. They can be erased, but the erasure mark may be visible. Take your time and make small cuts to avoid tearing the paper (or cutting your fingers).
Here's my second banner completely cut out. If there are any spots along the edge that didn't glue, and are splitting, apply some thinned white glue and gently press them together.
As with the banner tabs, paint the white edges of the paper with a matching color.
For the flaming banner, the same principles are used, but the edge is cut to the shape of flame licks rather than tattered cloth. The angled front of the banner discussed earlier allows the banner to flow backward more, rather than standing straight up.
Here are the completed Red Guard banners in all their glory!
'Til next time!
The Red Guard Skeletons
Before falling into ruin centuries ago, Von Koss Keep was once a functioning fortress of the Empire. Many of the soldiers that once loyally served the Imperial garrison were entombed in the catacombs beneath the keep's foundation, while others rest in the now overgrown battlefields surrounding it. When the Legion of the Infernal Skull rose to power and the vampires von Koss claimed the fortress for their own, these soldiers were resurrected and now form the The Red Guard. Though bound by necromantic magic, these undead warriors fight vigilantly to protect the keep as though they still remember their oaths sworn long ago.
Dimirti von Koss uses these skeletons as his personal retinue. Awakened by his dark invocations, fallen soldiers crawl out of the earth to join the Red Guard's ever growing ranks.
Converting the Red Guard
The Red Guard skeletons are constructed using the plastic Skeleton Warriors and Soldiers of the Empire kits from the previous edition. (You'll find that many of my tutorials feature older models, as I've been collecting for years. While you may not have access to the older kits, the conversion and painting techniques can still be applied to the newer models.)
I had built two 20-man units a few years ago, with the intention of adding more models to cap off each unit at 30. The 20-man skeleton units have served me well on the tabletop, becoming a staple in most army lists, and it's about time I followed through on my plan. In this tutorial, I'll take you through the process I use to assemble and paint these skeletons.
Assembly
It may appear that you would only be getting one unit out of two boxes, but with different combinations, you can stretch the parts further and still get two regiments-worth of models. Skeleton legs with an Empire torso, and Empire legs with a skeleton torso, for example. The arms and heads are the tricky part, because you want skeletal hands holding the weapons and a skull head to reinforce the unit's appearance as skeletons. Fortunately, most of us have plenty of spare weapon arms in our parts boxes, and skulls are not difficult to come by.
Below, you can see all the parts laid out to build two models. By using a combination of skeleton and Empire parts, you can create a unit that looks suitably armored, and has a definite Imperial flare. A similar technique could be used to make High Elf or Bretonnian-themed undead regiments.
The shields are from the classic Fighter Shield Sprue. The two horns are used to create a neck for the skull, since skeleton heads and Empire torsos would otherwise be joining socket-to-socket (and wouldn't work).
Before assembling anything, go through and clean all of the mold lines and distress the clothing and armor with cuts and divots. A dull hobby knife blade and pin vise are useful for creating all manner of pitting, tears, and scratches.
For the model on the right, it's a simple matter of gluing the torso and legs together. The legs of the model on the left prove a little more complicated, and uses the following technique for combining clothing with skeleton parts.
You are going to use the upper portion of the sleeve, and the lower portion of the skeleton arm. Clip away the red parts, as shown in the image. To easily create a secure and realistic-looking join, use a large (1.90mm is fine) pin vise bit to drill out the bottom of the sleeve. The skeleton arm can now sink into this hole, creating a more secure bond when glued together.
For the weapon arm, use the same technique. If you prefer to use the existing, weapons that the skeletons are armed with, that's fine. For my skeletons, I cut away the weapon and attached a sword from an Empire soldier. By scoring the parts and making sure the parts joined level and flush, I was able to attach them with super glue and no pinning.
Why go through all the trouble with the swords? I'm glad you asked! The new skeleton kits have nicely uniformed swords, but the old kit had a mix of flails, axes and swords. Skeletons with mixed weapons look like rabble. That's fine for for zombies, but skeletons in a Blood Dragon army should have a martial, disciplined appearance. The skeletons still wear their former uniforms and armor, and bear the same equipment.
To further complicate matters, I had already built my Grave Guard and equipped them all with swords from the skeleton kit. I didn't think it would be appropriate for skeletons to have weapons the same size as the Grave Guard, so the smaller swords from the Empire kits were the obvious choice.
You can see the difference in this side-by-side shot:
Attach the finished arms to the skeleton. To create the neck, glue the horn into the neck socket, and then clip off the pointed part. In lieu of the horns, thick plastic or brass rod will suffice, although you'll need to drill a hole for it to sink into. The fact that it doesn't have any visible vertibrae texture doesn't matter; In the end it should be mostly obscured by the head and collar.
Using the same technique from the sleeves, combine the pants and skeleton feet to resemble the skeleton on the left. If you are attaching a skeleton ribcage to the flat top of the pants, you'll need to add a little bit of "spine" so the torso doesn't appear unnaturally stunted. This is easily done by slicing the top of the pelvis and spine off of the skeleton legs with a very sharp hobby knife. (You only need about a 3mm thickness, here. If you have ever worked in a deli, you should have all the skill required to do this!) Glue this part onto the pants, and then attach the ribcage.
To complete the assembly, just attach their heads and shields!
Here is a shot of four skeletons on a regimental base before I attached their shields. The metal heads were left over from my Execution Guard Grave Guard unit, and the helmet in the middle was made by combining a skull with a classic Bretonnian knight's helmet. The dragon icon on top was cut from the metal Grave Guard champion's head.
The breastplates were sculpted with brown stuff putty using a press mold to transfer the armor detail onto a plain Empire torso. The straps were then sculpted around the back.
Here they are: Twenty skeleton warriors, ready to join their comrades in death and glory! I attached all the shields prior to painting (even on the regimental strips) to speed up the process and avoid spending time on parts of the miniature that would just end up being covered.
I super glued sand and a few tombstones to the bases before spraying them with black primer.
Painting
A note on the painting: Because I jump back and forth between P3, and old and new Cidatel colors, I've identified each color with its manufacturer or replacement color the first time it appears. (If you're using the GW comparison chart, note that Ushabti Bone, is not the same as the old Bleached Bone. Screaming Skull is a closer match. Thanks to Scott at GW Echelon Village for pointing that out.)
Step 1. Over black primer, begin by drybrushing up the base and the bone areas. Start with P3 Battlefield Brown, then P3 Gun Corps Brown, GW Snakebite Leather/ Balor Brown, and GW Bleached Bone/ Screaming Skull. Give the bones a layer of Bleached Bone/ Screaming Skull, and then wash the entire thing with a mix of Brown Ink and Snakebite Leather/ Balor Brown.
Carefully drybrush the bones with Bleached Bone/ Screaming Skull and then with a mix of P3 Menoth White Base and P3 Menoth White Highlight on the highest areas. Try your best to keep the drybrushing out of the recesses. If necessary, paint more of the brown wash into the recess, over the teeth, etc. Don't forget the skulls on the ground!
For a more detailed step by step description of the ground and bone painting, check out the Graveyard Bases tutorial.
Step 2. Painting the bone takes the most time, so the rest should go fairly quickly. Start by basecoating the clothing with a mix of P3 Thamar Black and GW Scab/ Khorne Red. This should be fairly dark to start with, but not quite black. Then, overbrush the clothes with successively light layers of the same mix until it's straight Scab/ Khorne Red on the highest areas (we're only talking about 3 levels, here). Finally, mix in a little P3 Skorne Red to add some highlights.
As when you were painting the bone, try to keep paint out of the recesses when drybrushing or overbrushing. If any recesses fill in, you can always apply a controlled, dark wash to recapture the shadow.
Step 3. For the shields, simply paint the undersides black (they should already be mostly black from the primer layer). Then paint the front of the shields the same color as the clothes. Using a large drybrush, stipple a little dirt on the bottom of the shields using a mix of Gun Corps Brown and Snakebite Leather/ Balor Brown. Drybrush this dirt mix on the bottoms of some of the pants legs, as well.
Step 4. Paint all the brown bits (leather straps, belts, and any visible sword hilts. Base coat them with Battlefield Brown, and then apply a highlight with Snakebite Leather/ Balor Brown.
Basecoat the tombstones with a dark mix of Thamar Black and P3 Ironhull Grey. Then, drybrush up with Ironhull Grey, and finish off the edges by adding a little GW Shadow Grey/ Fang Grey and P3 Morrow White into the drybrushing mix. Wash a little Brown Ink around the stones' bases.
During this step you should paint any black areas of the clothing, like patches, socks or sashes. Use Thamar Black and Shadow/ Fang Grey to apply a two-step basecoat and highlight similar to that used on the leather straps.
Step 5. Paint Catachan / Castellan Green around the base edge, and spray the miniature with Testors Dull Cote matte sealer.
I use Dull Cote on the models to eliminate the shine that ink washes create, and to help the colors "pop." Dull Cote kills the metallic sheen, though, so I spray it prior to painting the metals. Since summer is here, it's worth noting that if you spray Dull Cote outside and bring it inside into an air conditioned house, there is a good chance that it will frost up. So, leave the figures outside, in the garage, or on an open windowsill until they completely dry. Take care leaving plastic models (or even the plastic bases) in the sun, though!
Step 6. The final painting step is to finish off the metal. Basecoat the weapon hilts and helmet embellishments with P3 Molten Bronze and highlight with P3 Rhulic Gold. Basecoat the swords, armor, buckles, and helmets, and paint the cuts on the shields with P3 Pig Iron.
On the helmets, paint straight Scab/ Khorne Red between the banding. Then, shade all of the metal areas (including the cuts on the shields, bronze parts, and the red on the helmets) with a wash of Brown Ink.
Paint a line of GW Mithril Silver/ Runefang Steel along the edges of the blades.
Step 7. Finish off the figures by adding static grass to the bases, and send them forth to crush their foes!
When painting blocks of horde infantry like this, remember to keep it simple and quick. The overall appearance of the unit is more important than any individual model, so don't sweat any small mistakes or missed details. This is the reason that I paint the figures with their shields attached– I'm not tempted to spend too much time on the areas I can't reach with my brush. If the brush can't reach them, chances are they can't be seen on the table, either.
I hope you've found this guide useful and entertaining! Here are the completed Red Guard skeletons in all their glory:
Coming up, I'll show you how I make those banners.
'Til next time!
In 2004, GW launched its Warhammer campaign: Storm of Chaos. That was the same year I was working with Jason Buyaki & Chad Mierzwa on the US hobby team. For the campaign, Chad and I were tasked with building a table represening the gates of the besieged Empire city of Middenheim.
Middenheim is a literal mountain of a city– think Minas Tirith, if built in the round, and with miles of bridges and walkways before you even reached the gates. The table Chad and I built focused on the bridge leading up to the city walls at one of the main gates. Basically, the setting for one of the largest siege games imaginable.
Photos were taken along the way (If I recall, Rick Smith was the cameraman, popping in every hour or so to snap a few pics). The entire table took around three weeks to finish with Chad and myself working full tilt on different parts, and putting in lots of overtime.
What follows is a photo journal of the table's construction. I hope you enjoy it and can draw some inspiration & techniques for your own terrain projects!
The Gates of Middenheim
We began with a plywood frame for the table base, bridge, and wall foundation. If I recall correctly, the table was about 5' wide by 4' deep. The walls themselves were fabricated out of foam core. Here, I'm cutting the wall section for the back of the gate house.
The wall features a double gate. The gatehouse interior was one of the first areas to be finished, as once the roof was in place it would be difficult to reach. The Empire Handgunner standing in the gateway gives you a sense of the scale.
Chad and I used brick and stone textured styrene card from Plastruct to cover the walls. For embellishments and trim we used Hirst Arts blocks. The blocks also helped hide the joins between the styrene sheets. (That's Chad's own Vampire Counts fortress in the background.)
Chad built the sides of the bridge...
...and here they are in place as he applies a layer of textured styrene over the castle walls. We went with a double tiered wall because let's face it– no one's getting into this place!
At this stage the cobblestone surface of the bridge was laid down. It's textured wallpaper, affixed with wood glue and then covered with a wash of thinned wood glue to make it a little sturdier. This shot provides a nice view of the wooden table frame.
The gatehouse interior's upper railing came from the Empire fighting platform variant of the old metal steam tank. The banners are all made from thick styrene card, carefully melted with a heat gun to create some folds. Each banner was attached to a dowel with hooks on either end, and hung on the wall via small eye screws.
With most of the card texture in place, we began adding the details. Here I'm building support beams with bass wood strips. Below, Chad is attaching the crenellation with Hirst Arts blocks while I spray prime the gate house interior.
The pink foam was attached with Liquid nails, and then held in place with long screws. Once the adhesive dried, the screws were removed and the foam was carved into the rocky cliffs at Middenheim's feet. Above the foam, you can see the layer of rock-textured styrene forming the stony foundation of the wall.
Here, the foam has been carved, and the gaps filled with wood filler putty. The out buildings are being constructed with foam core.
In this shot, most of the details are in place and the towers have been added. The one on the right is a ruin, with scaffolding for reconstruction. I think I went with that option because I didn't want to build another tower top! On all of the brick face, we added patches of wood filler to create some surface variety and strategically hide any joins or defects.
Most of the details like the tower top, guard rails on the bridge, and windows have been added.
Around the table frame, we applied a thin veneer of plywood, cut to size and sanded. (I'm almost certain we boarded at least one tool or parts bin inside the framework!)
Chad constructed the buildings on the back of the castle with foam core. We also made a 1' wide addition to the table, to allow more space for the fighting to carry on into the city beyond the wall. This was just a flat table, textured with the cobblestones. There aren't any photos of it, unfortunately.
The wolf heads over the doors are the old metal dire wolf heads mounted on 25mm round bases.
In this shot you can see the framework for Chad's buildings, and the added detail below. Basswood, popsicle sticks, textured card, resin windows and plastic model parts went into the construction. The roofs are made from hand-cut shingles as well as shingle-textured styrene card.
The back of the wall, nearly finished.
The entire castle was sprayed with black primer. The sides were left blank, and later coated with black latex paint, like the sides of all the game tables. All of the buildings, and the tallest tower, were kept separate for easy access when painting.
At this stage, it was suggested that we add some extra towers on the sides of the bridge. So we built two towers that would fit over the existing side rails, and then permanently attached them.
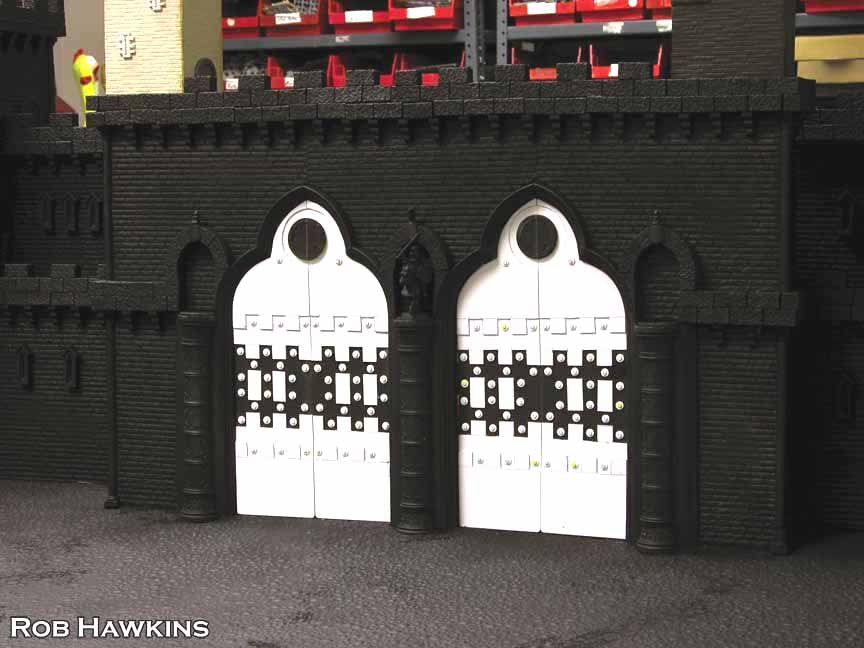
Regrettably, this is the only shot of the doors. I couldn't find one of them painted, or on the finished table. Chad made these with Styrene card and punched out rivets, mounted on foam core.
With the priming done, we laid down a base color using grey spray with a few hits of green and red. When drybrushing, the color shows through a little, giving the stone a much richer tone than if it was just grey.
Here, I'm painting some iconography on a banner. Jason Buyaki lent his talents to the banner painting, as well.
At this stage, the first layer of drybrushing on the bridge, stones, and bricks was complete.
After that came the detail work and weathering, and the table was finished!
More detail shots of the completed table can be seen in my terrain gallery.
'Til next time!