I think I've solved the problem with traveling at the speed of light. Shows like Star Trek would never work because when the Enterprise travels at light speed, everyone in Starfleet that wasn't on the ship would grow old and die because time passes more slowly for a ship traveling close to the speed of light (if you believe in crazy theories like "physics").
My wife and I just purchased our first home and moved in. It seems like the last time I checked my watch, it was October. November and December flew by like they never even happened. Now that the move is finished, things are resuming their normal pace. I can logically conclude that time actually sped up for us during the process.
So– What happens if you buy a house while traveling at light speed? The time distortions will cancel each other out, of course, and the ship can approach the speed of light without the time dilation. Boom. Problem solved. Somebody with science things get on that.
2013: A Look Back
This was a pretty big year. Despite neglecting the blog most of the last quarter, we grew by over 100 followers (316 as I type this), and the Facebook page gained even more. Thanks to everyone who came aboard, and to everyone who stuck with me during my absence.
I wanted to increase my commission and definitely did so. I managed to build ten commissioned terrain tables, and painted more than 100 models for the dioramas and other projects.
Looking back at some of the displays:
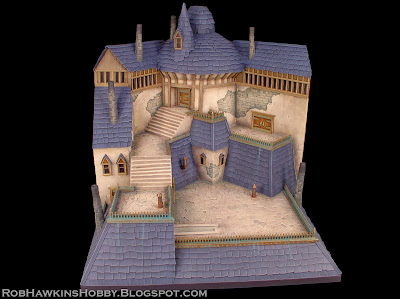
Of the five Wrath of Kings displays, I think the Shael Han rooftops was my favorite. The colors came together really well, and the wall texture worked out perfectly.
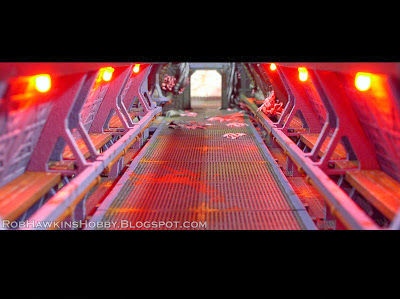
The Sedition Wars tables featured some of the most extensive Led lighting I'd used to-date.
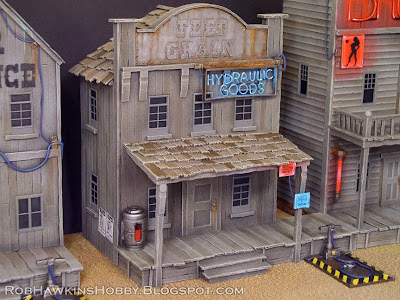
The Wild West Exodus Terrain was certainly the most expansive of all the projects. Something like 23 buildings and a combined total of 36 square feet of table area. Yeesh!
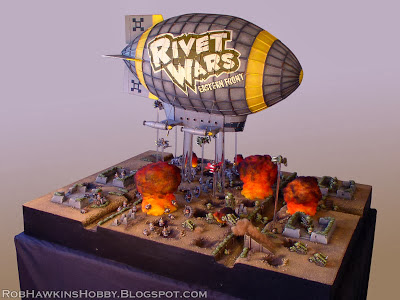
I think I had the most fun working on the Rivet Wars diorama, though. between the zeppelin, the explosions, and the little rivet dudes, it was just a blast.
I only managed to get in a handful of games this year, but one of them was the largest game of Warhammer I'd ever played. Check out the battle report if you haven't read it; it's truly epic.
Unfortunately, there were a lot of things I didn't get to. A few of the Vampire Counts models on my Shelf of Shame remain unfinished, but the most egregious offenders are the Terrorgheist, Corpse Cart, and Garden of Morr. I also promised a more in-depth tutorial of the bunkers I made for the Rivet Wars diorama. Definitely things I need to address early next year.
2014: A Look Forward
Now that I have more space (and won't disturb the downstairs neighbors) I'll be able to set up the equipment to have a dedicated resin-casting station and produce some terrain kits.
On the gaming front, my friends and I have been working to get together a map campaign or slow-grow league for Warhammer. Possibly a combination of both. If we can swing it, I'll be sure to post about it here.
'Til next year!
My wife and I bought a house recently, so most of my time has been spent preparing for the big move. I've been at Home Depot nearly every day, but not to buy terrain supplies.
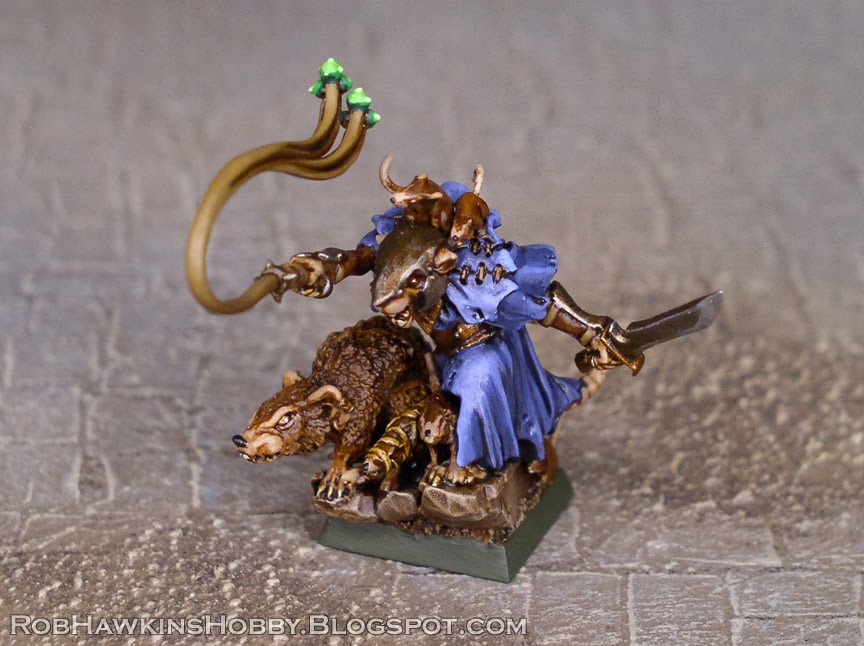
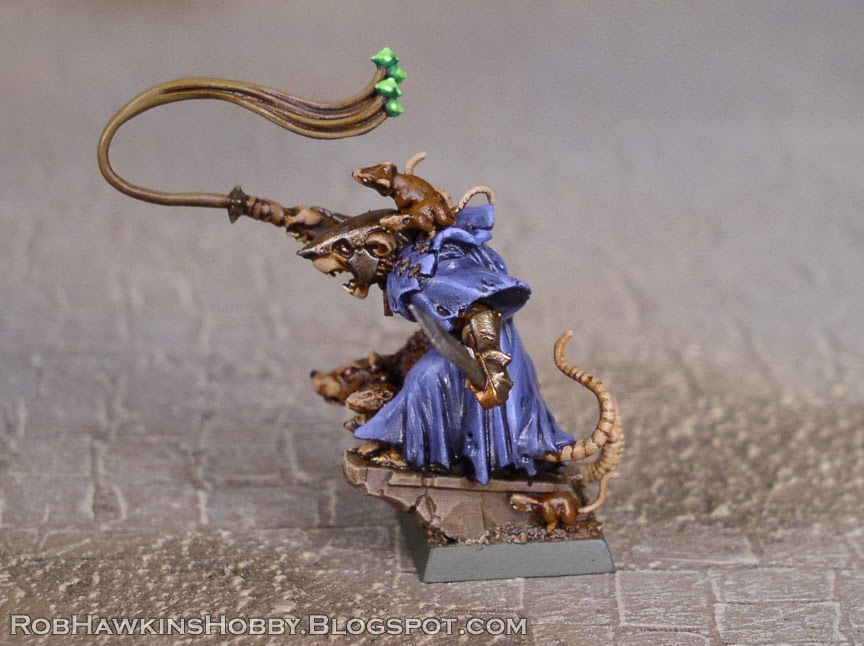
This little goodie came in the mail– an official Skweel Gnawtooth, all the way from Germany. Many thanks to Andreas from Spielmann's Workbench for the model! A lot of great conversion work on his blog. Check it out: spielmannsworkbench.blogspot.com
Skweel is on the back burner until I get settled in, though. I've still got the rat ogres and a second doom wheel to finish. I went through my Skaven figure cases and reorganized them with some custom cuts to accommodate the new large models. Everything is in its case and ready to travel.
The only painting I've been able to do has been at the house. The kitchen was a bit of a nightmare due to the paint selection, but now I know to stay away from Glidden. I've always gotten Behr when mixing colors for large projects, and as it turns out, it's great for painting rooms, too! I'd rather use a large drybrush and 237 pots Cidatel paint to finish a room rather than try rolling Glidden again. Ugh.
The good news is I'll have more studio space to work on large projects. But for now, it's back to packing.
'Til next time!
I've been working on my Skaven recently (much to the chagrin of my Terrorgheist). I picked up a second Doomwheel, and finally assembled the Rat Ogres from my Island of Blood starter set. The packmaster Skweel Gnawtooth is a must-have to accompany Rat Ogres; one of his abilities bestows a mutation to the unit that can result in poisoned attacks, extra attacks, or regeneration.
I was having trouble tracking down a model, so I decided to convert my own. The body is based on the Skaven warlord in the starter set, with arms pulled from one of the champions. The whip is from an Orc model. One of the classic metal giant rats and a bunch of plastic rats make up his verminous bodyguard. Some sculpting on his robes and the rocks finish off the model.
Skweel gets the same quick-and-dirty paint scheme as the rest of my Skaven.
'Til next time!
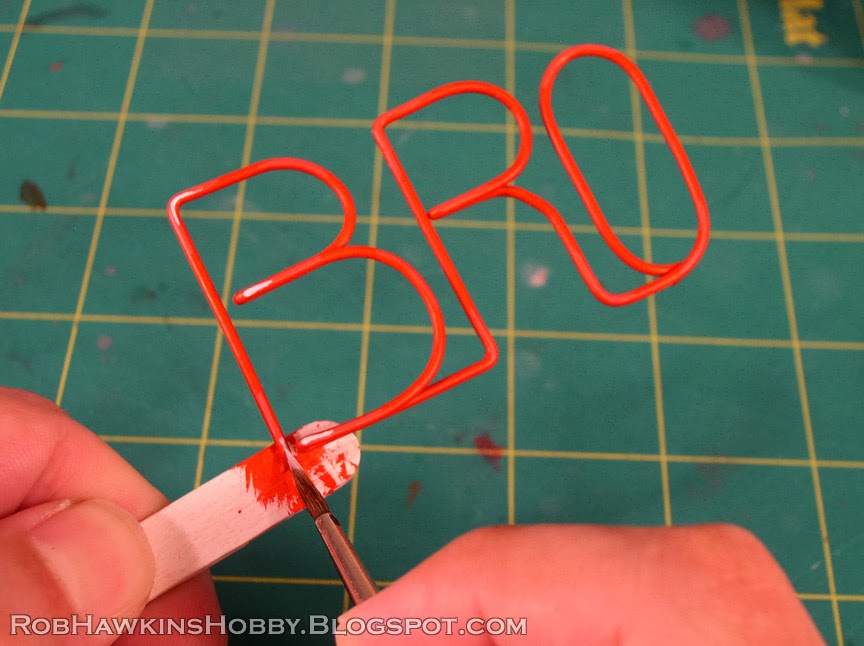
Here's how I create the ubiquitous neon signs for the Wild West Exodus terrain. This technique would also work for contemporary and sci-fi settings.
What you will need:
Heavy gauge floral wire
Pin vise and drill bit (same size as floral wire)
Clippers
Needle nose pliers (with flat jaws)
Constructing the Sign
The round floral wire will form the "glass tubing" of the neon sign. It can be bent into letters or different shapes. Use needle nose pliers to bend the wire. It's important that the pliers have flat jaws, as serrated jaws will mar the smooth surface of the wire. It helps to plan the path of the wire so the letters can flow in one long line without too many overlaps or doubling up. The pliers will also help you get clean 90-degree bends.
For a lettered sign, begin at one end and work your way to the right. Start with a 1/4-inch section that will insert into the back of the sign, and build the letter from there.
The rounded sections, like this B can be bent by hand.
Where the middle of the B bends, use the pliers to fold the wire back over itself, and then squeeze the two sections together.
Do the same at the bottom of the B and bring the wire over to the next letter. Try your best to get consistent spacing and height to the letters. Practice makes perfect!
On larger signs, the word may need to be broken into sections if the wire isn't long enough. Here, the word brothel has been broken into "BRO" and "THEL." There is an attachment point at the end of each section, in this case at the bottoms of the B, O, T, and the top of the L.
Fit your letters as you work to avoid running out of space. It may help to draw a pattern on a piece of paper the same size as your sign, and match the wire letters to what you've drawn.
Once the wire work is finished, mark the attachment positions on the sign, and drill holes with a pin vise. Fit the sign in place, but do not glue it yet. In this shot, below the main, sign you can see the legs and sign frame that were outlined with thin wire to make the neon shapes. The sky's the limit to what you can do!
Painting the Sign
Drill holes in popsicle sticks and lightly glue the neon letters in place. Spray them with white primer, and you're ready to begin painting.
Since this is a red neon sign, that's the color I'm working with in this tutorial. You can use whatever color you like for your signs, the process remains the same.
Start by basecoating the letters with red.
Be sure to get clean, smooth coverage with no white showing through.
For the next step, mix a little white into the red. Just use enough to lighten the red without turning it pink. Brush this mid tone over the corners and upper curves of the letters.
Finally, apply a straight white lighlight line on the corners and ends.
Create the separations between the letters by blacking out the negative spaces just like on a real neon sign.
Any of the sign that passes behind the letter should be blacked out.
Here are the finished neon letters:
Painting the Glow
Once the building and the letters are painted, it's time to add the glow on the sign itself.
Start by painting a dark glaze over the area, blended out at the edges. To darken the red, I added a little P3 Sanguine Red.
Before the glaze dries, pull out some of the color where the open areas of the letters will be. It's important to note that from here on, you should let each layer of color dry completely before moving to the next step. Otherwise the blending can pull up the layer of paint underneath.
Use the letters as a guide, and paint a lighter version of the letters on the sign. I used straight red, thinned a little. You can see it running into the cracks between the boards. Before the paint dries, diffuse the edges with a dry brush, and pull any of the color out of the recesses where it may have gotten out of control.
It's a bit of an organic process. An airbrush might make things a little easier.
Once you're satisfied with the letter glow, add a little white to the red and paint it into the centers of the letters. Things may get a little pink, but that's okay.
To finish everything up, apply a thin glaze of red over the entire area. This will tone down the pink, and brighten the background a little, leafing a nice impression of the sign's glow.
All that remains is to glue the neon letters in place!
Similar techniques are used on the smaller signs and the glow around them. Experiment with different colors and thicknesses of wire. Above all, have fun!
'Til next time!
The terrain galleries have been sorted out and reorganized. I'm keeping Wild West Exodus and Wrath of Kings in their own galleries due to the volume of work I've done for each system. Everything else is in the Main Terrain Gallery.
The gallery page now has a single shot of each table which links to a sub page of detail shots. Hopefully that's easier to navigate than scrolling through miles of images to find the ones you want. I've also gone through the No Man's Land and Lustria Revisited photos and color-corrected them to eliminate the awful yellow hue they were suffering from. (I also added more rocks in front of R2-D2 and digitally inserted Jabba the Hutt into every shot.)
The Rivet Wars diorama has been added to the gallery, with previously unreleased detail shots, so be sure to pop in and check those out.
Wild West Exodus Buildings
Here are some images of the finished WWX demo table commissioned by Outlaw Miniatures. This is a 2'x2' table, with the buildings magnetized to a sand-textured GW Realm of Battle board section.
The Wild West Exodus Terrain gallery has more detail shots of each building. If you missed the construction of the buildings, here's a link to my previous blog post More Wild West Exodus Buildings.
Coming up, I'll have a tutorial on how to make and paint neon signs.
'Til next time!