When building my Skaven force, since it was a horde army with lots of models in large units, my goal was to have as few separate models as possible. To make deployment easy, I used as many regimental base strips as as I could. Unfortunately, I built myself into a corner because now the screaming bell won't fit in my stormvermin unit.
The bell fits just fine if I set up the unit in a 10-wide Horde formation, where I can have four models on one side.
But any narrower and there's nowhere for my four-man regimental strips to fit up front, and there aren't any single models left to fill out the gaps in the back ranks.
I picked up ten more stormvermin, which will allow me to bump up the unit to 50. Six of them will be converted into bell pushers on a large base and the other four will be singles. As I'm painting them, I'll take the opportunity to rebase a few of the regimental strips. The plan is to cut two of the four-man strips in half, and pop six guys off and put them on single bases.
With the Age of Sigmar round-base craze going on, I figure this will give me a little taste of what this would be like on an army-wide scale.
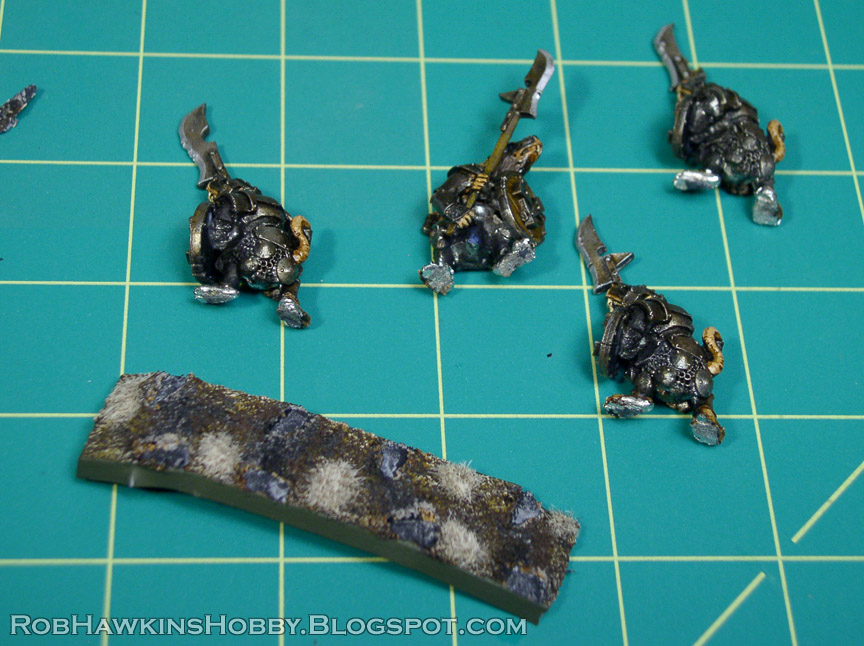
Because of the metal strips on their feet, the models on the double base need to be cut free with clippers. I also cut the strips away so the models can stand on the top of the new bases.
The models on the regimental bases come off a little easier. The already had their metal strips removed, so they just pop right off.
Breaking the models free leaves the feet needing some touch-up painting.
There are also some spots on the miniatures that didn't get painted while on the regimental strips. The models were close together and the sides behind the shields couldn't be reached with a brush, and were mostly unseen. Now that they will be on single bases, the sides of those models need to be painted.
Touching up the rats is easy enough– Some metal on the armor, a single coat of flesh on the feet, and a brown ink wash over those areas takes care of it.
The loose bases are sprayed with primer so the edges can be painted. I coat the top of each new base with super glue, position the model on it and sprinkle fine ballast over the surface before the glue dries.
For the strips that need to be cut in half, I measure to the center and make a cut in the side with a hobby knife. Then I slice along the underside of the base.
I cut as deep as possible to get through the plastic. Then, with a little flexing, the two halves of the base come apart.
I trim the cut side to match the angle of the opposite edge.
A strip of plastic is measured and cut to the height of the base. The strip is sprayed with primer on one side.
The un-primed side is glued to the base.
Then the corners are trimmed and sanded to create a smooth join.
Note that I accounted for the thickness of the plastic strip when trimming the base, so the final length matches the width of two single 20mm bases.
The final step is to paint the ballast on the new bases and paint all the sides green. Then I add static grass and use it to cover the join of the plastic strip.
The batch is rebased and ready to rejoin the ranks of their brood-brethren!
The new models are also finished, and the bell pushers came out great. I made these the same way I modeled the monks pushing their plague furnace. You can see that post here.
With the basing finished and the new models added, the 50-man unit of stormvermin can form up around the screaming bell in any formation!
'Til next time!
Here's a look at some of the construction of the buildings on the Wild West Exodus industrial board. The facility is used by Dr Carpathian for processing RJ-1027, the compound used to power his weapons and technology, as well as manufacturing his cruel instruments of destruction.
Alchemical Plant
The giant boiler heats and processes various chemicals and gasses used in Carpathian's weapon experiments.
The building is a foamcore frame, skinned with basswood strips and paneling. The windows, door, and small chimney are resin components that I've made for my projects. The Boiler is made from a section of PVC pipe and end caps, and fits into a cutout in the back of the building.
The coal furnace doors are made from plastic bottles, cut to fit against the pipe. The bottoms of the bottles are covered with 40mm bases, punched with rivets. The doors are built from styrene card. Some I-beams were added to support the weight of the pipe (it's actually quite heavy).
Above the boiler are the work platforms. All of the platforms are made from foam core with riveted strips of styrene, and U-Strips to cover the edges. Three small PVC pipes create the main stacks.
These Yakult bottles are great for terrain projects like this. Yakult is a probiotic drink that can be found in Asian supermarkets. The bottles have a unique shape that's great for chimney tops and industrial smoke stacks.
In the final stages, some details were added like the diamond deck plate, made from textured styrene sheets; the railings, made from large scale styrene ladders turned sideways; and the tech detail on the smokestacks, made from a Lawman Interceptor's gun mounts.


RJ-1027 Processing Silos
These huge silos house vast quantities of the compound. The structure is surrounded by gantries to oversee the operations and monitor progress.
All of the metal grating is made from Darice® plastic mesh. The craft store carries it in multiple colors, and while "clear" is what most people are familiar with, I prefer "black" because any areas missed by the primer won't be as obvious. The mesh is cut to the shape of the walkway, and the edges are sandwiched between an L-strip and a square rod. The plastic mesh doesn't really take to super glue, so I make sure the glue is bonding the styrene strips, seeping through the mesh to lock it in place once dry.
The silos, like the boiler above, are made from thick PVC pipe, with narrowing caps on top, covered with a 40mm base and resin components. The bottom PVC caps are molded with a seam and struts and already looks pretty interesting. A few more tech details and some bolts cut from styrene hex rod are added to finish it off.
The rails around the silos are made with a series of square rod, run vertically, and then curled and wrapped around horizontally. The silo windows are formed with thick PVC card and L-strip framing. The window itself is a sheet of red-tinted plastic fit into the grooves. To maintain the brightness of the red, the area behind it is left white when priming the silo. The result is a bright red window, with a glossy surface that stands out from the rusty metal.
The support pillars are scratch built from styrene strips, and the walkways were then positioned around them. To ensure there are no visible "bald spots" all of the components are painted separately and then assembled. This shot shows the final stages of assembly, right before I add the top plate and walkway.
the stairs lead up to each level, winding around the vertical framework. The base of the piece is made from 1/8-inch MDF board, stacked to create a step. The double layer also ensures that the base cannot flex, which prevents the other components like the gantries and silos from rocking and pulling apart. The bottom step is covered with diamond deck plate and the corners are all covered with styrene L-strips. With all the components assembled, some brown ballast is super glued in place to add a little dirt and crud (and to hide any imperfect cuts).

To paint all of this rusty metal, I first primed it black, then added a patchy spray of silver and red. Over top of this, a brown (similar to Formula P3 Bloodstone) was applied with a rough drybrush and using a sponge to blot the color. Patches of orange were also dabbed on with a brush and then blotted with a sponge. Some brown ink was painted in the recesses where appropriate, and the orange rust streaks were carefully painted with a fine brush. Some greenish oxidization streaks were also added using a mix of P3 Thrall Flesh and Arcane Blue. Throughout, you'll notice the RJ-1027 power cells are still mostly silver; this is to establish a difference between the newer technology and the older structures. Since the spent power cells would be rotated out, the ones in use aren't as weathered as their surroundings.
Iron Works Smelting and Casting
A blast furnace heats the crucible to thousands of degrees, melting iron and scrap metal. Inside the building is an iron casting facility where Dr. Carpathian's deadly armaments are manufactured.
I think this was my favorite building to make, since it incorporates such a wide variety of materials and unique shapes.
In the background of this shot, you can see the foamcore structure of the crucible. It's made from thick PVC pipe and sloped foam core panels that form an octagon around the pipe.
The workshop is built around the crucible and they both sit atop a base of two inch insulation foam. A thin layer of the foam is sliced away, and the lower level is cut with a stonework texture. the surface layer is coated with wood filler putty and cut with cracks. The result is a stone foundation covered with a cement facade that is crumbling away.
The crucible is framed with styrene I-beams and square rods to conceal the seams between the foam core panels, and the pipe is plugged with a foam core disc.
The release valve is made from a plastic bottle, styrene tube and strips.
The windows have metal shutters made from textured card and U-strips cut to form the latches. The little resin bits at the bottom are from some cable attachments that I made. In this shot you can also see the mesh walkway prior to painting.
The large RJ power cell is made from a plastic bottle covered with a styrene "sleeve". The styrene sleeve is painted separately and slides over the bottle so the clear windows are visible. The red RJ-1027 is painted on the inside of the bottle. Thick floral wire is used to create the connecting cables.
The copper roof was painted with an oxidization patina using P3 Thrall Flesh and Arcane Blue. All of the pipes were painted separately and added afterward. The interior of the crucible was painted with a red/orange/yellow glow of molten metal. That's right folks– working in a metal building with no air conditioning next to a thousand-degree cauldron of molten iron. And you thought your job was difficult!
Smoke Stacks
These giant smoke stacks spew black soot into the air from the furnaces below. This is the top of some underground facility, the inner workings of which one can only guess.
As with the other structures, the walls are made from foam core. The walls form up around a central rectangle of MDF board with two blocks of insulation foam, cut with stonework and mounted on it.
The stairwell is made with the plastic mesh and styrene stairs. I-beams form the corner supports.
Another area of mesh covers the cutout in the top platform, and a ladder runs up the opposite side. When designing these buildings and the layout of the table, I tried to incorporate multiple ways for models to access the upper levels of each structure. This, combined with the walkways between them, creates a unique multi-tiered gaming environment.
The furnace doors are made in the same manner as the ones for the alchemical plant.
The smoke stacks themselves are made from dollar store items– Plastic echo microphones and large crayon banks. They had just the right thickness and unique angles and bevels at the ends. Doctored up with extra details like rivets and pipes, they fit the bill nicely. The area between the two stacks is filled with all manner of junk– Aluminum foil for a base of shredded "scrap metal," larger components from my scrap box, and a few resin parts from WWX vehicles. The railings on the stairs are made from thick floral wire, with openings to place the modular connecting walkways.
All the buildings together make up the industrial complex. Check out last week's post here to see more shots of the full table, and check out the Outlaw Miniatures website for info on the Wild West Exodus game itself.
'Til next time!