As the final details come together on the Rivet Wars diorama, I paused to take some shots of the painted blimp. Since this is an "attraction" piece, the Rivet Wars logo is stenciled on the side. This was achieved by masking off the areas and spraying with green & white. The rivets and "Eastern Front" outlines were all freehand.
If you missed the construction of the blimp, you can see it in my Oh the Humanity post.
1.5-inch acrylic rods support the blimp over the battlefield.
All that remains is to glue down the troops and illuminate the explosions.
But the Red Baron has just arrived with some air support, so we're not quite finished yet...
The Rivet Wars diorama that I'm building for CoolMiniOrNot is nearing completion. This week I'll focus on how the battlefield itself came together:
Accessories
In addition to the troops and blimp, I made some extra bits to adorn the battlefield. These tank traps are made from blocks of insulation foam, coated with Liquid Nails and glued atop a small Rivet Wars Base.
I made some bunkers to match the style of the plastic bunkers previewed in the Rivet Wars Kickstarter. They appear to be squared off corner sections forming a small defendable area. I scaled them up a little and added some variety to the number of openings.
Each is built on a square of thick cardstock, with andged foam sides.
Next, I cut some thin slices of foam for the concrete floor tiles.
These tiles were then subdivided into smaller sections. The walls were roughed up with some chips and bullet holes and the joins puttied over with some wood filler.
These were pretty simple to make, and I'm so happy with the result that I think I'll do a full, detailed terrain tutorial on the bunkers in a future post. (Keep your eyes peeled.)
The Battlefield
The table is built atop a wooden frame with 2-inch insulation foam on top. While the troops and blimp were shaping up, I planned out the layout of the battlefield. The original concept I was shown had the blimp hovering over the center. I decided on having trench lines at either end with a no-man's-land in the center. One side (the Blight forces) will be making a push into the enemy line with the support of their air cover.
The first step in modeling the terrain was to cut out the trenches. Channels were cut out of the foam. The removed portions were split in half, and then the bottom half glued back in place.
The edges of the trench were roughed up with a wire brush.
The joins in the foam, and the corners of the trenches were then spackled over with wood filler putty.
To make the craters, I burned recesses into the foam with a heat gun.
Here's the battlefield with the trenches cut, and craters burned out.
The Trench Line
For the trenches, I built up a walkway with a layer of foam core.
The beveled edge was coated with Liquid Nails to seal the exposed foam and smooth over the join.
Basswood strips were then added for the framework.
The trenches were finalized with some resin-cast sandbags.
Finally, the bunkers were secured in place and more sandbags were added around their tops. You can see a couple channels cut out for the stairs, and the ladders for when the rivet troopers hear that fateful whistle and are ordered "over the top!"
The final table, awaiting its cover of sand and gravel:
Painting
The painting was done in stages. The first step was to prime it black, and spray a little grey on the concrete bunkers.
Next, the ground was drybrushed.
The craters were blackened, and the bunkers and tank traps were painted.
The brown of the wooden trench-works was brushed up with a bit of color.
Finally, the sandbags were painstakingly basecoated with olive drab and drybrushed with a little highlight green.
All that remains is for the painted blimp and troops to be added and the lighting for the explosions to be installed.
Last week, I showed you the blimp that I made for the Rivet Wars diorama. Now we'll take a look at the troops that will fill out the scene.
I want to incorporate as many elements as possible without taking forever to paint them, so I use a spray method to get their base colors painted quickly. For the Allies troops, I used successive layers of Model Masters Dark Green and Medium Green sprays, and then drybrushed over them with GW Camo Green. Some final highlights were applied with P3 Thrall Flesh.
The Ostrich walkers were painted the same way, and I converted a couple of them into wrecks, which will be complete with flaming plumes of smoke (more on that below).
Here are some finished Allied rocket bikes, ready for war.
The Blight troopers took a little more work to get a grey color I was happy with. The range of Model Master and Tamya sprays that were available didn't seem to have an adequate mid tone; they jumped from a dark grey to an almost white-grey. I ended up washing them heavily with P3 Ironhull Grey and then drybrushing the tone back up with a mix of black & white, with a little P3 Frostbite to add a blue tint. This image shows them after the wash.
Here the walkers have been drybrushed up, and the final highlight of Frostbite was applied.
With the grey finished, I darkened the hatches with GW Nuln Oil, and added some rust with P3 Bloodstone. The chipped paint is a mix of P3 Pig Iron and Bloodstone.
The completed Blight walkers:
Here the Blight troops, with their helmets finished, are awaiting their face and detail painting.
The Blight troops, backed up by some machine gun units are ready to make their big push!
And, here are both armies all laid out:
Burning Wrecks
Tea lights from the dollar store are great for small lighting projects, because they have everything you need: the LED, a battery, and a switch, and you can buy them in packs of 3 for a dollar. Here, I've soldered wire onto the leads of the LED to make it long enough to fit in the walker.
I start by drilling out the turret to create a hole for the LED to fit through.
The LED goes through and can be held in place with hot glue. The wires at the bottom connect to the battery and switch.
The yellow light will provide the fire glow for the burning plume. For this example, the tea light housing is visible, but in the final diorama, it will all be rewired and concealed in the table.
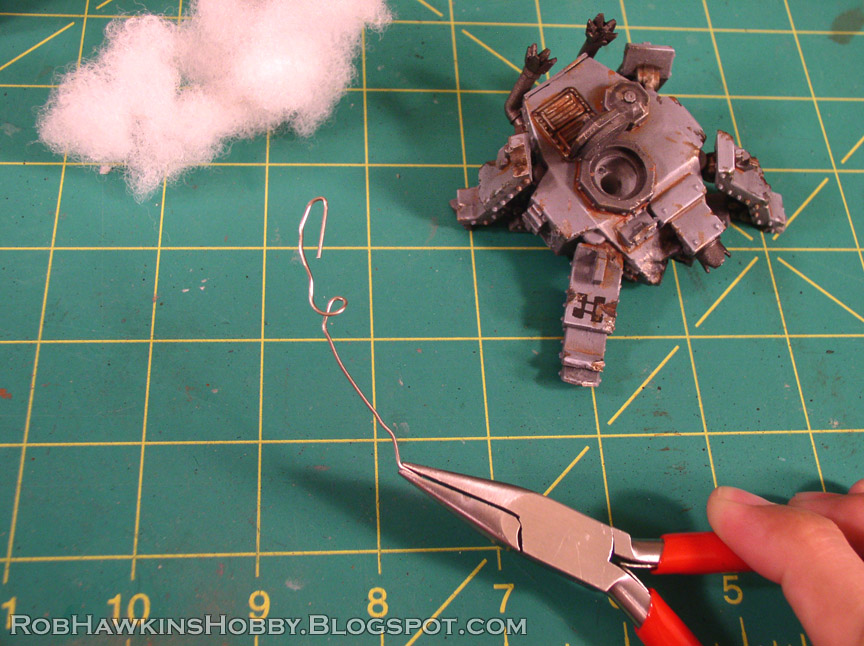
Poly-Fil® is used for the smoke. Since the Poly-Fil is pretty light and flimsy I've bent a wire to use as an armature. It will be inserted into a small hole, drilled nest to the LED opening.
The Poly-Fil gets wrapped around the wire and "fluffed" into the desired shape. The wire will hold it up, and can be bent to angle the smoke in any direction.
I attach the wire to a piece of wood and spray it, starting with yellow, then orange, red, and finally some black just at the top.
The wire is carefully glued into place...
...and the bottom of the Poly-Fil is tucked into the walker's hatch.
Here's the final walker with it's smoke plume.
And here you can see the fire effect in action:
Ugh, I definitely need to invest in a better camera. (If anyone has any recommendations, I'm all ears.)