Painting Tutorial: Tomb Kings Skeletons
In this tutorial, I share my process for batch-painting skeletons:
When painting large units, the goal is to get through them quickly as a group, rather than painting each model one by one. By using an assembly-line process you can knock out all the base color, all the highlights, all the trim, across the entire batch, which saves time switching paints, cleaning brushes, etc. Painting the whole group also has the advantage of allowing time for any washes on the first models to completely dry before you come back around to them for the next step.
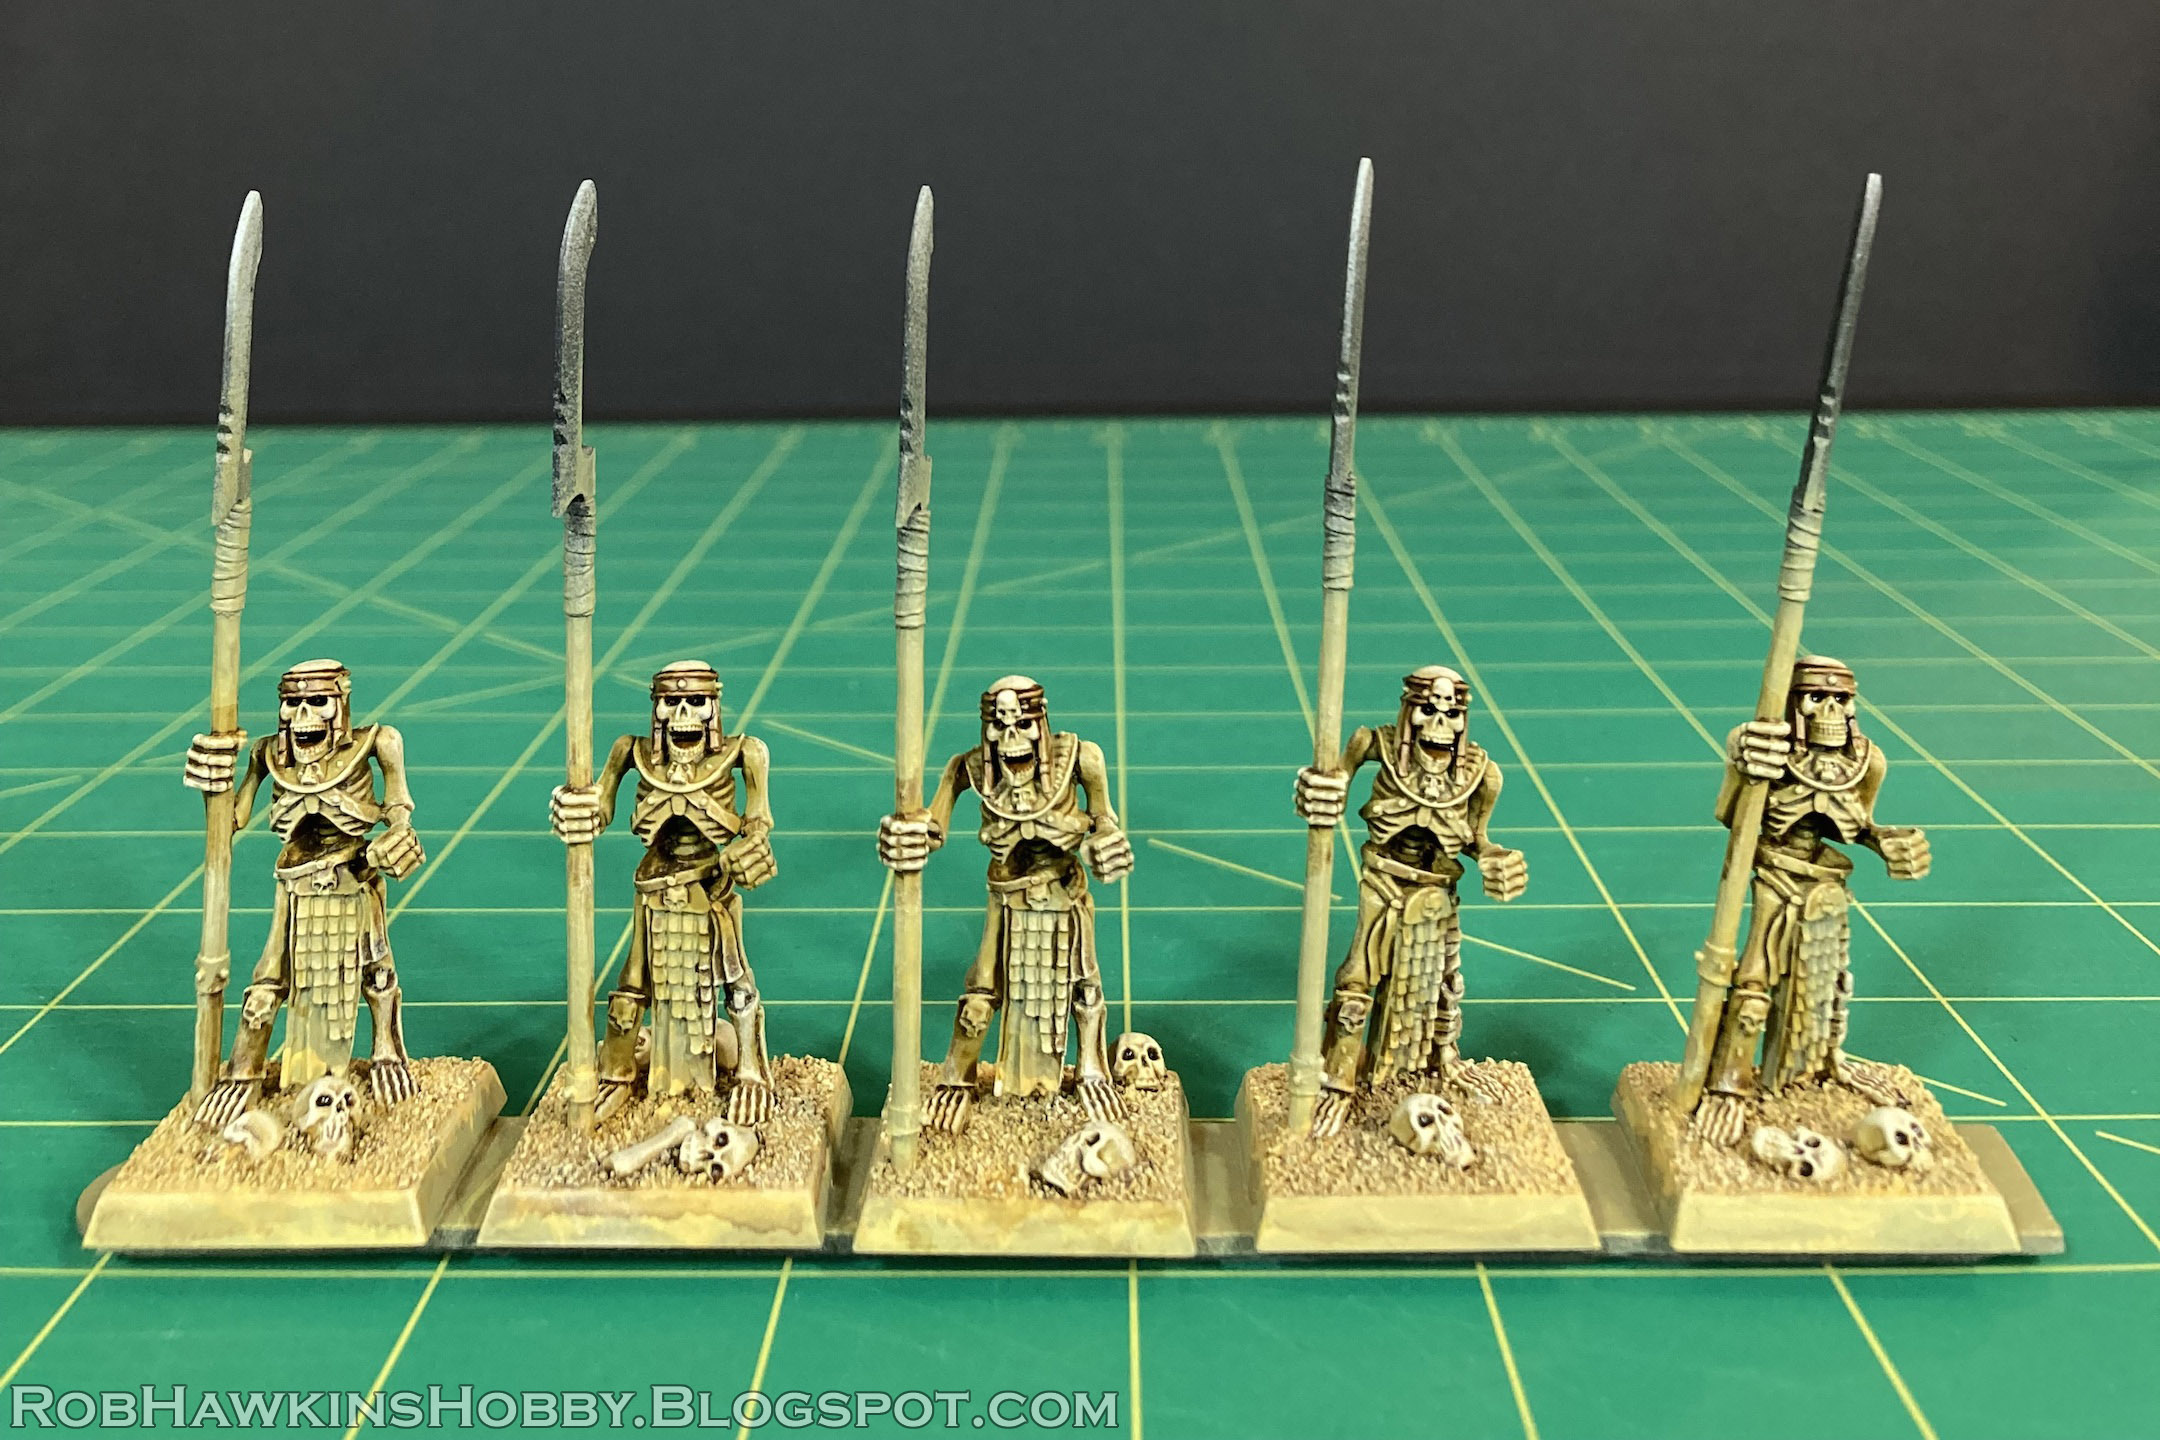
For my 30-man unit of skeleton warriors, I used a piece of double-sided tape to affix a line of five models to a wide popcicle stick. When doing this, I try to put models with the same poses and details on the same stick so I can go down the line, painting all the same detail.
This leaves me with six five-man strips to work on. I have the option of painting one step across the entire batch, or painting through each strip in its entirety if I start to get bored of drybrushing bone color. Either way, I end up knocking out significant chunks of the unit, and get through the project efficiently and quickly.
Here is a list of all the paints and sprays I used:
Duplicolor Sandable Primer Flat Black (spray)
Tamiya TS-3 Dark Yellow (spray)
Tamiya TS-80 Flat Clear (spray)
Moldy Ochre (Formula P3)
Zamesi Desert (Citadel)
Ushabti Bone (Citadel)
XV-88 (Citadel)
Skeleton Bone (Army Painter)
Lahmian Medium (Citadel)
Aggaros Dunes Contrast (Citadel)
Screaming Skull (Citadel)
Brainmatter Beige (Army Painter)
Nuln Oil (Citadel)
Liquitex Burnt Umber Transparent Ink (aka, Brown Ink)
Skeleton Horde Contrast (Citadel)
Leather Brown (Army Painter)
Umbral Umber (Formula P3)
Matt Black (Army Painter)
Crusted Sore (Army Painter)
Pure Red (Army Painter)
Grunge Brown (Vallejo Game Color)
Mournfang Brown (Citadel)
Steel Legion Drab (Citadel)
Retributor Armour (Citadel)
Solid Gold (Formula P3)
Gun Metal (Army Painter)
Shining Silver (Army Painter)
Priming and Basing
I always attach the basing material during the assembly process. If you prefer to use a technical "ground texture" paint, you can save that step for the end, but for the purposes of this tutorial, I am including the basing as part of the painting process.
With the models on their strip, spray them with a primer and base color. Duplicolor Sandable Primer is my go-to primer, and I hit these guys with a coat of black primer, and then sparyed them with Tamiya TS-3 Dark Yellow. Something like GW Zandri Dust would probably work just as well; the purpose is to get them a quick ochre-colored base coat. After the Dark Yellow Spray, I also hit them with a quick dusting of Tamiya TS-80 Flat Clear. Many colored sprays tend to be a bit "slick" or even glossy, and the Flat Clear has a dulling agent that gives the surface a slight "tooth" like primer so thin washes will not bead up on the surface.
Since the basing is the messiest part, I tackle that first, starting with a thin basecoat of Moldy Ochre on all the sand.
While waiting for the ochre to dry, I gave the skeletons a quick drybrush of Zamesi Desert to punch up the yellow just a bit. (I think I've mentioned this previously, but I differentiate my Tomb Kings skeletons from my Vampire Counts skeletons by striving for a more yellow/sandy color for the desert-themed army.)
To shade the sand, I use XV-88 brown and a bit of isopropyl alcohol to get it to flow into the recesses. I have a small pump-spray bottle of alcohol, and give the base a spritz before applying the brown.
I've found this a useful technique when applying washes over ground texture where it can be difficult to get the wash to flow into every nook and cranny. If you attempt this, be careful when and where you use the alcohol, because it can strip the paint. At this stage, there's not much to ruin, but if in doubt, you can first seal the model with TS-80 flat clear because the alcohol won't really eat through the spray.
Once the wash has dried, I drybrush the sand with Moldy Ochre and then Ushabti Bone.
I give the skulls on the base and the skeletons' feet a quick basecoat of Skeleton Bone to distinguish them from the sand a bit.
Painting the Bones
I wash the entire skeleton and the skulls on the base with a mix of Aggaros Dunes, Lahmian Medium, and a few drops of XV-88.
After the wash has thoroughly dried, I drybrush the bones with Zamesi Desert, and then with a mix of Zamesi Desert and Screaming Skull, finishing off with a drybrush mix of Screaming Skull and Brainmatter Beige on just the high points like the shoulders, hands, heads, and faces.
With the main bone color finished, I use a mix of Brown Ink and Nuln Oil to darken the eye sockets, under the ribs, and in the open mouths.
I also outline around the head straps, and the top of the collars.
Painting the Clothing Bits
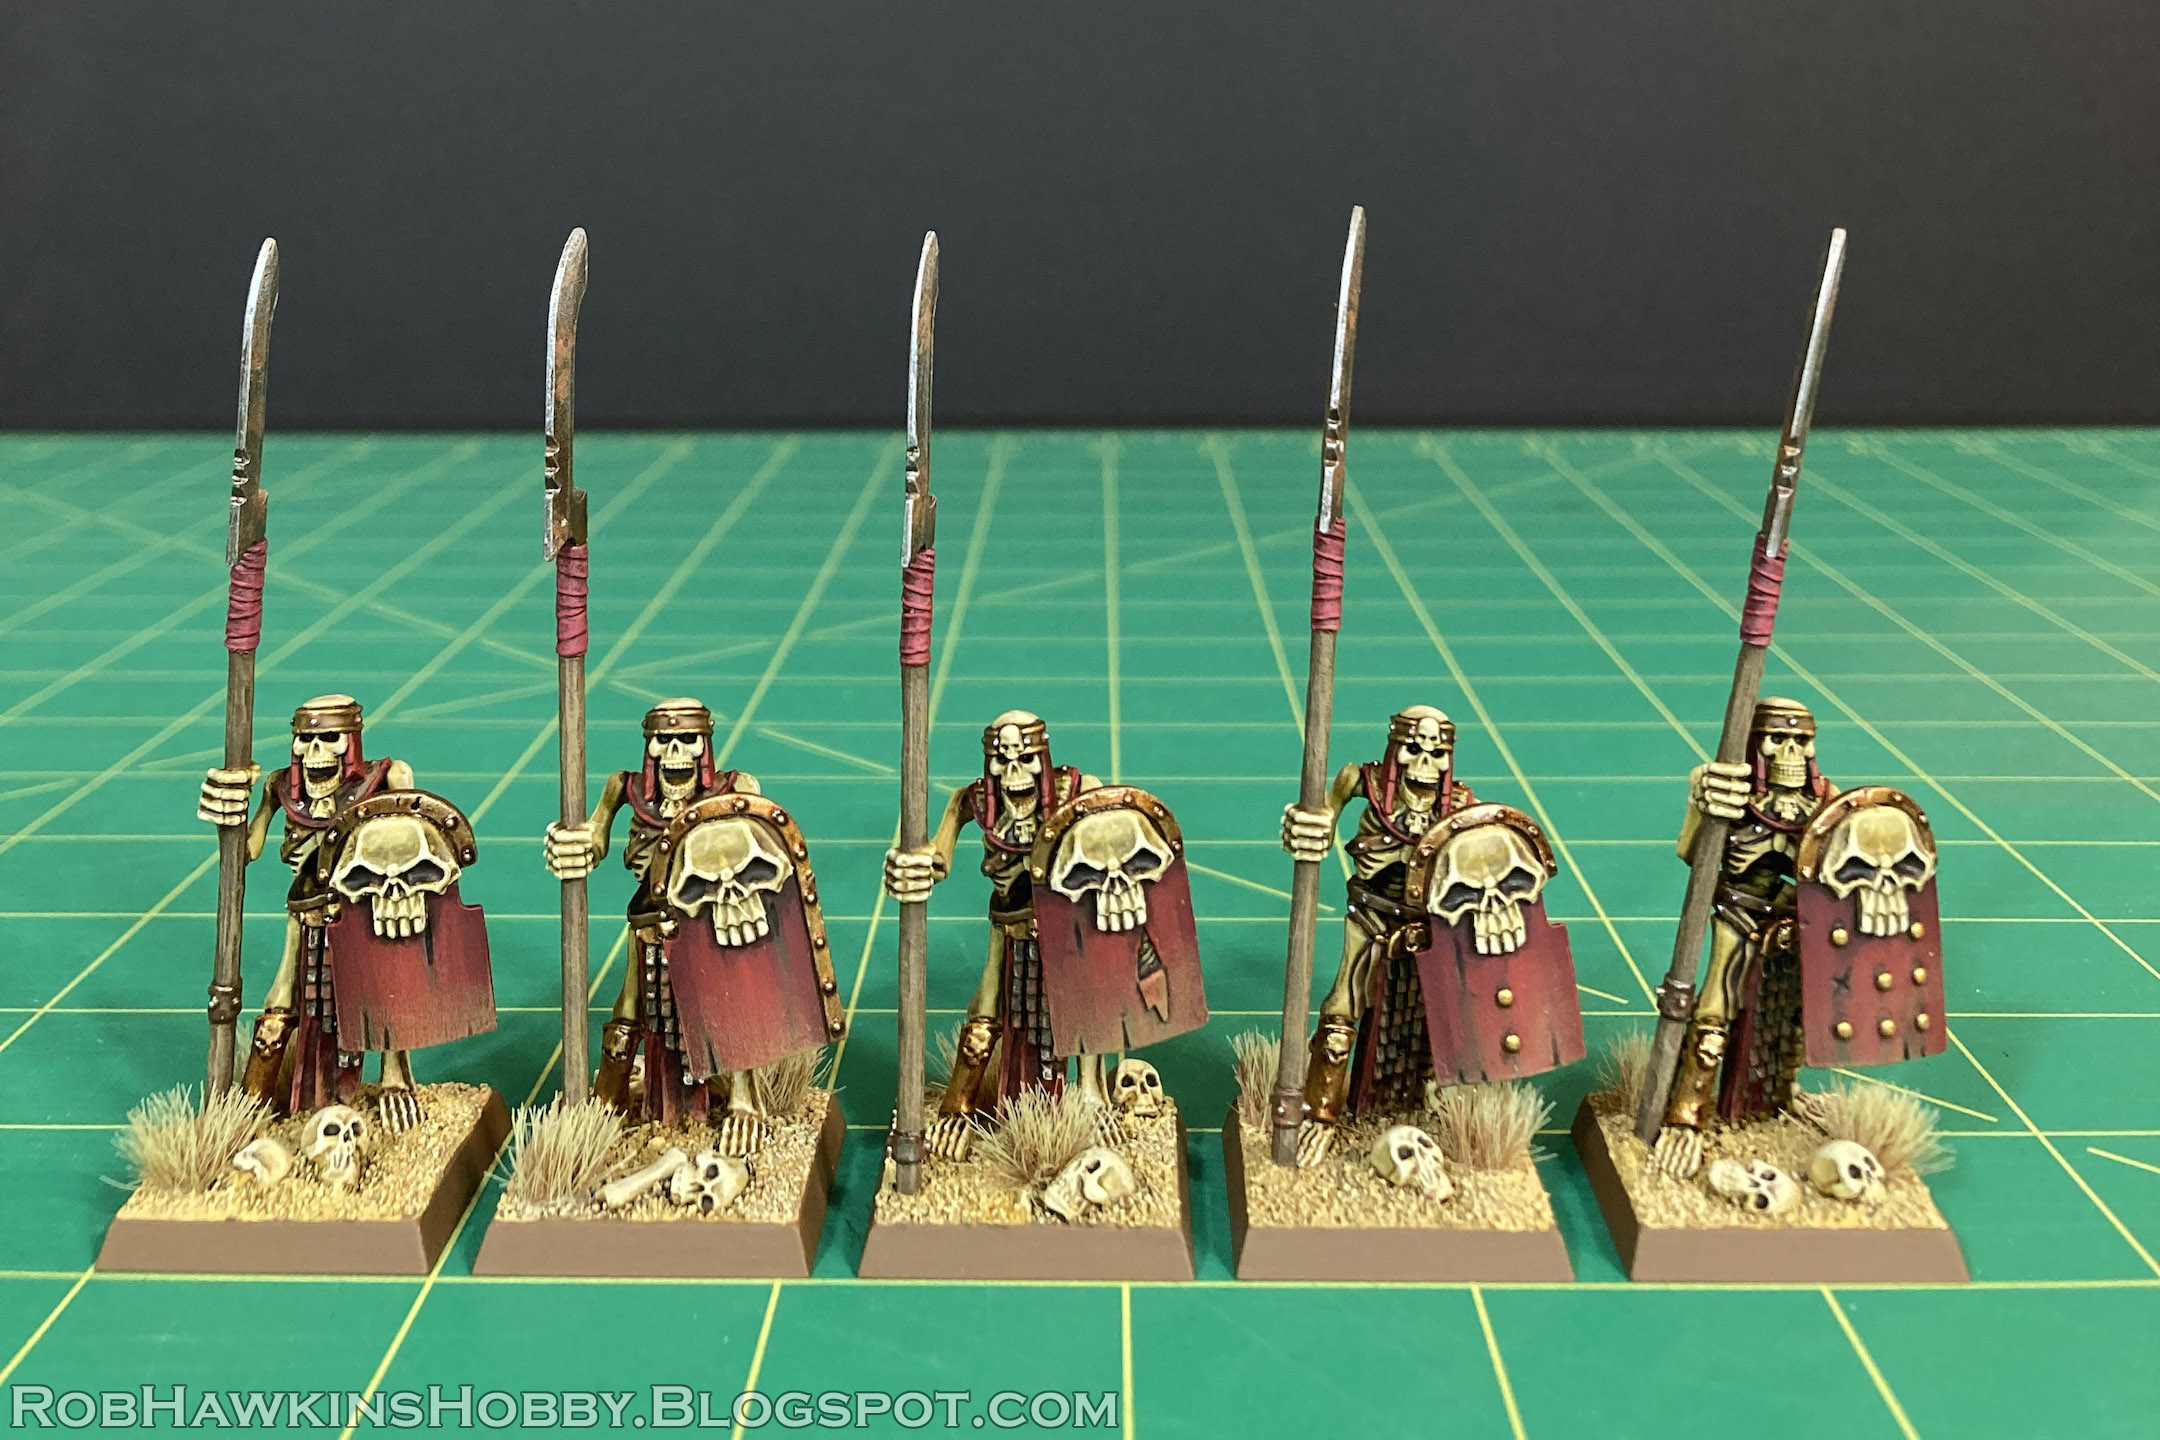
Some of the skeletons have bandages, and to paint these, I give them a quick basecoat of Zamesi Desert and a wash of Skeleton Horde. I follow the wash with a very light drybrush of Ushabti Bone to catch the edges of the bandages. To keep the bandage color differentiated from the bone color, I reapply the Skeleton Horde wash anywhere it made the bandages too bright.
For the headbands, leather straps, and belts, I basecoat them with straight Leather Brown, wash them with Skeleton Horde, and then drybrush the edges with a mix of XV-88 and just a touch of Skeleton Bone.
I basecoat the dark leather collars with Umbral Umber, and highlight them with XV-88.
I darken under the edge of the collars with a mix of Brown Ink and Matt Black. (Using black instead of Nuln Oil increases the opacity, making the underside of the collar darker than the underside of the rib cage.)
For the wrappings on the spears, I basecoat them with a mix Brown Ink and Crusted Sore, and then drybrush them with Pure Red
At this point, I take the models off of their strips so I have better control when painting the final details. I paint the loincloths with a mix of Matt Black, Brown Ink, and Crusted Sore, blending down to straight crusted Sore at the bottom, and then highlight with a mix of Crusted Sore and Pure Red. For the red piping around the collars and the ear flaps, I first paint the stripe and the flaps with straight Crusted Sore, and then edge highlight with straight Pure Red.
Adding the Finishing Touches
I basecoatspear shafts with a mix of Umbral Umber and XV-88...
...and then drybrush the wood grain with XV-88 and a touch of Skeleton Bone.
I apply some dust to the bottom of the loincloths by drybrushing a mix of XV-88 and Zamesi Desert.
The leather bits have rivets all over them, and these need to be picked out with metal, but at this stage, I simply paint them with a dot of Grunge Brown mixed with a tiny bit of Brown Ink to make them appear rusty. (They will get a final dot of silver after the matte sealer, when I paint the rest of the metal.)
To complete the bases, I paint the base rims with a 50/50 mix of MournFang Brown and Steel Legion Drab. (I know, I know– Why mix a color for the base rim? Well, Mournfang is a little too red, and Steel Legion is a little too grey, and I couldn't find a color that was right in the middle. You do whatever you want.) I also add a few tufts to the bases– These are Army Painter Mountain Tufts.
It's worth noting that before putting the models back on their painting sticks, I propped them up a bit with some double-sided tape so that the bottom edge of the base isn't touching anything, ensuring the paint and spray will go all the way past the edge, preventing it from scraping off when the model eventually sees some action. I also try to keep the tufts clear of any metal details on the figure so I can easily paint them after the matte spray.
Matte Spraying and the Metallics
I always paint my metallic colors after the matte spray, because the Tamiya TS-80 Flat Clear (and, previously Testor's Dull Cote) is a dead-flat matte spray. Any metallic shine will be killed by the spray, leaving you with dull grey blades instead of silver. I also add the tufts before the spray because they are made from silky fibers that can be a little shiny at times. The spray also seals in the grass and stiffens it up a bit.
Once the models are sprayed with the Flat Clear, I go back in and paint the metal bits, starting with the gold on their grieves, belt plates, and the shoulder epaulets. I basecoat them with Retributor Armour, and then wash them with a mix of Brown Ink and a bit of Grunge Brown. Once the wash has dried, I highlight them a bit with Retributor Armour and Solid Gold to brighten up the details.
I finish up the gold by painting the edging on the headbands. I carefully paint these with Retributor Armour brightened with a bit of Solid Gold, and don't add any shading.
The mail on the loincloths, spear tips, and metal rings on the spear shafts are painted with straight Gun Metal, and the loincloths are washed with Brown ink and a bit of Nuln Oil to darken the recesses.
Next, I add rust by mixing some Brown Ink, Grunge Brown, and Bright Orange and using a combination of washing and stippling to create a mottled, rusty appearance.
I paint the blade edge of the spear tips with Shining Silver, and then drybrush the color over the entire spear tip. I also do a bit of drybrushing and highlighting with Gun Metal on the mail and rings to brighten the metal a bit.
The last step is to apply a touch of Gun Metal to each rivet on the leather.
Final Assembly
For the shields, I leave them on the sprue, and paint them with the same process as the rest of the model– Dark Yellow spray, paint the bone, wood, and red, matte spray, and paint the metal. Then I carefully clip them free and touch up the attachment points.
Once the shields are glued in their hands, this batch of skeletons is finished!
These five are ready to join the first batch, and I'm one third of the way done with the unit.
Here you can see the entire regiment in progress– I have already finished the remaining skeletons up to the "red spear wrappings" step, and I've taken ten of them up to the Flat Clear spray, so the unit should be finished in no time.
The most important thing to remember when painting a large regiment of troops is that you are painting a block of 30 models, not 30 Golden Daemon entries, so you shouldn't worry about the odd slip or missed detail here and there. The regiment needs to look nice and cohesive as a whole, and will be viewed as a whole. Spend a little more time on the front rank and command models, and the sheer volume of troops will be impressive, even if some of the guys in the back ranks may have been a bit rushed.
'Til next time!


Are the shields cast by you?
ReplyDeleteNo, they are a kitbash/ conversion using the TK shields and the shield icons from the classic "Vampire Counts" plastic regiment.
DeleteExcellent! Always love detailed guides even if I am not painting those models (for now at least!).
ReplyDeleteRegarding the flat spray, you said that you replaced Dull Cote with Tamiya TS-80 Flat Clear, is that just for availability or is it better?
Both. Testors Dull Cote was my go-to when I started, but the quality had been on a decline since about 2009. It never seemed to be dull enough after that, and the consistency varied from can to can– Sometimes I would get a can that was properly dull, sometimes it would be more satin-finish, or even not dull at all.
DeleteA couple years ago Testors "Model Masters" line of paints was discontinued, and Dull Cote became more difficult to find in stock anywhere. I think it *is* technically still available, but at this point who cares because the quality and reliability is completely gone.
Tamiya TS-80 Flat Clear does exactly what Dull Cote used to do: It is a dead-flat matte sealer. And Tamiya's quality is consistent, so it works as intended every time.
Thanks for your many years of service, Dull Cote. You hereby stand relieved.
The availability is certainly an issue, although in my relatively modest can usage (hardly more than one a decade!) I did not notice the quality change.
DeleteTamiya paints are far more available locally than Testors, so I will check for the Flat clear next time I am at the hobby store!
Be sure it has the code "TS-80" Flat Clear, because Tamiya has other clear sprays that are not dull like the TS-80.
Delete