Dark Age Demo Tables: Construction
Cool Mini Or Not has called upon my services once again, this time for the game Dark Age. The tables feature an abandoned mining rig set in a underground lava chamber. This is a set of four 2'x2' tables that can be set up as four separate demo tables, one large 4'x4' square gaming table or a single, linear table eight feet long. Here's a peek at the construction process:
I began by framing out each table base and building the platform structures out of foam core. The floor of the cave is made from pink insulation foam with areas for lava pools burned through using a heat gun. The lava would be lit from below with LEDs, so I added a layer of clear textured acrylic beneath the foam.
Here, you can see all four tables and the major platforms. It took a little planning to get the walkways to meet up between platforms and allow them to be arranged in two different configurations. I made a small mock-up to figure out the level each platform and walkway needed to be to sync up with its neighbor.
To detail the platforms, I built and resin cast some heat dampeners and deck plates. To see more of my resin casting process, check out part four of my Wrath of Kings diorama assembly journal.
The deck plates were used to create a uniform pattern on the surface.
The heat dampeners attach to the sides.
Once the deck plates were in place, I began the arduous task of building the railings, stairs and gantries. Check out my tutorial on building stairs to see how they were made.
The railings around the decks were made from heavy gauge wire, bent 90 degrees and pinned into the side of the platform. A styrene strip was attached on top of this. At each connection, a small cuff was made by cutting styrene tube into little rings. (That's over 500 holes drilled and rings cut!) The walkways were thinner, meaning the railings couldn't bend and attach at the sides, so I used Plastruct ladders. Much easier on my hands and my sanity!
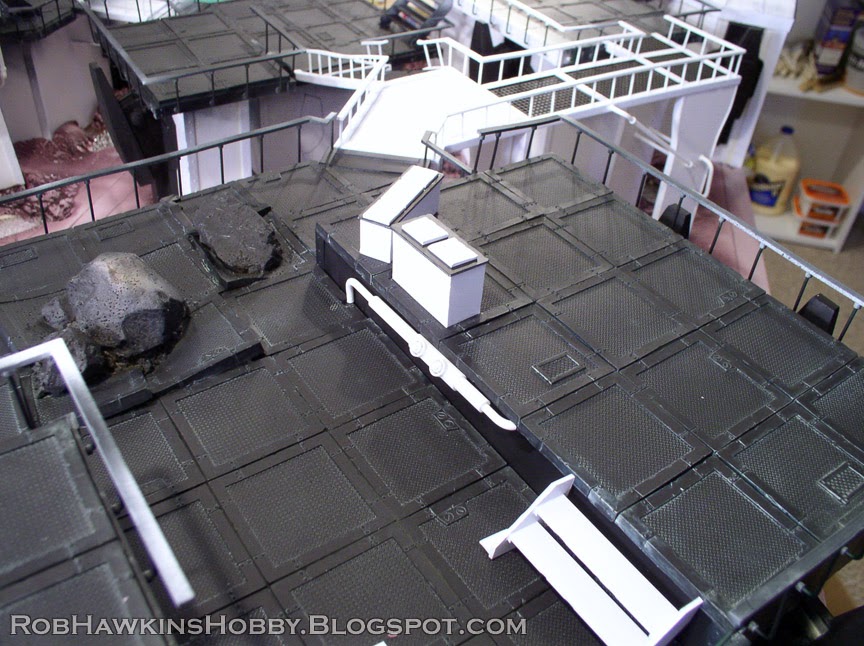
At one corner of the setup is a lab, smashed by falling rocks. By de-molding the deck plates before the resin was fully cured, I was able to bend and press them to appear deformed and crushed by the boulders. The control panel keyboards were sculpted with Brown Stuff modeling putty.
Plastic mesh, available at most craft stores, was used for the metal grille of the walkways. The plastic doesn't take super glue at all, so I had to sandwich the edges between two pieces of styrene and fill the gap with super glue to securely lock the mesh in place.
On the corner opposite the lab is a collapsed portal. A cave in has crushed part of the platform and shattered the surrounding structure. The styrene railings were bent using a heat gun and then glued atop the wire supports which were similarly bent with pliers.
I used different sizes of styrene rod and tubes to create the pipes running up the sides of the shaft. Guitar string (technically bass string; it's a little thicker) was used for the cables.
Since I was working on this throughout January and February I was struggling with the snow and freezing temperature just to find time to prime the components. Any day when the temperature was above freezing, I'd run outside and quickly spray whatever I could!
Here's the finished construction. That's about all I can show until Cool Mini debuts the table at a convention. Once they've had a chance to formally unveil it, I'll post pictures of the painting and lava effects. Keep your eyes peeled for these tables in the Dark Age section of the Cool Mini Or Not booth!
'Til next time!


Fantastic stuff, looking forward to seeing the painted version
ReplyDeleteThat looks amazing! Awesome work!
ReplyDeleteExcellent work, very impressive!
ReplyDeleteThat looks fantastic, can't wait to see it finished.
ReplyDeleteSo that's brilliant.
ReplyDeleteAlways incredibly inspiring. I would love to see this being built. It's no surprise that these companies are hiring you for display pieces.
ReplyDeleteWell done. Awesome work! I am looking forward for the finished table.
ReplyDeleteI enjoy a good bit of terrain as much as, if not more than, the next man, but this is amazing stuff.
ReplyDeleteThe railings and walkways are top-notch, and I like the fallen rocks having smashed their way through the structure into the labs and tunnels beneath, a lovely bit of set dressing which will no doubt play a part in making the players' lives just that little bit more interesting! The cast resin features are especially nice.
I look forward to seeing some pics of the completed table in the not-too-distant future!
The finished table is up now. Today's blog post shows it off, and the main terrain gallery has the whole table with detail shots. Thanks for the comments, everyone!
Delete