Oh, the Humanity!
Blimps. Zeppelins. Rigid airships. Whatever you call them, they're all just flying hydrogen bombs.
"Some woman gets on there with a staticky sweater, and BOOM!"
–Archer, Skytanic (still my favorite Archer episode.)
I've been working on a Rivet Wars diorama for CoolMiniOrNot, the main feature being a giant blimp with the Rivet Wars logo stenciled on the side. Here's how it came together:
It started with layers of 2-inch thick insulation foam. They were cut to differently-sized circles to approximate the shape. I glued them together with hot glue and Liquid Nails® and then sanded them into the smooth, form you see here. A little wood filler putty was applied to fill in the gaps. At this point it looked like a giant, pink beehive.
The blimp has a framework all the way around, so I drew out guide lines, using the 2" sections for the vertical supports, and a straight edge for the lines running from nose-to-tail.
The fins are cut from foamcore (these are just rough shapes here) and inserted into slots that I cut along the top, bottom, and sides.
To achieve the canvas texture, I cut strips of fabric to "skin" the blimp. Each section needed to fit together without overlapping, folding, or creasing. Quite a task on the curved surface. All the seams are aligned with the framing guide lines.
Once the strips were cut, I soaked them in wood glue and laid them on, sort of like paper mache.
Here's the final, skinned blimp. The guide lines are still visible through the fabric.
For the framing, I used balsa strips, super glued along the lines, covering the seams between the sections of fabric. I started with long strips for the horizontal beams.
Next, I added the vertical rings using small lengths of wood, fit between the longer strips.
Here you can see how the framing fits around the slots for the fins.
On the nose and tail, I sculpted end caps using Aves Apoxie® Sculpt. Once dry, it was sanded smooth to match the taper of the wood struts.
The wood didn't have as much flex as I had hoped, and kept snapping at the nose. Instead I used styrene rods, which could easily bend around the curve and form the nose framing.
In this close-up, you can see the texture of the fabric. A few of the seams are still visible.
Liquid Nails was "caulked" into all of the seams. This had the benefit of adhering the wood more securely, and covering any exposed edges of the fabric.
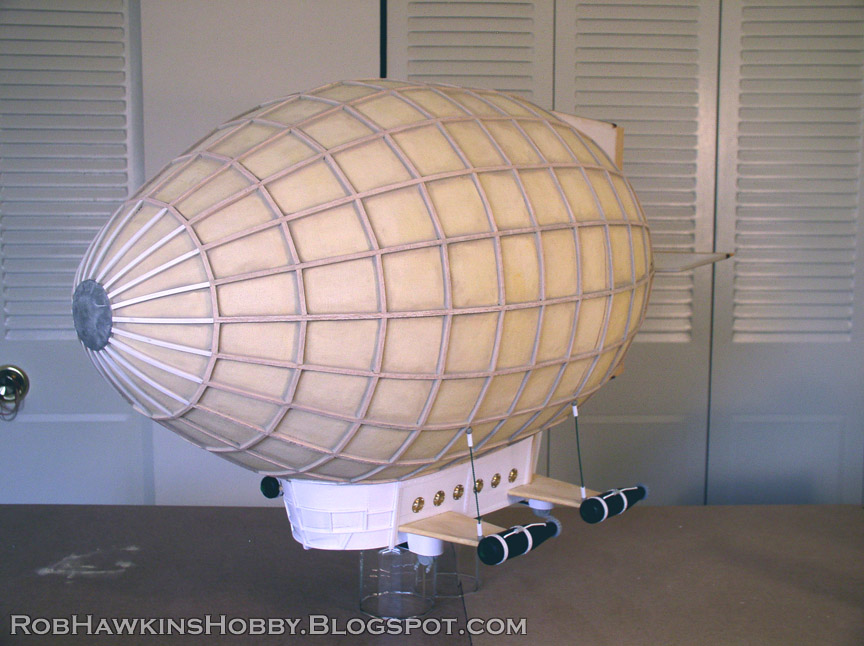
The final, skinned and framed blimp:
From there, I built the control module, and finished off the fins.
The fins were cut to shape, and their edges rounded off with Aves and modeling putty. Tapered basswood was used for the rudders.
The cockpit was built using a core of insulation foam with styrene sheets laid overtop. This was all framed out with rivet-punched styrene strips and more balsa wood where it joins with the blimp.
For the hatch pistons, I used parts from the Allied artillery piece, metal rod, and a combination of styrene tubes, rods, and L-strips.
The ball turrets came from the underside of the Allied "Ostrich" tank walker. The housing was carefully cut from styrene, and fit overtop of a PVC tube.
The cockpit windows were made from layers of rivet-punched styrene sheets and hex rod for the window framing.
The hobby shop's model boat section had some brass portholes that fit the bill (and the scale) nicely.
The wings were made from wood panels, cut and sanded to a "wing" shape. For the support cables, I twisted wire and added styrene tubes and balls of Aves putty for the attachment point. The assembly was pinned together.
The engines were built from toys that I found (I think they used to be plastic baseball bats). More parts from the Allied artillery, along with styrene strips and rod, were used to add the surface detail. The artillery wheels have a nice swirl pattern that's evocative of a fan. I have some propellers that will be added after painting.
I'll leave you with a few rotation shots of the finished blimp. Watch for the painted blimp and see how the rest of the diorama came together in upcoming posts.
"Whoopie, a zeppelin!"
–Randy, A Christmas Story
'Til next time!


That one is just Great! no less ))
ReplyDeleteLooking forward to see it done
Wow, what a nice "flying hydrogen bomb" you have there =)
ReplyDeleteLike it alot.
Okay, That is really nice, good show!
ReplyDeletevery nice. I like the small details.
ReplyDeleteThis is fantastic, well done!
ReplyDeleteFMB
Super cool! Keep going! Can't wait to see some paint on that!
ReplyDeleteExcellent model. I was using brass and plastic rod for the struts on mine, but the plastic didn't work out - my model will be too small scale (1:300) to use wood. Yours looks really good though. Look forward to seeing it painted.
ReplyDelete