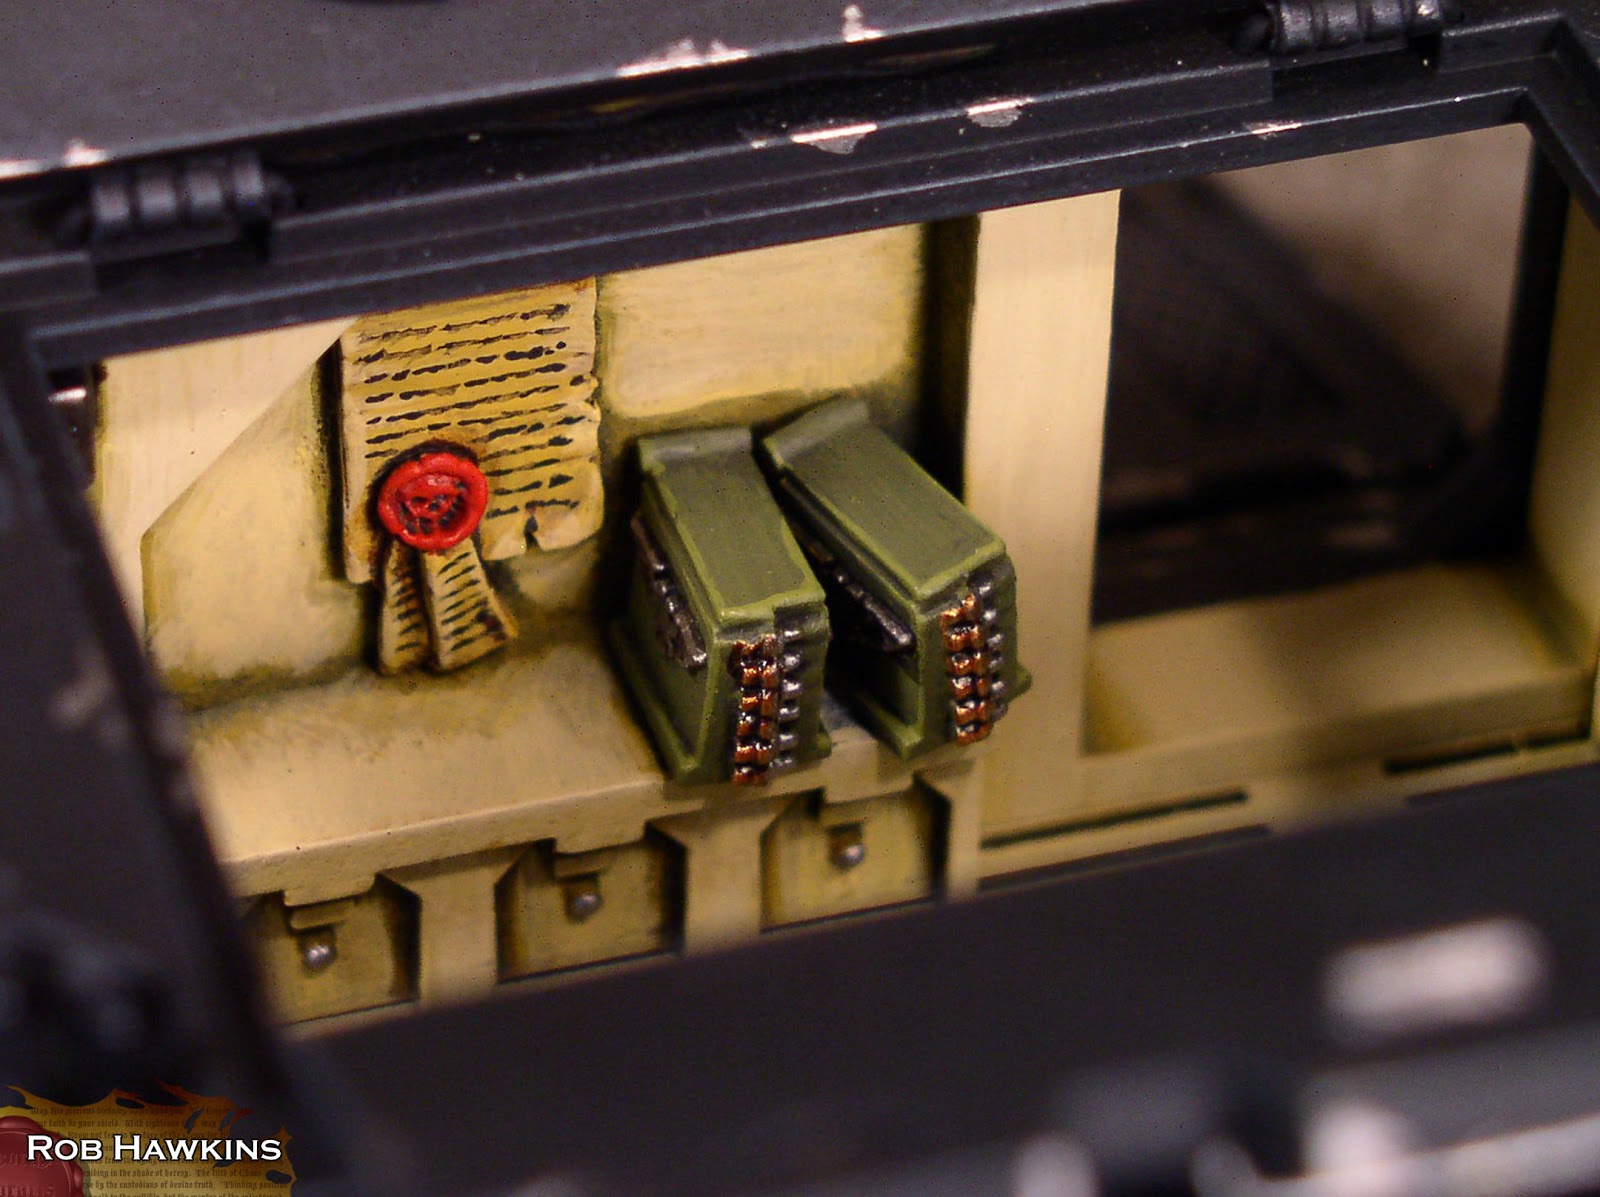
I'm taking a quick break from the terrain grind to show off some more Black Templars. This is a Rhino that I converted to have working hatches and a fully detailed interior. If you were reading White Dwarf in '03 or '04, you may have seen this along with a brief tutorial.
The front plate, and hatches are all Forge World parts.
I had to cut away the emblem on the rear hatch and affix it to the plastic door, which had a better fit on the plastic kit.
The inner hatches on the sides were cut away to provide a better view of the interior. Inside, I added a shrine, and some ammo crates.
The door leading up to the cockpit was also removed.
The handles on the top hatch are metal wire, pinned in place, and are there mainly to make it easier to get the top open.
The hinges were created with a "U" shaped piece of brass wire that pins into the side of the vehicle. Some of the frame around the hinge needed to be shaved down to allow the door to swing freely. At the top of each door are two pins that plug into the door and hold it closed.
The 'dozer blade is removable, and I modeled a winch from some metal rod, thread, and a search light for the motor. The hook is from one of the Kroot Warrior accessories.
The front plate opens, and the pilots are modeled from attack bike sidecar gunners.
The cockpit itself is detailed with textured styrene card and parts from Space Marine bikes and land speeders.
I still don't know how they fit 10 Space Marines in there...
No Quarter Magazine #45 came out this week, and has the second in a series of articles about converting Warmachine and Hordes models into Iron Kingdoms RPG characters.
This time, it's variations on the mechanik character class. Check out No Quarter for the step by step tutorials. Here's how the finished models turned out:
Trollkin Field Mechanik/ Soldier
Bull, from the Mercenary pair Dannon Blythe & Bull is a great model for conversion because both of his arm joins are right at the sleeve, making arm swaps a breeze. The Khadoran Battle Mechanik Officer has some great bits, which I've used in almost all of these conversions.
Parts List:
Bull Body
Trollkin Scout w/ Hood Axe Arm
Trollkin Scout Leader Left Arm
Battle Mechanik Officer Left Arm
2010 Butcher Gun
Vassal Mechanik Pack
Battle Mechanik Officer Tools & Head
Human Arcane Mechanik/ Priest
This guy was really challenging. I think I tried every Flameguard Cleanser model before settling on the unit attachment officer. I also wasn't sure if I could pull off the "arcane" theme without him looking like just another Cygnar model or a Protectorate priest, but I think the parts and color scheme go a long way to distinguishing him as part of a unique sect. Of all the conversions I've ever done, this is one of my favorites.
Parts List:
Flameguard Cleanser Officer Body
Battle Mechanik Officer Tools & Head
Flameguard Cleanser Officer Head
General Adept Nemo Right Arm
General Adept Nemo Staff
Captain Arlan Strangewayes Wrench
General Adept Nemo Boiler
Exemplar Errants Scabbard
Thunderhead Tube #2
Mechanik's Steamjack
And since mechaniks can be accompanied by steamjacks, here's a conversion of a patchwork 'jack. I think the the Cygnar Grenadier head matches the Buccaneer torso perfectly, and maybe even looks better than its original head.
So we're closing in on the end of the year. October and November seem to have flown by, and Christmas is right around the corner. I've had my hands full with terrain commissions, which can't be discussed until the material has been released to the public by the respective clients. But rest assured– there will be some cool terrain pics coming down the pipe early next year.
I've also got another round of Iron Kingdoms RPG conversions in the latest issue of No Quarter Magazine, so check out the article (NQ#45 hits the shelves today). I'll have pictures up on this site in a bit.
Skaven Update
My opportunities to work on personal projects have been few and far between, but I've been able to squeek out a few hours here and there to paint up my Skaven Globadiers.
There have been some Kickstarter campaigns popping up in the past week, that I'd like to help promote:
Sam Sedghi and the guys at Games & Gears launched their Kickstarter project for their line of modular game tables, with interlocking textured panels and felt borders. They can be built to size for your gaming needs, whether it's a small RPG table or larger wargame board. Check out the Kickstarter and their Facebook page!
Adam Poots has also begun his Kickstarter for the Kingdom Death game which, to me, looks like an interesting hybrid of RPG and tabletop game, and has some of the nicest miniatures in the industry. Here are links to his Kickstarter and Facebook pages.
With the Kingdom Death environment represented as oasis of lantern light in the never ending darkness, I think it would be sweet to see the game played on a Games & Gears table with that solid black border representing the darkness surrounding the encounter area.
So throw these guys some love (or, you know, cash) if you dig these projects!
The Liebster Blog Award
I've been nominated for a Liebster Blog Award! What's a Liebster Award you ask? It's a favorite blog award for up-and-coming sites with fewer than 200 followers. If graced with the honor, you're supposed to nominate 5 more blogs. Not quite as nefarious as a chain letter, since you're basically spreading the love and promoting other blogs that you like and that your readers may find interesting. But I heard about this one girl, who's blog was nominated, and she didn't pass it on, and the next day, she drove her car off a dock, and a shark ate it. True story.
So, thanks to John at 1000 Foot General for the nomination! (Now I feel guilty about not updating the blog as often as I should.)
My nominees for the Liebster Award (and some of the blogs that I follow) are:
This is a great site for terrain inspiration. Lots of tutorials, great photography of the finished pieces. Some of his work puts me to shame; I can't believe he doesn't have more followers.
I've been a fan of Robert's work on the IDW G.I. Joe comic for years. His art blog is pretty frequently updated with sketches and whatnot. Always good stuff.
Welcome back! It's been a long two weeks, filled with commissions, freelance work, and disaster recovery. I appreciate the concern some of you have expressed through Facebook and email. My wife and family have been fortunate to come through the storm with no damage, and we didn't even lose power. Still, it's difficult not to be affected by such widespread destruction, and I took some time out to donate supplies and volunteer with the cleanup effort.
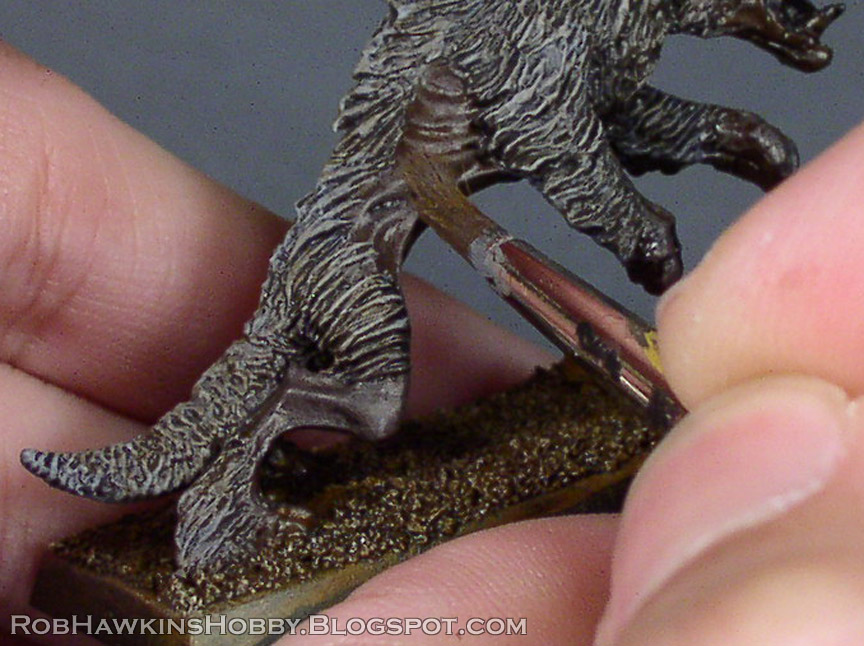
This week, we've got the second half of the dire wolf tutorial: the painting.
In this painting guide, I use the classic GW Brown Ink quite heavily. I experimented with the Agrax Earthshade, but it just didn't have enough pigment to get the effect I was going for. If you're trying to replicate the process described here, in lieu of GW Brown Ink, I'd recommend thinned brown india ink or a chestnut ink, darkened with a drop of black (just enough to cut the chestnut red tint and make it brown).
For each color listed, I label it as a P3 color or a GW color (with it's classic name and new name). This is intended to be an assembly line process for painting large units, so I'm painting all three converted models, side by side in each step.
Basecoating and Washing
Start by priming the models black.
Basecoat the sand with a thin layer of GW Snakebite Leather/ Balor Brown.
Basecoat the Fur with GW Codex Grey/ Dawnstone, mixed with a little black (something like a 70/30 ratio.) Basecoat the skin on the legs, ribs and faces with a 50/50 mix of Codex/ Dawnstone and P3 Battlefield Brown. Basecoat the Skulls on the base with GW Bleached Bone/ Screaming Skull.
Next, wash the entire model with GW Brown Ink. Add some spots of P3 Armor Wash, thinned with a little water into the fur.
When the ink is completely dry, finish the base sand by drybrushing with successive layers of P3 Gun Corps Brown, Snakebite/ Balor Brown, and Bleached Bone/ Screaming Skull. Don't worry about the skulls on the base at this point; we'll address them when finishing off the wolves' faces.
Painting the Fur
The fur can be simply drybrushed, but it's too easy for the paint to become chalky and clog up the texture. I prefer an organic process using a series of thin drybrush layers and washes to get a rich, varied tone to the fur.
It's important that you don't let the paint get too dry in your brush; that's how the chalkiness occurs. If you find the drybrushed highlights getting too bright or filling in the recesses, you can always add a thin wash overtop to darken it. Then dryrush back up. I think on my first batch of wolves I went back and forth a dozen times, but after 30 wolves, I've got it dialed in:
Drybrush Codex/ Dawnstone over the fur, recapturing the grey color.
Add a little Bleached Bone/ Screaming Skull into the grey and drybrush some highlights over the fur.
Add a thinned wash of Brown Ink over the fur, and then spot in some thinned Armor Wash. You don't want to darken the fur as much as the initial brown wash did.
Drybrush lightly with the Codex/ Dawnstone and Bleached Bone/ Screaming Skull mix. Then add a few hits of GW Fortress/ Administratum Grey.
Painting the Skin
Mix 50/50 Codex Grey/ Dawnstone and Battlefield Brown. Drybrush this over the areas of skin (ears and faces, too). Use a small drybrush to keep things pretty controlled.
Then paint highlights with straight Codex Grey/ Dawnstone. Use a sharp brush, and just hit the raised edges. Paint the edges of the torn flesh on the wolve's faces, and add a highlight line on the edges of the ears.
Painting the Faces
Basecoat the bone areas with Bleached Bone/ Screaming Skull. Get the skulls on the base, as well.
Wash the bone with a mix of Brown Ink and Snakebite Leather (about 70/30). After the ink dries, Drybrush the edges with a mix of Bleached Bone/ Screaming Skull and P3 Menoth White Highlighht. As with the fur, don't let the highlights get too bright; it they do, wash on some thin brown ink to shade it.
Paint straight P3 Skorne Red into the meaty areas, and around the edge of the exposed skull and torn flesh. Don't forget the tongues. Keep it pretty spotty; you don't want these to be too bloody. (Or do you...?)
Then, wash over the bloody areas with Brown Ink to shade it.
Finally, add a dot of P3 Khador Red Base in the eyes, and paint the claws and any intact noses with Black Ink or Armor Wash. (I use the ink rather than black paint because it has a slight translucency that eliminates the need to highlight it.)
Finally, paint the sides of the base with Model Masters Medium Green, add static grass, and they're finished!
Here's a close-up of the face, step-by-step:
The new Doom Wolves are finished as well. Here's a before and after comparison of the sculpted head detail:
And the running wolf:
I can't tell you how much of a relief is is to finally have these off my painting table, and to be able to field multiple units of dire wolves. Now it's off to war!