The Vampire Counts range contains a lot of ethereal models– banshees, spirit hosts, the mortis engine, and hexwraiths. I've been sitting on these models because I was never quite sure how I wanted them to look. In the past, my banshees and spirit hosts were simply drybrushed with grey and white but the new, ubiquitous blue-green hue of ethereal models has started to grow on me.
I had painted a bunch of banshees during the End Times campaign, but I was never happy with the result. I attempted a subtle wash over some white primer. They were fine to get some models on the table but the color wasn't quite what I was looking for.

During my recent Skaven blitz, I had painted the smokey plumes from the plague censors with an effective technique using only a few green washes over a white primer coat. I was able to dial in my wash technique and get a really nice transition between the white smoke and green glow of the warpstone.

After digging around online, I found some techniques and colors that worked pretty well, and decided to have another go at it on my newly assembled spirit hosts. The idea was to come up with a formulaic process that could be easily replicated when I get to my other models like the mortis engine.
Painting Ethereal Spirits
For this technique, I am using some of the Citadel shades and technical paints. They are simultaneously the greatest things and the worst things in the world. On the one hand, they result in really smooth shadows and glazes. On the other hand there is only one way to use them, and deviating from using it straight out of the pot can lead to terrible results. GW Lahmian Medium, at least, allows you to thin them, but adding any water ruins the properties of the shade. You also need to cover the entire area in one go, without portions of the shade drying because, once it begins to dry, painting more over top before the coat is completely dry will cause it to peel and flake, leaving deposits, lines, and "crumbs" on your otherwise smoothly shaded miniature.

Supplies
I picked up a pack of large brushes to use for the washes and drybrushing. A fine brush was also used for the details. The list of paints I used are as follows:
GW Citadel Paints
Lahmian Medium
Nihilakh Oxide
Coelia Greenshade
Dryad Bark
XV-88 (brown)
Screaming Skull
Formula P3 Paints
Thrall Flesh
Cryx Bane Highlight
Gnarls Green
Menoth White Highlight
Gun Corps Brown
Cold Steel
Quick Silver
Other Paints
Black
White
Liquitex Transparent Burnt Umber Ink (Brown Ink)
Vallejo Game Color Ghost Grey
Model Master Medium Green
Testors Dull Cote
Model Master Navy Aggressor Grey (spray)
Assembly and Priming
When assembling the spirits, I was meticulous in cleaning the mold lines. Not that the lines were excessive, I merely wanted to ensure that there wouldn't be any seams that might capture the wash and be made more prominent. Each base has three spirits that fit together into a swirl of ghosts. I assembled and primed each one separately to ensure proper coverage in the recesses.

I stuck some double-sided tape over the attachment points so I wouldn't need to scrape the primer away before gluing the plastic together.

After spraying the models with white primer, I removed the tape and completed the assembly of all of the spirits hosts. I attached them to their bases, making sure they could rank up cleanly.


Each host base was then attached to a priming stick for the next spray step.


The models were given an all-over spray of Testors Model Masters Navy Aggressor Grey, and then a top spray of white primer.

Painting
The first step is to give the spirits an all-over wash. I find that Nihilakh Oxide is a little too blue, so I added some Thrall Flesh to give a more green hue. The ratio is a little difficult to gauge because I mixed a large batch. I poured a fair amount of Lahmian Medium into a cup and then added a few brushfuls of Nihilax to bring the color up. Then, I added a couple drops of Thrall Flesh. In these shots, you can see the color before and after I added the Thrall Flesh.


Then the wash was painted over the entire spirit with a large brush, taking care to cover as much as possible in a single pass so I wouldn't get lines at the edges of the wash where it may have dried.

Once the wash was completely dry, I mixed up a batch of Nihilakh Oxide, Thrall Flesh, and Ghost Grey, and drybrushed this over the model. The intention of this drybrush was to bring the color back up on the raised areas and eliminate any points where the wash may have pooled outside of the recesses. I kept the brush very dry to avoid any brush streaks.

Next, I used more of the first wash and a fine brush to paint it into some of the recesses. These were recesses that I wanted to darken a little more, or that may have filled in from the drybrushing. I also painted it more heavily on the undersides of the spirits and on their hands to shade the gaps between their fingers.

I wanted the bottoms of the spirits to be darker, so I mixed another wash of Lahmian Medium, Coelia Greenshade, and Cryx Bane Highlight. The ratio was about three parts Medium to one part Greenshade, and one part Cryx Bane Highlight to add a little grey into the green. This wash was painted heavily on the bottom of the "tails" of the spirits, and a little thinner as it blended up toward the body.

After the wash was completely dry, I mixed another wash of equal parts Lahmian Medium and Coelia Greenshade and painted this over the lower areas of the spirit to add a darker green shade in the recesses.

The next stage was to smooth over the mid tones and fix any places where the washes were patchy. To do this, I used the colors from above in various combinations to match the mid tones and build highlights. There were three main steps:
First was to match the mid tone using Nihilakh Oxide, Thrall Flesh, and a little Coelia Greenshade to keep it from getting too bright. This was used to blend the middle area where the green transitions from light to dark.

Then I started to build up the highlights using Nihilakh, Thrall Flesh, and a little Ghost Grey.

More Ghost grey was then added into the mix to brighten the highlights.

Finally, I mixed equal parts Ghost Grey and White and painted the brightest highlights on the head tails, faces, and arms. With that, the ethereal portion of the model was finished.

The weapons needed to be picked out with metal, so I base coated them with Cold Steel and then washed them with the following mix: Three parts Coelia Greenshade to one part each of Lahmian Medium, Nihilakh Oxide, and Thrall Flesh. I also used the wash to shade the fingers gripping the knives.

Once the wash had dried, I touched up the fingers with Ghost Grey.

Basing
Normally I add the basing elements during the assembly process but, because the models were primed white, I wanted to tackle the tombstones separately and rely on the natural brown of the ballast as much as possible to minimize any potential splatter onto the nice, clean spirits while painting those elements.
The Tombstones were all affixed to a stick with double-sided tape.

They were primed black and drybrushed with successively lighter layers of grey, mixed using black and white with a little Screaming Skull.
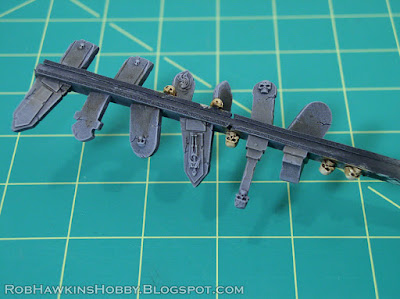
The bases were painted with Dryad Bark and the skeletons with XV-88.
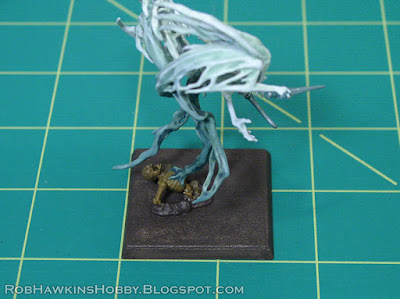
Then, the skeletons (and the skulls with the tombstones) were drybrushed with Screaming Skull, then washed with a mix of Brown Ink, XV-88, and a touch of Lahmian Medium. Once this was dry, a much drier brushing of Screaming Skull and then Screaming Skull with a little Menoth White Highlight was applied.

I touched up the ethereal wisps around the skeleton with a mix of Coelia Greenshade, Nihilakh Oxide, and touches of Thrall Flesh, and Cryx Bane Highlight. I found that adding a little Gnarls Green into the mix allowed me to increase the opacity while matching the color. This was thinned a little with water and glazed over the chest, shoulders, and around the skull. Finally, more Thrall Flesh was added to the mix to punch up the highlights on the tendrils.

I super glued the tombstones on the base and then used white glue to add the ballast.


Once the glue had dried, I painted the sand with Brown Ink to darken it just a bit, then drybrushed up with XV-88, Gun Corps Brown, and Bleached Bone.
The Edges were painted with Model Master Medium Green and then the whole model was sprayed with Testors Dull Cote.
The final touch was to add static grass and paint Quick Silver on the edges of the knives (I saved this step for after the Dull Cote so the metallic paint wouldn't be matted by the Dull Cote).
The Finished Spirit Hosts:
'Til next time!
If any of you remember my Shelf of Shame post from 2014, you'll know how long this thing has been kicking around. Part of the delay in finishing it was work and other, tastier projects that kept popping up. Then I went on a big Skaven push while my buddies and I were involved in our Warhammer campaign. Mainly I just didn't want to basecoat, wash, blend, re-wash, and highlight all of that rotting flesh on the corpse pile.

I don't even remember when I actually started this model. I think I assembled it when I was still in Seattle. The cart sat in that stage for at least four years, but it's finally finished. The model was converted from the "stock" cart with the wooden cage frame. This one has been adorned with Chaos spikes and the cage was replaced with a spiky fender around the wheels. The cart is also festooned with carrion birds. The largest of which are from the old Nurgle Chaos Lord's sign post. This is why I couldn't find more crows for my cornfield and there's only one lonely bird on the scarecrow; the rest are all on this rolling buffet table!

The front of the cart has also been modified with the body from the Corpsemaster's spear. The corpse has been impaled on a spike and is being pecked at by a crow.


Now I have two of these bad boys to roll into battle. The flaming skulls (representing the Balefire upgrade) are pegged in place. I'll eventually make a pair of bells so I can replace the Balefire with the Unholy Lodestone upgrade. I had left the Corpsemasters off of them because I was intending to keep the rider separate to distinguish whether or not the cart was being used as a mount for a Necromancer, but I'll likely paint them up at some point and pin them onto the corpse piles. Each cart should still have its own driver, even if it's not a Necromancer, per se. (In Age of Sigmar there's no longer the option to put a Necromancer on a Corpse Cart.)

I wonder if GW is ever going to get around to making a new zombie kit, one with proportions that more closely match the zombies on the cart. They are officially the oldest plastic kit in the Vampire Counts range, going on 17 years now. (Ha, look at me, talking about Warhammer like it's still a thing!)
With the completion of this cart, there are only four unfinished projects from my undead Shelf of Shame:
The Hellsteed– This model just needs a paint job and a rider. But unfortunately, Hellsteeds aren't an available option in the Age of Sigmar Vampire Count warscrolls. Even under the substitute warscrolls, it doesn't acknowledge the Vampire on Hellsteed, probably because they never made a Hellsteed model. I suppose it could pass as a vampire with wings and a hellsteed, but I'm pretty sure that's an "either / or" situation. I'll figure it out once GW releases an Age of Sigmar FAQ. (I was almost able to finish typing that sentence with a straight face!) I'm still building my Vampire Counts force with 8th Edition Warhammer sensibilities, so maybe I'll get around to finishing this, but the enthusiasm is gone, so probably not.

Vampire Battle Standard Bearer– As I mentioned in the Shelf of Shame post, I need more loose bats to put on his cloak. But, like the Hellsteed, there's no option for a vampire to carry an army standard in Age of Sigmar. I'd be fine using this model to represent a wight king with an Infernal Standard, but I already have a wight with an Infernal Standard. The whole point of making the vampire was that there used to be different rules for the two different character types. So, I don't know where this guy is headed. He's not past the point of no return, so I could replace the banner arm with something else. I'm already considering replacing the sword with a smaller, more vampire-y version and shortening that arm because it sticks out much too far. Either way, this model is too nice to not use for something.

Mounted Battle Flag– This guy, on the other hand is definitely getting finished. He just needs paint and the banner.

The Winged Ghouls– Ugh, these things. I'm not sure I have the motivation (or the time) to work on a major sculpting conversion theme across an entire unit of 40 infantry. Back in the parts bin!

First in the pipe, though, are the new Spirit Hosts. Once I nail down the ethereal effect, I'll be able to move on to the Mortis Engine, and then some of those Morghasts that I hear all the kids are crazy about.

'Til next time!
The Space Hulk Librarian is complete!

Since the Black Templars don't employ the use of psychics, it would not have been appropriate to model a Black Templars Librarian. I still wanted the model to relate to my marines, so I settled on their father chapter, the Imperial Fists. (Both the Black Templars and the Crimson Fists are second foundings, descended from the Imperial Fists.) I figured the Templars might work in tandem with an Imperial Fist Librarian at the behest of the Emperor.
The model itself didn't require much in the way of conversion sculpting. There was a surprising lack of Blood Angels embellishments, and the right shoulder pad was completely blank. Perfect for sculpting an Imperial Fists icon! The rest of the sculpting went into touch-up work where the detail on the plastic kit had been smoothed out to avoid undercuts in the mold. There was no need to put him on a round 40mm base as he wouldn't see action in my 40K Templars army; I simply used some styrene card to patch up the gap in the back of the base and cover the Blood Angels icon.


The Imperial Fists chapter colors gave me the chance to paint something outside of my regular pallet range of blue-grey, black, brown, bone, and red. I dig painting yellow armor (at least, I always think I do until I actually start painting it). Black lining is an exercise in tedium, but the end result is so striking that I can't help myself. Thanks to everyone who offered tips on my Facebook page; I'll experiment with some of those techniques and see if I can save some time (and eye strain) on the next one.

This is not my first Imperial Fist model, though. Waaay back in the day, I painted this guy for Games Workshop. I used mostly the same techniques– A light undercoat, yellow, and a bit of orange for the wash; then meticulous black lining and a white highlight line, with light yellow over that for the brightest highlights possible.


It was based on Games Workshop's image of this Pre-Heresy Imperial Fist. I recreated it down to the last rivet, using styrene card for the extra armor plates and crenelations on the shoulder pads. The elbow and knee pads were cut to match the shape, and the head and feet were taken from older, metal models to match the helmet style and the crenelation pattern on the feet.

The model appeared in White Dwarf #300 as part of this spread of Pre-Heresy marine chapters. Looking through the magazine brings back fond memories of the good old days at the Glen Burnie headquarters.

On a funny note– While looking for that image of the Pre-Heresy marine, I stumbled across my model from the White Dwarf photo on someone's Deviant Art site. The person was claiming to have modeled and painted it himself. I say that it's funny because he was using the same clipped model asset from the magazine (you know, the photo that used to have my name right next to it?) and the quality of his other models by comparison was, shall we say... lacking. It was an older post from about 5 years ago, and (other than my comments calling him out on his thievery) there didn't seem to be any recent activity on his page. Still, there's no expiration date on being an ass-hat.
Here are some more shots of the Librarian. One image with detail insets for the gallery, and the full shot from which each detail pic was pulled. Even though Librarians typically wear blue armor as the symbol of their office, I really wanted to paint this model with yellow armor to make him stand out. The blue is represented on his shoulder pad.


And with that, the Space Hulk Terminator challenge is complete! 12 marines in 12 months, converted from Blood Angels into my army's chapter. I made an effort to replace every detail removed with an equal embellishment across the entire line. All the bases are magnetized so I can use them in my 40K army and swap them onto squares for use in the Space Hulk game.
I keep toying with the idea of making a 30K Pre-Heresy army. It would obviously be the Imperial Fists– the Pre-Heresy version of the Black Templars. The Betrayal at Calth board game has a nice selection of Pre-Heresy marines, but I already have two sets of Dark Vengeance marines (with all those Terminators!) so I can't really justify buying more, especially considering how rarely I get to play these days. We'll see what the future (or rather the past?) holds.
'Til next time!


