Project Log: The Emperor's Champion, Part 8
Finishing up the champion's equipment–
To build the scaled-up bolt pistol, I used a heavy bolter from a Space Marine attack bike. I shaved the detail off the side, removed the muzzle, and trimmed around the front sight.
I cut a section out of the middle to shorten it, leaving me with the existing detail at the back and the sight.
For the magazine, I cut a piece of thick rectangular styrene rod, and added a thin piece of plastic card on the bottom.
To make the semicircular cutout in the cover, I simply drilled a hole with my pin vise and a thick drill bit, and then smoothed over the hole with modeling putty. I also added the ridges along the sides of the magazine.
I finished up the shape of the pistol by sculpting the box around the magazine and extending the cover around it to match the shape of the smaller bolt pistol.
I sanded the surface to make sure everything was smooth, and added the remaining details using styrene rod of various thickness, and some plastic card for the buttons and raised panel on top.
Then it was just a matter of attaching it to the hand. I used the metal bottom of the grip that was cut from the opposite hand, and used putty to sculpt the grip and trigger finger.
The finished bolt pistol:
The holster was made from Aves Apoxie Sculpt, with a button cut from styrene rod.
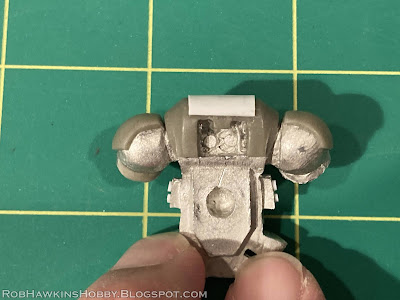
Then it was time to work on the backpack, detailing it to represent a Primaris-style pack. I added the extra layer of armor on the vents, and cut away the detail on the center to make room for the round cover.
To make the round dome, I pressed some putty into the concave back of a pin vise (Chapstick was applied to the metal to prevent the putty from sticking). I found that the cap from the plastic tube that holds my spare knife blades was the perfect size, and pressed it into the putty to trim the edges of the circular cover. I used a small piece of metal tubing to make the four cutouts at the edges.
I added some putty to the pack to form the raised spot where the round cover would attach.
Once the putty had cured, I popped it off the pin vise, which left me with a round dome. I stuck it on a piece of double-sided tape to do some more work on it.
I built up and smoothed the circle on the backpack, and added a Templar cross on the cover.
The cover was then glued onto the pack, and I added some rivets cut from thin styrene rod. The next step was to sculpt the top cowling of the backpack. I filled in the vent holes with green putty to make a smooth base to sculpt over. (In my enthusiasm to get this finished, I forgot to get a photo of the final sculpting before I glued the vent plate onto it.)
The vent plate was made from a thin sheet of styrene. I marked out the position of the vents...
...and used a pointer to make an impression to keep my drill bit in position. With a pin vise, I drilled holes at each end of the vent slit.
Then, I used a ruler and a hobby knife to cut out the center, creating a row of evenly spaced cutouts with rounded ends. (I botched the first attempt; the spacing wasn't even, so I did it again with a slightly smaller drill bit.)
I cut out the panel and glued it onto the newly-sculpted backpack top.
The final step was to add more rivets and some styrene panels.
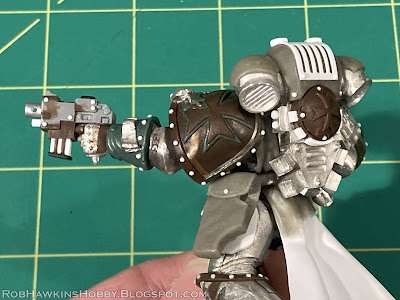
Here's the pistol, holster, and pack on the figure. He's almost done! Just a few details and the head remain!
'Til next time!


Looking great! That pistol has an excellent look, and the backpack turned out very nicely. (although as I recall, isn't the main portion of it somewhat thin compared to a regular power pack? Might be worth a sheet of plastic to add a bit of depth)
ReplyDeleteThanks! The giant backpack IS a little thin, but it's not noticeable once the Primaris detail was added. The main issue I've noticed is that the top is a little taller than the 28mm backpack. But it's fine.
DeleteThat really is a high level of attention to detail! Kudos!
ReplyDeleteThank you sir! :)
Delete