Cursed City Objective Markers
Obligatory Cursed City post!
I've been neglecting my blog for the past few weeks as I was focusing on a scenery commission, but I've opened my Cursed City box and have started working on the models. I plan on painting the undead figures to fit into my Age of Sigmar army, so I'm waiting to see what happens with the Soulblight Gravelords release before I get too carried away with them. I'll be chipping away at the boxed set, and will probably play a few games with my existing skeletons, zombies, bats, and vampires just to see how it plays before I run a "proper" campaign with everything from the box.
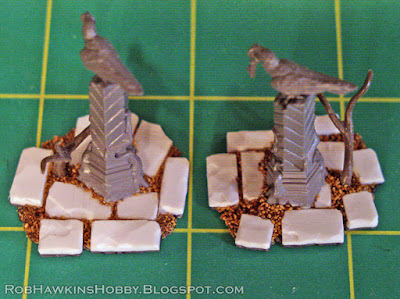
To that end, I've started with the mysterious objects. I love the idea of the critters carrying around keys. They would make great objective markers in a scenario with shifting objectives– Imagine the crows flying around with keys as you try to catch them!

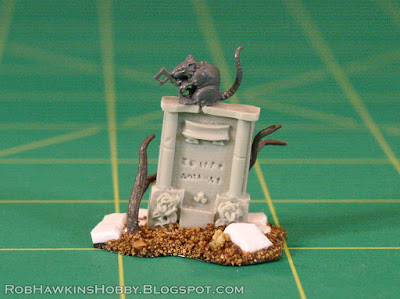
I also made one out of the rat with a key that was on one of the Kosargi Nightguard bases. This little guy is too cool to be relegated to a base decoration, so I stuck him on a tombstone and turned him into a third key-critter objective.
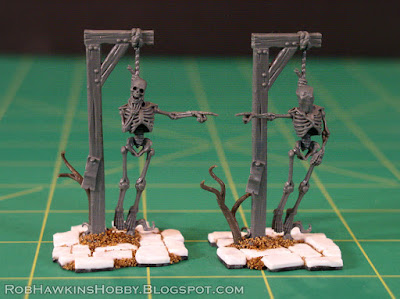
Then, I moved on to the gallows:
As with the key critters, I made a third one out of the gallows and noose taken from the back of a Nighthaunt Lord Executioner. I was initially planning to just have the empty gallows, but it seemed a little plain, so I strung up one of the zombies. This model was pretty easy to convert into a "hanging" pose. I cut off the tombstone and all the branches and then cut a gap in the noose to fit over her neck. The trickiest part was repositioning her feet so they would be dangling instead of standing flat. I puttied over the attachment points and the rough spots where the tombstone was removed, and viola! A hanging zombie.
I used a branch to create a second attachment point so the thin rope wouldn't be the only thing supporting the figure.
The tombstone that I removed from her back went with the other mysterious object tombstone markers to give me three of them as well.
I prefer my objectives to look more like scenic pieces instead of Formally Based Models™ so I put them on a piece of styrene card and added sand and paving stones cut from thicker styrene. I trimmed the underlying card to the shape of the paving stones to give it an irregular outline that will still fit inside the board game square and match my battlefield aesthetic. I also used some branches from Woodland Scenics plastic tree armatures to carry on the overgrown tree root motif present on the zombies. (I may or may not carry that through the skeletons and other Soulblight models... Time will tell, but I like the idea of it.)
So, that's nine objectives, ready to paint:
Speaking of being ready to paint, I finally had a day that wasn't freezing, raining, or enduring wind storm, so I was able go outside and spray prime my Imperial Fists! I'll be able to tackle them and put together a tutorial for (hopefully) quickly painting yellow space marines.
'Til next time!


Sounds like you managed to get a copy of Cursed City! I had hopes to get one later, but who knows if that will ever happen.
ReplyDeleteGreat work on the little bitz as always, but the zombie in the noose is particularly good. You could add some putty if you wanted her to be a bit more fresh...
Thank you! I told my shop I wanted to reserve a copy the day it was first announced, so I was 2nd in line to get a pre-order. I never had any illusions about Cursed City being "permanently available." Every other big box game and starter set since Soul Wars has been a one-and-done- run, so I just read the tea leaves, man. I think it will be a miracle if they bring it back at all.
DeleteGreat looking objectives! The paving stones cut from thicker styrene look very "natural". Can I ask how you realised them ? Were they scoured individually ? Do you have a method that would allow to do this relatively quickly ?
ReplyDeleteGreat looking objectives! The paving stones cut from thicker styrene look very "natural". Can I ask how you realised them ? Were they scoured individually ? Do you have a method that would allow to do this relatively quickly ?
ReplyDeleteThanks! For the stones, I cut a few strips of varying width from the thick card. Then I sliced and scored the top and long edge of each strip with my knife to get a chipped, irregular surface.
DeleteOnce that was done, I cut the strip into smaller segments and chipped up the ends the same way. This gave me a handful of stones of varying widths and lengths.
Finally, each on was glued onto the underlying card and fine ballast added in the gaps. Finally, I cut out the shape, trimming the edge of the card to the contour of the stones.
I haven't found an easier way to do that, unless you were to use putty and a textured roller, but then you have the uniformity of it all being the same repeating shapes and thickness, plus you have to wait for the putty to cure.
your stuff is just brilliant!
ReplyDeleteThanks! :)
Delete