Modeling Tutorial: Converting Gauss Reapers
If, like me, you've been collecting Necrons for a long time, you probably already have more than enough Necron Warriors and don't need to purchase more just to get a new weapon option. In this post, I'll show you how I converted some of my classic Necron Warriors to equip them with gauss reapers (with green rods, no less!) so you too will be able to update your army without re-buying all of your core troops.
The gauss reaper is essentially a shorter, double-barreled version of the gauss flayer, with a lot of the same design sensibilities, so you can replicate one with spare parts that will match the classic gauss flayers.
Necron Warriors are sort of like the "skeletons" of the 40K universe; I've used them to make broken Warriors on bases and in scenic pieces like these stasis tubes and emerging from the portal of my Monolith. This has left me with plenty of spare parts from the Warrior kit.
For this conversion, you'll need some classic Necron Warriors, a selection of weapon parts from a spare Warrior kit, and the barrels of some Necron Immortal gauss blasters. (If you built your Immortals with tesla carbines you should have the blaster parts left over.)
Start with the blaster barrels– Trim them where the red line indicates, leaving you with three "dots" on the barrel. (I know the real gauss reapers have two dots, but I think that might be too short. Three dots leaves you with a barrel that's half the length of the classic flayer's green rod.)
You'll need two classic gauss flayer muzzles for each reaper. Keep the points at the bottom, and trim the others, leaving squared off blocks on the sides and in the center.
Trim the two little nubs on the barrel (they will be too long for the muzzle to fit over otherwise). Attach the bottom muzzle first. The block where each muzzle meets will overlap, so they need to be trimmed, allowing the muzzles to fit together flush.
That's the front of the gauss flayer finished. Now it's time to work on its attachment point.
Take two of the gauss flayer halves and glue them together This will create the cup at the front where the green rod plugs in.
Make two of these, and carefully slice off the cup so you have one for each barrel.
Trim one tab off of each cup so they can fit together on the barrels. If you plan on using the green rods, lightly tack them onto the ends of the barrel with just a tiny dot of super glue (they will need to be removed later). If you want to keep the newer plastic barrels, you can glue the cups on normally.
To prepare the gun for the barrels, start by removing the red-shaded portion in the image. Then trim the top off of the cylinder with the gun sight and the bottom off of the corresponding part on the spare weapon.
Now, the two cylinders can be stacked to create a taller attachment point for the barrels, and the front of the gauss flayer can be cut off just ahead of the hand grip. Dry fit the parts to make sure everything lines up properly. Trim the lowest tab of the bottom cup on the barrels so it's flush with the bottom of the barrel.
You'll also need to trim the bottom rail on the barrels to the proper length so it connects to the grip. Glue the two cups to the gun frame, but don't add any glue on the bottom rail.
Extend the height of the casing above the coil with a piece of plastic sprue or thick styrene card (I used sprue that I cut square and shortened the height of). Then, add some extra detail by gluing a thin strip of styrene along the top of the block of sprue (that's the white piece in the photo).
If you are planning to keep the plastic barrels, you're essentially finished at this point. If you want to replace them with transparent green rods, pop off the barrels where they were lightly tacked to the cups.
Carefully cut the plastic barrels away from the muzzle. Then, drill a small hole in the back of the muzzle so you can pin it to a painting stand.
Before I began painting, I realized that the gun needed a bit more detail, so I cut off one of the gun sights and glued that to the back of the sprue.
That just leaves the painting and the green rods. The gun muzzles can be spray-primed on their painting stand, but the new plastic bits need to be hand-primed so you don't wreck the rest of the model. If you have a brush-on primer, I'd go with that, otherwise a flat black basecoat will suffice.
I painted the new bits to match the dark metal of the rest of the weapon. Check out my tutorial: Speed Painting Necrons to see how I painted these warriors.
One green rod will be enough to make both barrels of the gauss reaper. Use the sprue attachment point as a guide to mark the center, and cut it in half.
If you plan to paint anything on the green rods, stick them to a piece ot double-sided tape on a paint stirrer, and spray them with Testors Dull Cote. The Dull Cote serves as a sort of transparent primer that you can paint over (otherwise the paint won't really adhere to the slick translucent plastic).
Glue the rods into the weapon and check the fit of the muzzle to make sure they line up properly.
Trim the ends with a knife to make sure they are even and the correct length so the bottom rail of the muzzle connects to the hand grip.
Do any painting on the rods before gluing the muzzle in place.
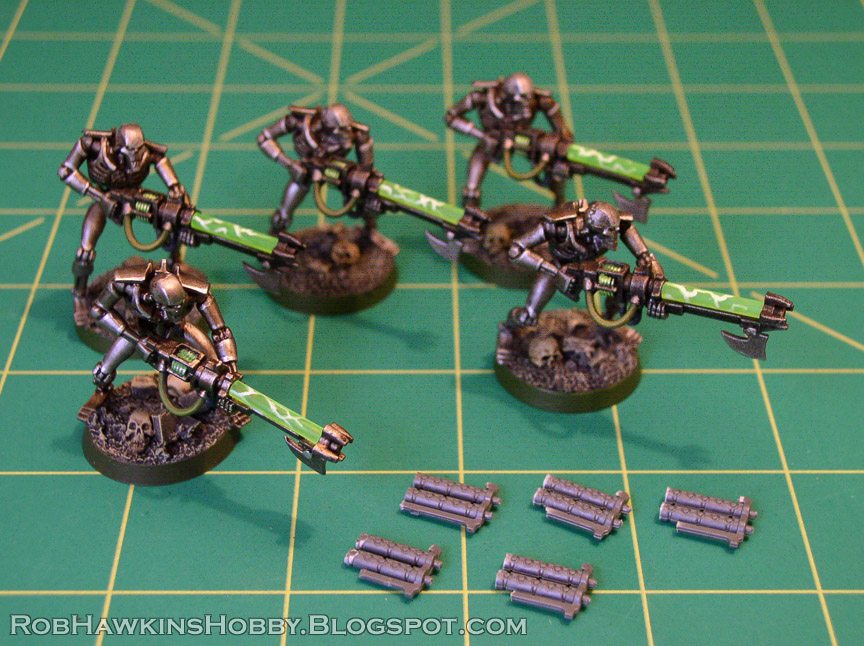
And that's it– A Necron Warrior upgraded to be armed with a gauss reaper.
I had enough spare parts to re-arm five Warriors. If I add any more Immortals, I be sure to save their gauss blaster barrels to use for another batch of reaper upgrades.
Spare Necron Warrior parts are useful for all sorts of conversions. Using some spare Tomb King weapon bits and parts of a gauss flayer, I built a warscythe for this Warlord conversion. Never throw anything away– You never know when it will come in handy!
'Til next time!


I like the green rod more than the newer guns
ReplyDeleteMe too. By painting the lightning on them they don't look as "cheap."
DeleteDo you know where to get similar pieces like the old guns? I started in 2022 so I never had a chance to get old warriors
DeleteAt this point, the only place to pick up classic Necron Warriors is second hand– Ebay or maybe a trading group on Facebook or somewhere. You can find the translucent plastic rod in hobby shops that carry styrene plastic supplies like Plastruct or Evergreen, or online. It might be difficult to match the exact shade of green plastic, but those plastic rods come in a variety of colors, so you could make Necrons with red or purple rods, for example.
DeleteThe green rods add a fun "toy" element to the figures, by making them look like something is happening right after you build them. Plus seems to save time over painting on the same effect.
ReplyDeleteI've never understood people's complaints about the green rods. If they don't like the translucent plastic, they can just prime and paint it with the rest of the model. But it adds a bit of "special effect" to the miniatures, and offers the option to change it for different color rods if one is so inclined. (One of my friends fit a small plasma globe atop his Monolith, and used translucent purple rods in his weapons to match.)
Delete