Project Log: The Watchtower, Part 4
In this post, I go through the entire process of constructing the top of the watchtower, step by step. This is a long one!
Detailing the Walls
The missing half of the house was previously framed out with foam core board. (I've shaded the edges of the white foam board so it shows up a little better in the photos.)
The walls need to be detailed to match the existing structure, and the first step is to get the new wall to be level with the plastic wall. To do this, I attach a layer of thick art board and styrene plastic, cut to fit into place.
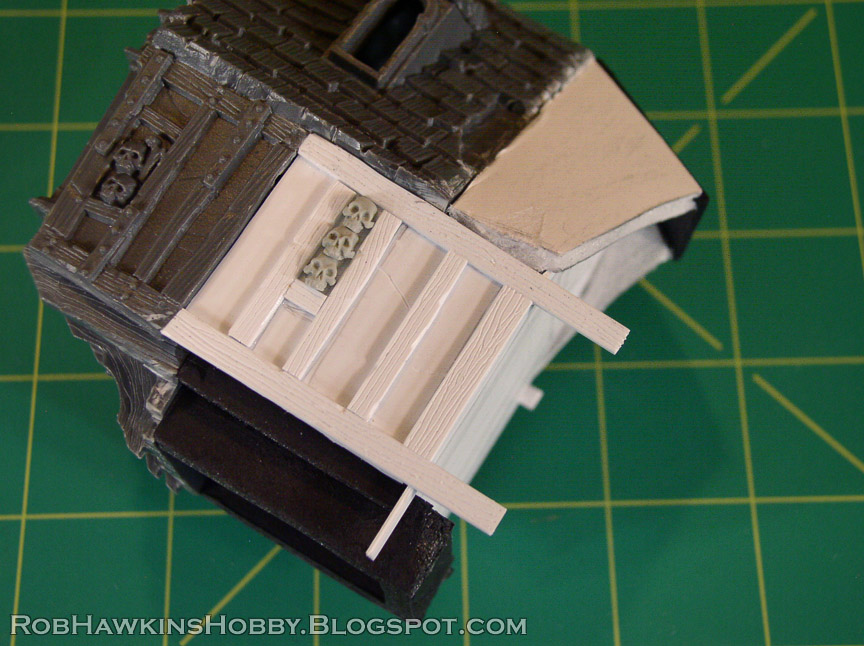
Once the sides are finished and level with the original structure, I cut another piece of card to fit on the front, and use a pencil to sketch out where the wooden timbers and other details will be.
The wooden beams are made from 1mm thick styrene card. I cut grooves in the card about 1/8-inch apart...
...and inscribe the wood grain with a sharp tool. The boards are kept attached to make this step easier.
Then, the boards are snapped off and their edges cleaned up and distressed with a hobby knife.
I attach the top and bottom boards first, leaving the ends overhanging...
...and then fit the vertical beams between them. I use a few Skull Forge Scenics skulls to create a wall shrine.
For the corner beams, first I glue a strip on the front, butted up against the horizontal boards.
Then I glue the side beam, lined up with the front strip, creating the corner.
I trim off the horizontal boards flush with the front strip. The corner is sanded to remove any irregularity, and then I inscribe the wood grain into the front so it looks like a single corner beam and the ends of the horizontal beams above and below it.
To recreate the metal reinforcement plates, I cut a few strips of thinner styrene, some "bolts" from hex rod, and some rivets and nails from thin round rod.
The strips are glued in place, and the nails and bolts glued where appropriate. I also make a few scratches in the wall surface to represent cracks in the plaster.
Sculpting the Eaves
The edges of the foam core need to be covered with putty. First, I add some thickness to the top eave by adding a few layers of art board underneath.
Then, I mix up some Aves Apoxie putty, add a little water to make it more spreadable, and coat the edges and undersides with a thin layer. I also cover the foam core under the wall and on the bottom support beam.
I let the putty set up for about 20 minutes so it's not as mushy, and then use the edge of my sculpting tool to cut wood grain into the surface.
I also delineate a small edge that will account for the thickness of the roof shingles, and add wood grain on the underside of the eaves.
The beams along the bottom are also shaped with wood grain texture, and I blend the putty and grain into the existing plastic beams.
Once the putty has fully cured, I clean up the edges with my knife, and add a few cuts and distress marks.
Next, I turn to the leftover arch from the Sigmarite Mausoleum entrance that I had cut up to make the balcony. Using a saw, I cut out the segment with the large skull, and then cut that part in half.
Once the excess plastic cut away, I am left with two large skull icons. I plan to use one of these over the door.
Under the eaves, I add more timbers. Before adding the rest of the detail, I need to address the balcony so I know where the bottom of the door will be.
Sculpting the Balcony
I cut a piece of thick art board for the surface of the balcony and glue that in place. Then, I mix up a batch of putty and spread it across the surface.
With a damp, stiff brush (to keep it from sticking), I stipple a rough texture into the surface.
Next, I use my sculpting tool to mark in some paving stones.
Once the stone pattern is established, I shape the edges a little to create irregular corners and imperfections.
For a little more texture, I press a stone into the surface in a few places, then I set the balcony aside to fully cure.
Once the putty is hard, I use a knife to trim off the points of the corners, bevel the edges in a few spots and generally clean things up.
Now, I can see where the balcony fits in place, and I glue the door to the wall so it is flush with the balcony floor.
To build the edging stones around the top of the balcony, I roll out a length of putty and attach it around the perimeter.
I use a popsicle stick to flatten the top a little and square off the sides, then press some texture with the brush, and leave it to set up for half an hour. By letting the putty partially cure, it will still be soft enough that I can slice it with a hobby knife, but it will be hard enough that it won't deform too much when I press in with the knife.
While the putty is curing, I add some more detail to the front of the house– The skull, and timbers around the door.
Back to the putty– I trim away the bottom to make a squared-off edge.
When I'm satisfied with the shape of the edge, I add more putty in the center to create the attachment point for a telescope.
Then, after the putty has completely cured, I use a knife to carve the spaces between the stones, add chips, and square off the top edges some more.
The finished balcony:
Constructing the Railings
I finish off the wooden details on the front of the house. The top ledge of the door was deep enough that I could sit a row of skulls on it.
Since I had cannibalized the entry arch from the mausoleum set, I decided to use the gates to create some railings for the balcony. I wouldn't be able to build railings all the way around but I could make a frame on either side of the door.
I cut off the bottoms, the hinges, and the highest spikes on the gates.
With the reduced height and the spike removed, the gates fit perfectly under the eaves. This is one of those happy little coincidences where a spare part just fits perfectly into a build.
And the spikes that I cut off won't go to waste, either– I'll use those to mirror the spikes at the end of the metal framing on the roof.
Sculpting Roof Shingles
I need to sculpt the shingles to match the size and style of the existing shingles on the house. I begin by applying a layer of Aves putty to the roof.
I use a popsicle stick that I've cut notches into the side of for my "shingle sculpting" tool. Starting at the top, I press it into the putty and pull it down to create the irregular bottom of the row of shingles. Then I press in below that to create a second row, and so on, creating a stair-step pattern all the way down.
By placing the stick in varying positions, I can alter the shape of the shingles, so each row appears different all the way down.
I let the putty cure for half an hour, and then use a hobby knife to cut in individual shingles.
Next, I lightly press the blade into the shingles to create the vertical ridges.
The last thing to do is cut out grooves on the corners for the metal frames.
The frames are made from square styrene rod, and I check the fit before setting the house aside to let the shingles finish curing.
Once the putty has hardened, I go back in with a knife to clean up the edges, trim corners, and cut the detail into the sides of the shingles over the eaves.
Finishing the Metal Trim
I notch and distress the plastic rods of the metal frames.
Then, I use the frame on the opposite end as a guide to mark the spacing of the rivets.
I glue the rods in place, and trim them down to size.
The rivets are cut from thin styrene rod and individually glued in place.
Looking at the spikes on the plastic end, I decide that they are a little "soft" and won't match the pristine ones that I'll be adding on the opposite side, so I cut them off and use some of the spare fence posts to replace them.
The spikes are drilled out with a fine drill bit and a piece of thin wire is inserted to pin them in place.
Here are the new spikes on the other end:
The last thing I need to address is the top. The original row of top spikes isn't long enough to cover the new roof...
...so I build a new top with spikes cut from the posts of the Sigmarite Mausoleum walls, and a piece of L-strip styrene. The ends of the L-strip are cut to match the contour of the spikes.
I distress the plastic, and punch some rivets into each side of the strip. Then, I fill underneath it with putty, and press it down onto the roof.
I trim off the excess putty that squishes out, and fill any gaps at the connecting points.
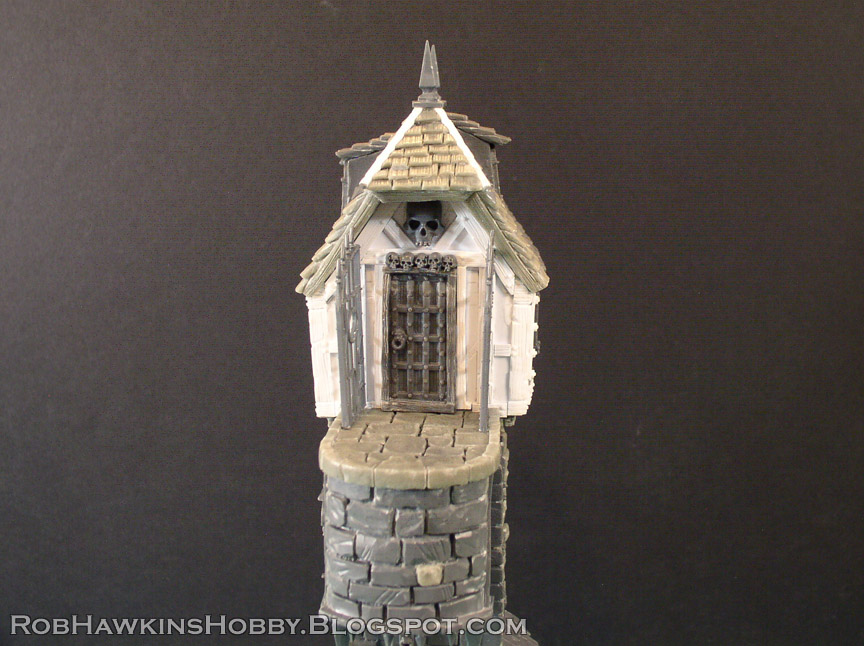
And that's it. Here's a look at the finished top of the watchtower. I still need to sculpt the stones around the attachment points and finish the bottom, but this is the most significant chunk of work out of the way.
'Til next time!


No comments:
Post a Comment
All comments are moderated. Any comments containing links will not be approved and will be marked as spam.