Project Log: The Watchtower, Part 3
This week, I'm going to tackle the rocks at the base of the tower and the reconstruction of the rear wall...
To add some extra stones around the bottom of the tower and cover the blank section where the stairs used to be, I cut up some of the rocks from the Skaven Gnawhole hit.


I make a few cuts and notches to fit them in place around the other rocks, and attach them with super glue.

This gives me the basic structure, and a nice "footprint"for the rocks. There are gaps and seams that need to be filled in.

For this, I use Aves Apoxie Sculpt. To match the rough texture, I press a stiff brush into the surface of the putty, and then poke a few spots with a stone from the yard. The Aves dries rock-hard, so I can carve or scrape the surface to add more texture or irregularities in the stone.


The Gnawhole rocks have Skaven symbols carved into them, and a smooth surface that doesn't match the rest of the rocks. I fill in the symbols and thin the Aves with water. By wetting the putty more, it develops a "slip" like wet clay. I smear this over the surface of the stones, let it dry a little, and then press it with a stiff brush to get a stippled texture that blends with the rest of the stones.

After all the putty has dried, the final touch is to super glue some ballast and sand in some of the crevices.

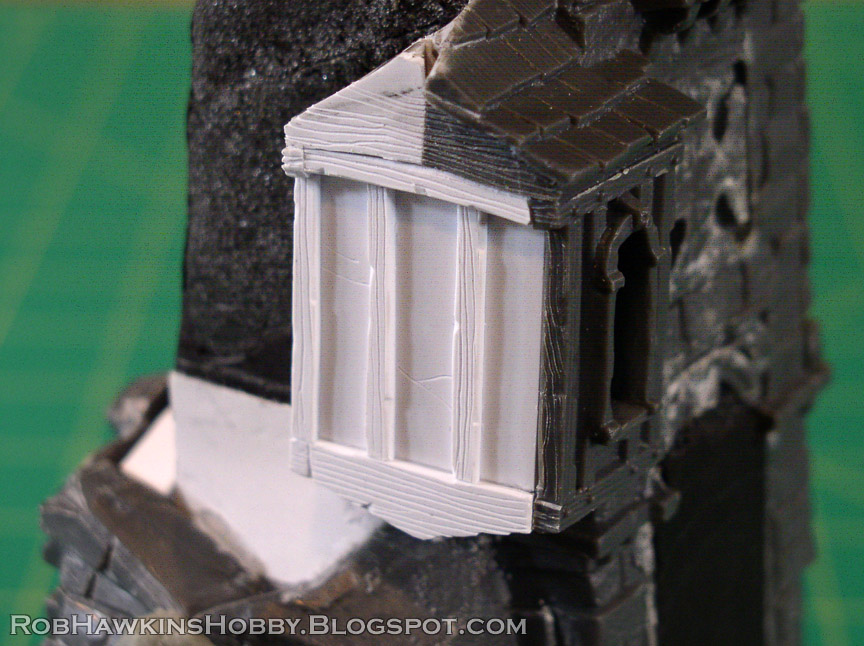
For the wooden window-box, I build a framework with foam core, and then cover it with thin plastic styrene card. Over this, I add the wooden beams, which are made from thicker styrene strips which I score with a wood grain texture.


For its roof, I sculpt the shingles with Aves Apoxie Sculpt, and match the style of the existing roof shingles.

Finally, I add some details like rivets (or rather, nails) and a bolted metal strip. For the skulls in the wall shrines I used my Skull Forge Scenics skulls because they more closely match the scale of the skulls in older GW scenery kits (the new GW skulls would be noticeably smaller). The skull icon at the top (a modified classic skeleton shield icon) is strategically placed to hide the seam between the grey and white plastic.

The rear wall has a lot of surface detail that needs to be repaired, but it's mainly covering over the rough spots with resculpted stonework.


Like the rocks, I use a brush and stone to press some texture into the putty, and shape individual bricks with my sculpting tool.

The skull over the door is taken from the Warscryer Citadel's upper tower. I press it into the putty, and then sculpt the stones around it.

There was a little ledge running across the tower wall, so I reconstruct it with a second layer of putty, and small plastic squares that I glue in place after everything has cured.

Once the putty is cured, I scrape a few of the stones to create a different texture, and chip away pieces of their corners to create more irregular stones.

The next step will be to tackle this side of the building, where I'll have to build the stone wall from scratch. I'll make sure to take a more step-by-step pictures of the stone sculpting process.

The bottom will require just as much work, but I need to settle on the orientation of the balcony and what kind of details I'll add at the base.

'Til next time!


No comments:
Post a Comment
All comments are moderated. Any comments containing links will not be approved and will be marked as spam.