Painting Tutorial: Batch Painting Clanrats
I recently finished up a batch of 100 Skaven Clanrats, themed to match my Clan Pestilens force. Painting large units can be a daunting, even exhausting task, but if you have a plan and work at a steady pace, you can get through it in no time. Here's a look at the process I used to batch-paint all of these Clanrats:

Step 1: Assembling the Models
Clean the mold lines on all the parts. For large units of infantry, do not try to paint the components separately. Glue on the arms and shields (these Clanrats have their shields molded on), and base the models. The unit is going to be fielded en mass, and will die in droves, so the focus needs to be on the unit as a whole, rather than any one model. Therefore, you don't want to get caught up giving too much attention to details that will only end up covered by their shields, details that will barely be visible on the tabletop.

If you use sand or ballast on your bases, apply it during the assembly stage. Use superglue to attach the sand so it holds up over time and is less prone to rubbing off during painting.

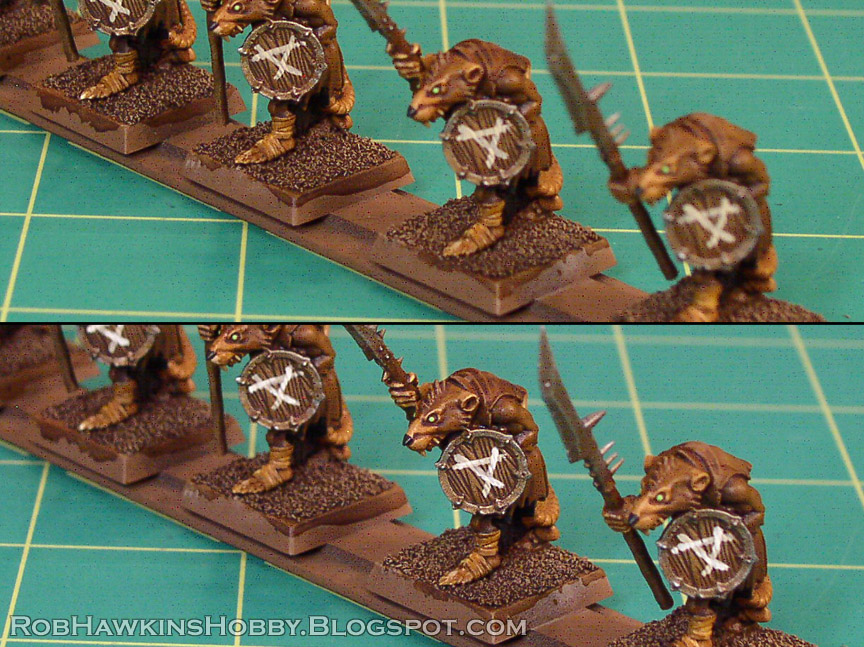
You can spend a little more time on the command models for the unit. I've converted my champion to have a unique weapon, and put together distinct standard bearers and musicians for each unit.


Use thick double-sided tape to attach the models to large craft sticks (wide popsicle sticks, like tongue depressors). Arrange all the models with the same body sculpt on the same stick. This will allow you to quickly move down the line and paint all the same details. Arrange the command models on their own stick.

Step 2: Priming the Models
Spray prime the models with black primer. Then, give them a dusting of Model Masters Light Earth spray for a medium brown. Apply the spray with a VERY light touch from below to keep things darker, and spray a little heavier from above. This brown spray provides a nice base for the leather, fur, and the sand on the base.


Assemble all of your infantry, attach them to the craft sticks, and spray them all in one batch. Then, paint them in batches of 10 or 20, whatever you are comfortable with. Now here's the key motivator in this plan: You won't be able to play with the models while they are stuck on the craft sticks, so in order to get them on the battlefield, you NEED to finish them!
Step 3: Making a Plan
As you paint the first batch of models, write down the paints you use and all the steps so that you can accurately replicate the process on the subsequent batches. Here's the list I made for my Clanrats. You can match my scheme, or just use these basic principles and apply it to your own infantry unit. As I was working, I also noted how many days it took, and how much time I spent on each step. As you can see, to paint a batch of 20 models took me about 12 hours spread over nine days, spending around an hour or two each day. That's really the key here– If you can maintain steady progress each day, you'll be through the unit in no time.

Paints Used:
GW Citadel Paints–
Tau XV-88
Runefang Steel
Lhamian Medium
Castellan Green
Formula P3 Paints–
Rucksack Tan
Moldy Ochre
Menoth White Base
Menoth White Highlight
Gun Corps Brown
Pig Iron
Quick Silver
Wurm Green
Vallejo Paints–
Heavy Skintone
Iraqui Sand
Scorpion Green
Other Paints–
Army Painter Matt Black
Liquitex Burnt Umber Transparent Ink (Brown Ink)
Step 4: Painting the Models
As I mentioned above, each batch of 20 took around eight or nine days (roughly a week) to finish. I'm breaking this painting guide down by days, with the intention of finishing a batch of 20 models over the course of one week, spending an hour or two painting each day.
This is a "quick-and-dirty" painting method, painting all the sloppy parts first, and tightening up with the successive steps. All the highlights will be overly bright, and the ink wash will tone things down and even it out. The focus is on finishing an entire unit that looks impressive, rather than painting individual models to a high standard. A mistake here or there won't be noticed when the whole unit is amassed on the battlefield. When painting, maintain a steady pace and focus on getting things done rather than perfect.
DAY 1– Painting all the Brown, Time: 1 Hour
Drybrush the entire strip with Tau XV-88. Focus on wooden bits like the spear shafts and shields, the arms, legs, heads, and leather bits like belts and pouches.

Next, basecoat all of the wraps and ties with Rucksack Brown. This includes the bandages on the feet, any wraps on the spear shafts, and things like the belts and wrist ties.

Then, overbrush all of those items with Moldy Ochre. Overbrushing is a technique where you wipe off some of the paint from the brush on a tissue, and then brush across the item so the paint catches the raised areas. It's similar to drybrushing, but since the paint in the brush isn't as dry, it does not require vigorous brushing, allowing you to control where the paint goes.

Here's a closeup of the overbrushed ties and wraps:

Drybrush the bases with Gun Corps brown, and then with Menoth White Base, taking care around the feet.

The final step for the day is to continue the Menoth White Base drybrush onto the figure, drybrushing the wood of the spear shafts and the shields, and a little on the wraps and ties.

DAY 2– Painting the Flesh, Time: 2 Hours
Now, we need to start taking more care with the paint so we don't mess up the previous steps. Carefully basecoat all of the flesh with Heavy Skintone. this includes the tails, hands, ears, faces, and the parts of the feet that are visible around the wraps. On this strip, it's just the heels and toes, but other Clanrats have their entire foot bare.

After the basecoat, use the overbrushing technique to add Iraqui Sand as the highlight color. Don't worry if the highlights appear to bright; the ink wash in later stages will diffuse and darken things a bit.

Here's a close-up of the finished skin:

DAY 3– Painting the Teeth and Noses, Time: 1 Hour
Use a fine brush and paint the teeth, toenails, and fingernails with Menoth White Base. Sometime the weapon hand will be too close to the body to get at the fingernails, and that's fine– just skip them.

Then, highlight just the front teeth and the front toenails with Menoth White Highlight.

Next, paint all the noses black. (I know rats usually have pink noses, but I take my inspiration from Don Bluth's The Secret of NIMH, where all the rats have black noses.)

Then, paint black over that solid block of "negative space" behind the shields, and under the robes.

DAY 4– Painting the Metal and Shading, Time: 2 Hours
Basecoat all the metal parts like the shield rims, spearheads, trinkets, and any armor with Pig Iron. Then, drybrush the spearheads with a little Quick Silver.

Once the metal parts have dried, mix a wash of Brown Ink and plenty of Lhamian Medium. I can't give an precise measurement because I mix a large batch and just eyeball it (literally pouring in a "dash" of medium). Straight Brown Ink will darken the model too much, so you want to add enough medium to thin it and allow it to flow into the recesses without darkening the model too much. Experiment on a test model to check the results before hitting the entire batch. When applying the wash, use a large brush and cover the entire model, including the base. Have a second brush on hand to wick up any excess ink where it is pooling too much.

It will take some time for the wash to completely dry, so make this the last step for the day. Here's how the wash should look when dry. You can see that it has darkened the recesses and softened the transition between the fur and flesh on the faces. The bright drybrushing on the shields has also been toned down, and the wood grain is nicely defined. The metal is also suitably shaded like dirty metal.

DAY 5– Painting the Details, Time: 1 Hour
Drybrush the metal bits with Runefang Steel. You can use a large brush on the spearheads, but use a smaller brush on the shields, just enough to catch the edges of the shield rims without getting any paint on the surrounding bits. Then, Drybrush Quick Silver on the blade edge of the spearheads.

Paint the eyes by using a fine detail brush to put a dot of Scorpion Green on each eye. These Clanrats have great, pronounced eyeballs that are really easy to paint. If the models were squinting, I wouldn't even bother with the eyes.

The final step is to paint the shield icons. You will only need to do this on the Clanrats with plain wooden shields, and can skip this step on the ones with sculpted icons (which were painted during the metal stage). Use a fine brush and Menoth White Base to paint the Skaven icon. Then, use straight Menoth White Highlight to paint a highlight on the ends. Arrange the highlights so the lines appear to overlap each other around the triangle.

Before you finish for the day, Paint the base rims with a single, thin coat of Castellan Green. Don't worry if you don't get perfect coverage; this is just the first coat, painted quickly while the models are still on the strip. We'll give them a second coat at the very end.

DAY 6– Basecoating the Green Robes, Time: 2 Hours
We're nearly finished! The final (and most arduous) task if to paint the robes. For this step, you only need Castellan Green and black. You can pop the models off the painting stick at this point, but I'd recommend painting the tops and backs of the models while still on the stick so you can still get to them in an assembly-line fashion, and then remove the models to paint their fronts and sides.
Darken the Castellan Green with a touch of black, and basecoat all of the robes. You can use a bit of an organic process, adding more black when you are painting the edges and recesses (to shade them), and keeping it closer to straight Castellan Green when painting the broad flat areas on the back.

Next, use straight Castellan Green with an overbrushing technique to bring the color up everywhere but the recesses. As I said, this step is very tedious, so you might break it up over two painting sessions, painting 10 models each time. If you can power through in one session, go for it, you're almost done!

DAY 7– Highlighting the Robes and Basing, Time: 3 Hours
Mix a mid tone of Castellan Green and Wurm Green, and paint the robes, bringing up the color on the flat areas and high points.

Then, finish off with a final highlight on the edges and wrinkles. Straight Wurm Green is a little too bright, so add a touch of Castellan Green to tone it down.

Finally, drybrush a few patches of Gun Corps Brown around the bottom of the robes to "dirty" them up. If there are any metal studs on the robes or hoods, paint these with a spot of Pig Iron, and shade them with brown ink.

The last step is to finish the bases by painting a second coat of Castellan Green around the rim, and adding tufts of static grass. And that's it, the batch is finished!

When it comes to the command models, you can include them as part of the batch, or save them for their own painting session so you can spend a little more time on them. When painting my command models, I used the same techniques and steps as the rank-and-file Clanrats. The only difference was the addition of painting brass on the bells and more highlighting on the warpstone accessories.

By using this method of painting large units in manageable batches, you can get through them in a few weeks without burning yourself out. You'll be able to see finished progress as you're working and, by keeping a list of your paints and steps, you'll ensure that you maintain consistency between each batch that you paint.
'Til next time!


I've always done red eyes on my Skaven, but the green looks fantastic there. I might have to switch over.
ReplyDeleteThey're mad with a warpstone-fueled fervor!
DeleteReally awesome effort, batching pairing that mini is no joke! When I first saw the post I was thinking you’d done it with contrast paints.
ReplyDeleteThank you! It was quite a chore. Not difficult, just tedious.
Delete