Necron Flayed Ones Conversion
If you haven't heard of #HobbyStreak before, it's a challenge intended to help hobbyists maintain momentum on their modeling projects. Every day, spend at least 1/2 hour on some sort of hobby activity– Painting, assembly, even cleaning mold lines or tidying up your work station counts! Every day, post a photo of your progress on Twitter with #HobbyStreak, and see how long of a streak you can maintain. Over the past month, I've been maintaining my hobby streak by chipping away at a few projects that I have finally finished... almost.

I'm trying to get my streak up to 365 days this year, and I'm up to day 174. If you've been following me on Twitter, you'll have seen my daily progress on these models. I have 80 Skaven Clanrats from the old Island of Blood starter set that I've been painting in batches of 20. After finishing my Warpfire Throwers, I went back to work on the Clanrats.

This batch had the standard bearers and musicians for the units. Combined with the unit champions from the previous batch, this gives me a full command set for two units.


That takes me to two 20-man units of Clanrats, but I still have 40 more rats to go before I bring them up to 40-man units...

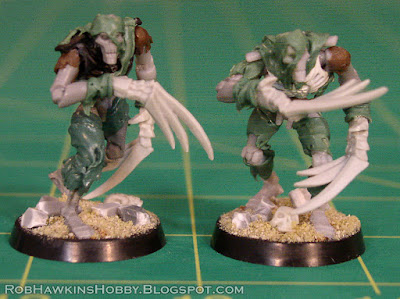
My other project is converting my spare plastic Necron Warriors into Flayed Ones. I began by posing the warrior bodies into more dynamic stances. I also clipped the guns and hands off of their arms.

The pose required separating and pinning their legs back together for a crouching/ running stance. I wasn't able to get them quite as hunched over as the original Flayed Ones, but it's close enough.


The next step was to add the flayed skin. This was achieved by stretching modeling putty over their bodies and legs, and sculpting it a little to look like torn skin.


Sculpting the skin was the most time-consuming part, but making the claws was the most challenging. I sculpted a pair of hands and scratch-built some claw fingers out of styrene strips, and cast them in resin. I
decided that it was more reliable to leave the knives rough and longer
for casting, and then individually trim each one into shape afterward.
That way, if the tips of the knives didn't fill in properly during
casting, it wouldn't matter since their length would be trimmed much
shorter.

To create a secure attachment point for the hands, I wrapped the arms with more putty "skin" and then trimmed the ends flat.

This allowed me to cut the wrists at different angles to get a variety of poses in the hands and arms. These are the first two finished Flayed Ones, complete with their claws. Now to work on the remaining eight, and paint them all.
'Til next time!


Those flayed ones are great!
ReplyDeleteHopefully GW comes out with plastic ones sometime, but yours will be better even in that happy time.
Thank you!
DeleteThose Skaven look ace!!
ReplyDeleteThanks!
DeleteGreat idea this hobby streak, that would help me loads too!
ReplyDeleteThese flayed ones are a wonderful, clever casting the claws. Do you do this by using a silicon mould?
Thank you! Yes, I made a silicon mold, similar to how I cast my Skull Forge Scenics products.
Delete