Counting Toward DOOMSDAY, Part 2
The march toward Doomsday continues as I chronicle my second week of work on the Necron Doomsday Arks...

DAYS 8 and 9
At this point, I had all the major parts assembled and attached to sticks for priming and painting. The only real assembly that remained was the group of Necron warriors in the repair bays. These guys went together pretty quickly and I added pins to their attachment points so I could peg them into position when using the Ghost Ark variant.


DAYS 10 and 11
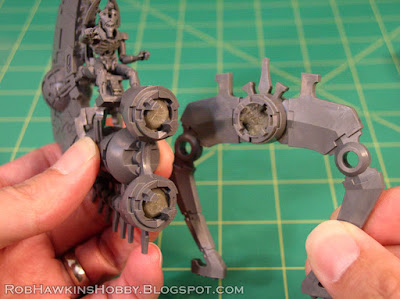
The components for the Ark's ribs and cannons stay in place well enough, but I added magnets to ensure a sturdy hold. I filled the voids in the pieces with Aves Apoxie Sculpt putty and then, once it had cured, drilled holes and inserted the magnets. The Ark ribs will fit in either the top, inverted position over the cannon, or on the bottom for the repair bay of the Ghost Ark.


DAY 12
I needed to confirm all the final positioning on the main components, so I began priming the other parts. Everything was sprayed with black, and then the body components were dusted with Rustoleum Metallic, Brilliant Metal Finish silver spray (Matte Nickle is the name over the barcode). When I begin painting, this will allow me to skip the initial base brushing of metal, and go straight to the dark brown wash. The parts for the guns and engines, which will be dark brass metal, were left black.

DAY 13
The final bit of assembly was the prow, which needed to fit in two different positions, one for each of the configurations. The prows plug in securely and don't bear any weight, so I didn't waste four magnets on them. Instead, I filled the rib's center with Aves putty and added a pin to the prow. Once the putty cured, I drilled a hole so the pin will plug in and provide more stability for the part.


DAY 14
After double checking that all the magnetized parts fit properly, I primed the remaining components. The last little bits are the gauss flayer muzzles and the retro thrusters that will fit under the ribs. I'll prime and paint those parts during the final assembly steps. The green rods will also be addressed once the guns are painted; for now they will be getting a spray of Testors Dull Cote and set aside. Now, on to the painting!


'Til next time!


Impressive dedication to flexibility, particularly considering you are building two!
ReplyDeleteI just hope they hold together. It's not like swapping out a weapon or turret; the whole thing comes apart in the middle.
DeleteI'm sure all this hard work will be worth it at the end.
ReplyDeleteI hope so. My Necrons need the firepower!
Delete