Terrain Showcase: Warscryer Citadel
The Warscryer Citadel is finished! I hope you enjoy this gallery and "walk around" tour of the terrain piece.

This completes the project log series for the Warscryer Citadel. Here's a shot of all the components, prior to assembly. The painting is finished and the bases are flocked with Woodland Scenics green blended turf, and green static grass in spots over that. They are just awaiting the addition of the final tufts of darker green and beige grass. Check out the previous posts in the Project Log: Warscryer Citadel series to see the step-by-step build of this massive scenery project.

Last time, I discussed the painting of the stone, rocks, and ground. As I walk through the terrain, I'll talk about the final bits of painting like the metal and wood.
The Observatory
Out away from the main tower is the observatory platform. I think this is my favorite part of the set. It's constructed from the top half of a second citadel tower, with the steps and bridge from the main building. The observatory dome is separate, so it can be rotated or removed.


I painted the dome with Formula P3 Molten Bronze and washed it with GW Nihilakh Oxide. A few additional streaks were applied by adding some white into the Oxide. The iron (and all the iron on the piece) was painted black and then washed with P3 Bloodstone and orange, mixed in various ratios. Once the wash was dry, I drybrushed some P3 Pig Iron on the edges of the metal.

With the dome removed, the structure looks like might serve as an airship (or dragon) landing platform.

The Bridge
The collapsed section of the walkway was built from the leftover pieces of the towers, and forms a nice connection to the main building.

The collapsed section is wide enough to allow large models to pass over it without the bridge interfering with movement, while implying the existence of a much longer bridge. The length of the bridge ensures that the observatory (and whatever dangerous experiments might be going on out there) are kept a safe distance from the main tower.


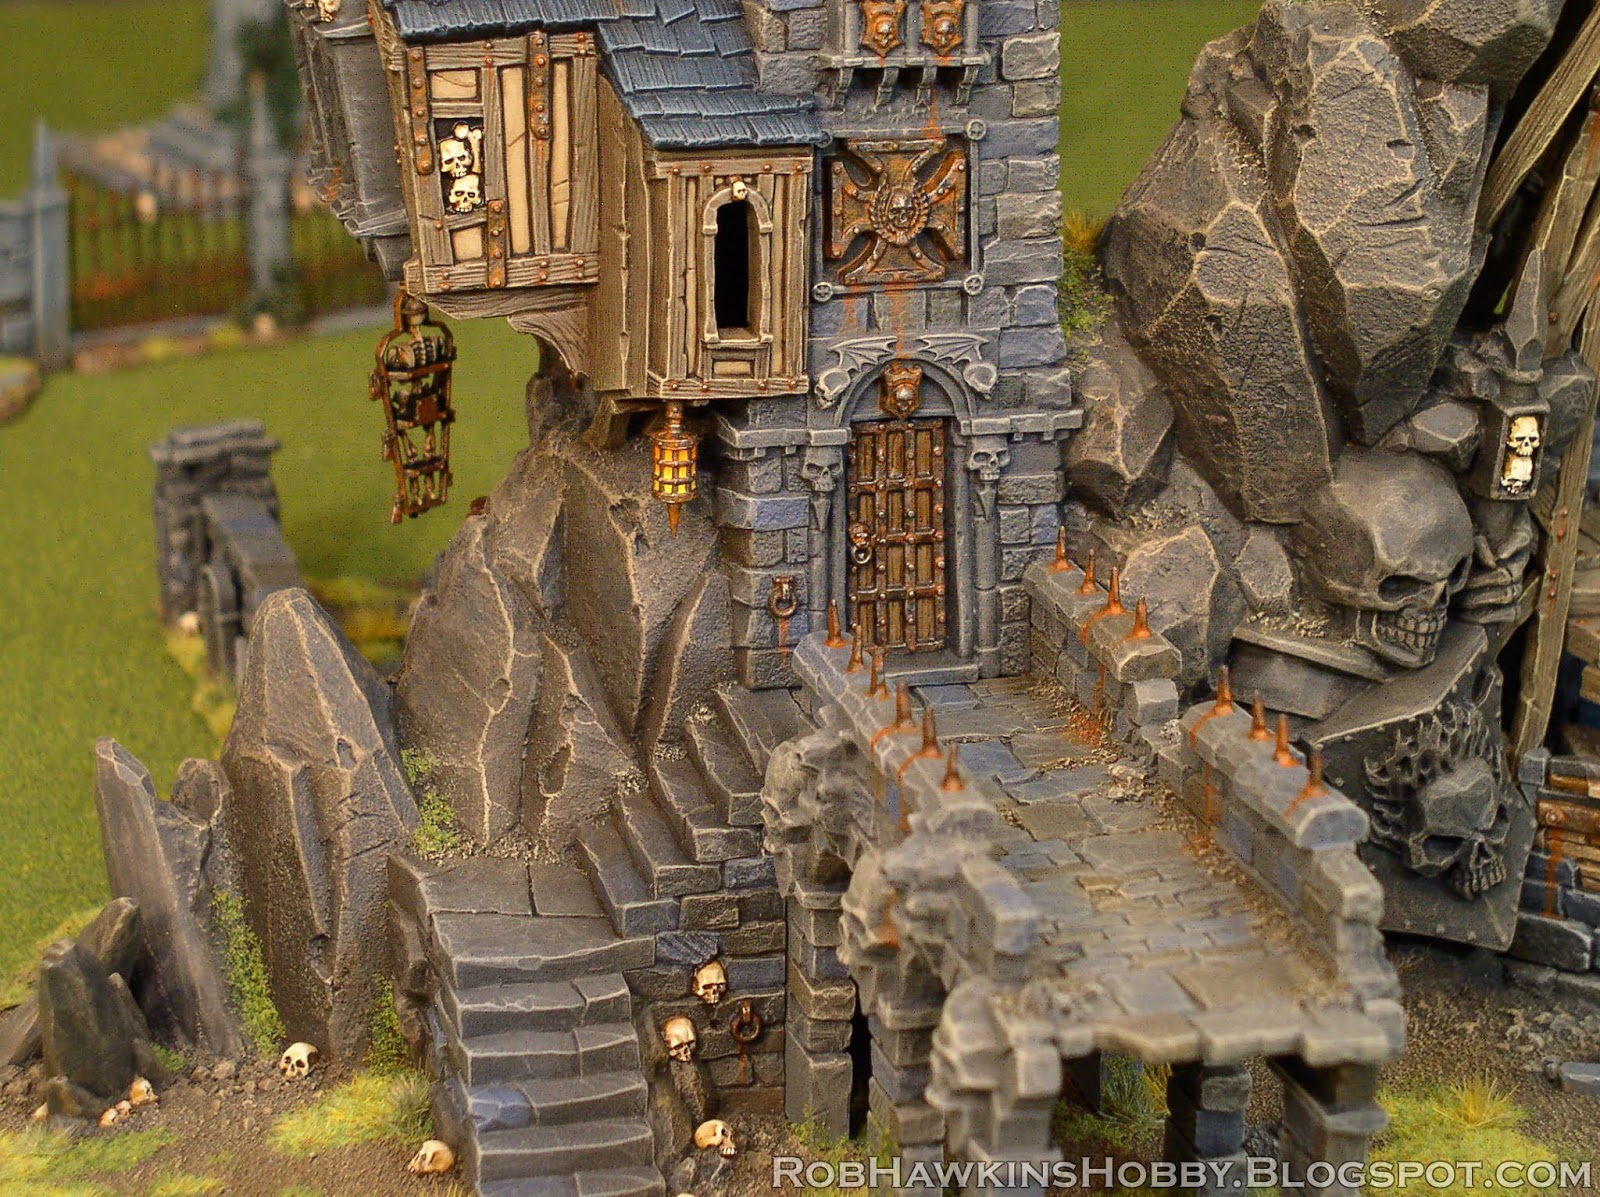
The bridge connects to the back door of the citadel. One extra touch I added was a hanging lamp over the stairs. The lamp is from the Corpse Cart kit.

The Tower Ruins
I wanted the tower to appear as though it had crumbled away over the years with the top propped up by support beams, and the bottom collapsed into ruins. The tower ruins were built from the bottom half of the second citadel tower. The stairs and wooden floor were scratch built from basswood, and are accessible to models that might want to occupy a position in the tower.


The Entryway
I used Skull Forge Scenics resin graveyard walls to build a path up to the front door. The paving flagstones are cut from thick styrene card.

The various tombstones around the yard are also from my Skull Forge Scenics range of resin scenery.

The wall posts can connect with more loose graveyard walls to build a perimeter wall, and section off areas around the building.


Above the front entrance hangs a gibbet, taken from the plastic Warhammer Giant kit.

The Citadel
The main tower of the citadel is a wood and stone structure, and I've kept it relatively unaltered from it's original design. The skulls at the back, which used to be comets, now evoke the flaming skull motif of my Undead Legions army.

The roof shingles were basecoated with a mix of black and Formula P3 Coal Black, then drybrushed with successive layers of Coal Black, GW Fang Grey, and a final light drybrushing with a mix of Fang Grey and GW Screaming Skull. All of the rust stains were painted on with P3 Bloodstone.

The wood was all basecoated with a a mix of equal parts P3 Bastion Grey and P3 Gun Corps Brown. Then it was washed with GW Agrax Earthshade. When the shade was dry, I drybrushed the wood with more of the original color, and then added Screaming Skull into the mix to drybrush the brighter edge highlights. I think this color of "grey" wood looks a little more natural and weather-beaten than "brown" wood. After the wood was finished, the wall panels were basecoated with P3 Hammerfall Khaki and shaded with Agrax Earthshade.


The interior of the citadel tower was modeled with styrene card. The roof is removable so a model can occupy the top of the citadel, and the detail can be seen through the windows.


The Tower
A walkway leads from the citadel over to the tower, with steps leading up to another rickety walkway. I added extra support beams underneath all of the platforms, and below the tower itself.


The top of the tower has three build options– bare, fitted with the tower ramparts, or supporting the observatory dome. (My preference is the ramparts, with the dome set up on the smaller observatory platform.)


And that's the Warscryer Citadel! I hope you've enjoyed watching this come together as much as I've enjoyed building it. This kit is a blast, and I'm really looking forward to using the core structure from my second Warscryer Citadel to build a stand-alone tower. I have a few other projects I need to clear out of my queue before I get there, though.

'Til next time!


Brilliant. A fantastic result.
ReplyDeleteThank you Kym!
DeleteAmazing!
ReplyDeleteThanks Shane!
DeleteWhat an absolute triumph!
ReplyDeleteThank you!
DeleteYou keep on amazing me with your creations. One of the things I like best about them is how vibrant your colours are. Even on something like this, which is adorned with skulls in every possible corner, there's also something inviting and warm about it because of the way you painted it.
ReplyDeleteThanks! I like to keep my scenery mostly monochromatic so it doesn't overpower the miniatures when they are on the table, and I was afraid of all the elements (rocks, stone, roofs, wood) being too similar when painted (all blue-grey-brown). And even though I made the wood greyer than I normally do, it all pops pretty well. The touches of rust and red stones help add splashes of color here and there. It's a really well-designed kit because the organization of textures and color elements are perfectly balanced so everything works out.
DeleteI'm speechless. You are such an artist, a master of scenery. You inspire me with every work you show in your blog. Thanks!!!
ReplyDeleteThank you! I appreciate the kind words!
DeleteThis series of post has been brilliant to follow (as are your others). Thanks for sharing.
ReplyDeleteThank you!
ReplyDeleteWonderful terrain project. I always appreciate your detailed descriptions and their accompanying photos. Your ability to make a terrain setting that is functional, grounded in its, in this case, fantasy world and then give it a twist by putting the observatory low while carrying the rickety yet utilitarian details throughout the terrain. The grey wood paint process is also appreciated.
ReplyDeleteThank you so much! Did you follow along with the whole Project Log series?
DeleteI found it because of your year end summary post. Does mean I've able to work my way backwards through the build which is a different kind of fun.
DeleteIf you click the link for "Project Log: Warscryer Citadel" you should see all the posts on the page (parts 1-8 & the Showcase). Then you can scroll down to part 1 and work forward from there. :)
DeleteGood Lord, incredible work! Really enjoyed reading the whole series, it's very inspirational. I've nearly finished a jungle terrain board for 40K, and kept thinking of your blog as I worked.
ReplyDeleteThank you! :)
ReplyDeleteHats off! A masterpiece :) It was great to see this project grow and change as you worked on it.
ReplyDeleteThanks! It was probably one of my most fun scenery builds.
ReplyDeleteWow, this is amazing! Giving me a lot of ideas for the Citadel. In the pictures with the graveyard/Mausoleum; what is that 4 sided tower with the skulls? It's awesome.
ReplyDeleteThank you! That tower is my "haunted crypt." I built it a few years back for my Halloween terrain tutorial, which you can see here:
Deletehttps://robhawkinshobby.blogspot.com/2014/10/halloween-terrain-tutorial.html
I love it! Especially the crumbled tower base, it gives a lot of visual storytelling to the teetery propped-up rampart.
ReplyDeleteThanks, I appreciate the kind words!
Delete