Terrain Tutorial: Swamp Grass
Over the years I've found a way of making tall swamp grass that's cheap, simple, and effective. In this tutorial, I'll show you the process I use for creating patches of tall swamp grass.

There are a few brands of scenic material that offer tall grass, but I've always found them very flimsy and difficult to control. Woodland Scenics, for example, sells packs of tall field grass that's so fine it's like working with hair. The best material I've found for making tall grass are these cheap paint brushes. You can find them at hardware stores like Home Depot, and a 2-inch brush will run you about $1.20.

My preference it to use the brushes for painting terrain, and when they're close to the point that they need to be replaced, I turn them into grass. Prolonged use wears the brush hairs down, so if you want taller grass, or a perfect, beige color, you can use a brand new brush.

The brushes are constructed with what is essentially a ring of hairs, and these form two rows, making it easier to cut and control.

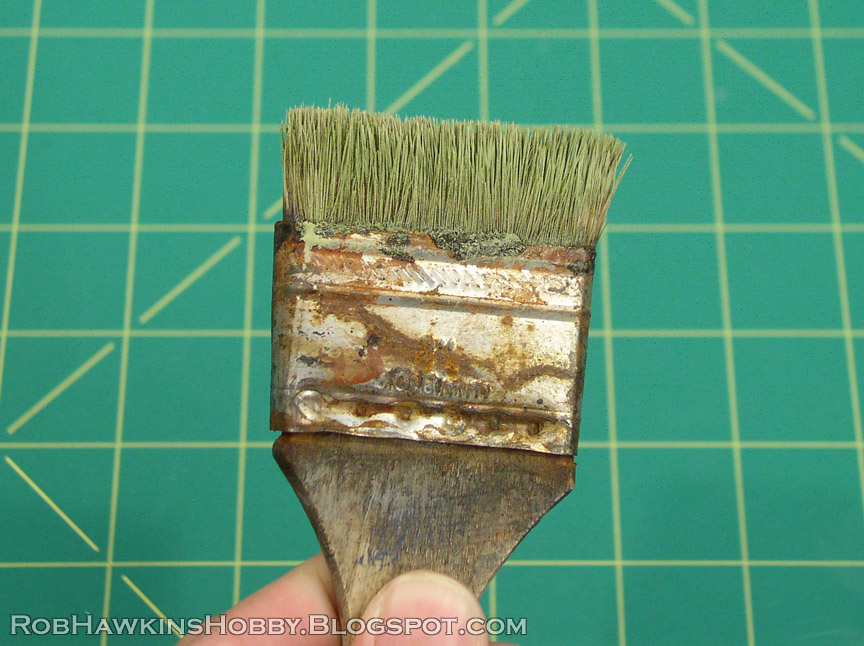
Step 1: To get the hairs to clump together, and add a little color to the grass, work some paint into the brush, the same as if you were getting ready to drybrush something. Here, I'm using Formula P3 Traitor green, mixed with a little P3 Menoth White Base.

Let the paint dry in the brush hairs, and you'll have a transition of green at the tips, fading to the natural beige brush color.

Step 2: Using a hot glue gun, run a bead of glue all the way around the tip of the brush, taking care to keep the two rows of hair separate.


Step 3: Once the glue had dried, cut the hairs off of the brush using either scissors or a hobby knife. try to get as close to the ferrule as possible so you don't waste any of the material.

Once the hairs are cut off, you'll have a neat row of tall grass. The glue end with the color is the bottom, and the beige end is the top, where the grass is starting to wither and lose its color.

Cut these rows into smaller segments, each one becoming an individual clump of grass. You can make them as wide or small as you like.

Trim the glue bead at the bottom so it's flat, but don't cut so far that the grass comes loose. The idea is to leave a flat bottom on the grass tuft so it will stand easily when you attach it to the surface.

Step 4: Prepare your swamp area, whether it's recessed into the table board, or a separate modular piece. Here, I've used putty to build up a retaining wall on a piece of MDF board. The piece was then coated with sand and a few rocks added. I finished it off by painting the sand and adding a few patches of flock and static grass to match the rest of the gaming board.

Add a small bead of hot glue to the bottom of the grass tuft and press it into the recessed area where the water effects will be poured. The water is important because it will conceal the glue attachment on the grass and secure it in place. (And this is a swamp after all!)

Add as many tufts as you like. Don't worry if the top of the grass looks unnaturally flat; we'll trim it later, but try to get the grass to fan out a little rather than standing in a perfectly vertical column.


Step 5: Pour the water effects into the recessed areas. Here, I've used Envirotex Lite "Pour-On." It's a two-part epoxy that uses an easy 50/50 mix ratio. I also tinted the epoxy with a little green and brown paint. (Make sure you mix the Envirotex in a well-ventilated area and protect your work area in case there are any spills.) Once the epoxy is poured, you can sprinkle a little flock over the surface to create algae. The flock will sink into the epoxy, and some of the surrounding grass may absorb it a little, creating a wet appearance.

Let the epoxy dry thoroughly overnight. It's fully cured when the surface isn't tacky at all.

Step 6: Trim the tops of the grass with clippers to give them a more natural, uneven appearance. This step is saved for the end because it's easier to trim the grass once it's locked in place with the water rather than trying to fiddle with the loose tuft. You can also use wood glue to add more grass or flock over any areas that got too wet-looking from the spread of the epoxy water.

And there you have it– Simple, effective swamp grass!

'Til next time!


Very nice looking results. Useful tip, thanks.
ReplyDeleteThis is brilliant - thanks so much for sharing this technique!
ReplyDeleteGreat tutorial! Thanks!
ReplyDeleteGreat advice for tall grass, Rob. Thank you!
ReplyDeleteI have the head of a yard broom that is destined to be reeds/rushes along a river, but I'll be adapting this method to make it work. Thanks!
ReplyDeleteBrilliant!!! Thank you for sharing a great tutorial.
ReplyDeleteThanks, guys! Glad you enjoyed the tutorial!
ReplyDeleteCan't wait to take advantage of this. Wonderful tips.
ReplyDeleteThank U !
ReplyDeleteExcellent! I've been meaning to add some grass tufts to my Nurgle bases for ages, but didn't like any of the options I found. This looks perfect! Thanks!
ReplyDeleteThat is stupidly simple I am amazed!Thanks for sharing!
ReplyDeleteGreat tip! The results look quite nice, and it is easier than fiddling with the various dyed hair products. You could even mix these tufts with other products to get a more "natural" look.
ReplyDeleteExcellent tutorial!
ReplyDeleteGreat stuff! Will be giving this a go. What flocks did you use?
ReplyDeleteThanks! I used Woodland Scenics Burnt Grass fine turf and then a mix of Burnt Grass and Medium Green static grass.
DeleteGreat post. Thanks for sharing
ReplyDeleteVery useful =)
ReplyDeleteCreative and excellent job!
ReplyDeleteAwesome, so glad I found your site
ReplyDeletemuy buena idea
ReplyDeleteBonjour,je vous remercie pour ces conseils très pratique et pas onéreux. Cela est toujours intêrressant d'avoir de nouvelles astuce.
ReplyDeleteThank you!
Delete