Transporting the Untransportable
Some of GW's new plastic kits (the ones for the Vampire Counts in particular) have been pretty spectacular. The dynamic splendor of the models makes them perfect centerpieces for an army but proves problematic when trying to get them to the battlefield.
The Mortis Engine (which I haven't even touched yet), while huge, lays mostly flat and should fit in a deep tray that would hold a chariot base. On the other hand, the Terrorgheist seems determined to only ever be in a display cabinet or on the tabletop.
Even with a custom tray, the block required to fit this monstrosity would need to be 8" x 8" x 7", and that's a lot of wasted space in my opinion.
I've had the Terrorgheist on my work table for a while now with the intention of magnetizing its wings, and the other day I finally got the nerve to start drilling. Here's how it all turned out, along with a tutorial if you'd like to apply this technique to your own model.
The overall plan is to have the hands, feet, and body of the Terrorgheist attached to the base, so only the wings are removable. Having two attachment points for each wing (the shoulder and the wrist) will ensure a solid bond that won't wobble.
Magnetizing the Shoulder
To ensure that the wings stay as secure as possible, you'll want the largest magnet that will fit in the shoulder. That's a 3/16" diameter, 1/8" thick rare earth magnet.
A drill bit of matching diameter is needed to make the holes. (The 3/16" bit was too large to fit in any of my pin vises and I didn't want to trust it to a power drill, so I hand twisted it using a pair of vise grips.)
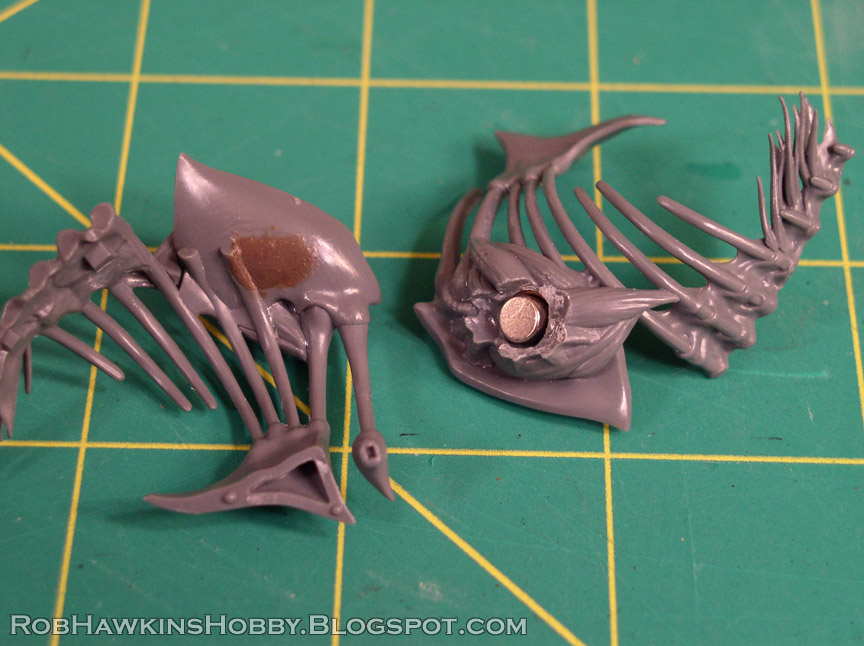
Start by drilling into the center of the shoulder mount. (You'll notice each half of the rib and shoulder assembly is not attached to the model; I've kept them separate so I can paint the detail under the ribcage and, as you'll see below, so I can get at the back of the part.)
Drill all the way through.
Then, apply a small amount of super glue and fit the wing into its socket. You only want a small dab of glue; the intention is to just tack the parts together, not bond them permanently. (Blue-tac won't work for this because you don't want the parts to shift at all during this next step.)
To get the two holes to line up perfectly, drill through the hole on the back of the shoulder blade and into the wing.
Then, pop the pieces apart, clean up the glue spots, and you'll have two perfectly aligned holes for the magnets.
Super glue the first magnet into the end of the wing. Be sure to let the glue dry first so the two don't stick together, then place another magnet on the end.
Mix up a batch of modeling putty, and move onto the next step.
Coat the exposed magnet with a little Chapstick (so the putty won't stick to it) and then place the shoulder blade overtop, so the wing fits snugly in its socket.
Press a bit of putty into the hole to fill in the space.
Then pull the wing off, and you'll have a depression at the correct depth for the shoulder magnet. Don't worry about smoothing out the putty blob on the back of the hole; just ensure the seat for the magnet is nicely shaped and let the putty cure. You can then trim the back smooth and clean it up without fear of distorting the magnet recess.
Once all the putty is cured, glue the magnet in place. Don't forget to make sure it's facing the right way!

Magnetizing the Wrist
With the shoulder magnets finished, use some super glue to lightly tack the ribcage in place and put the wings on. This will allow you to see how the model sits on its base, and where the wings connect to the hand.
The rare earth magnets for the wrist are 1/8" diameter by 3/32" thick, and they will be inserted at an angle of about 45 degrees.
Because the wrist is shaped at an angle, begin by scraping the corner of the wrist bone to create a bit of a flat surface to drill into.
Drill in as deep as possible without punching through the opposite side.
Next, glue the magnet into the hand and use its angle as a visual reference to find the angle to drill into the wrist portion of the wing (it should be about 45 degrees).
Place the second magnet onto the hand and check that the hole is deep enough for it to go all the way in.
Add a small dot of super glue to the end of the top magnet and press it into the hole in the wing. Hold the hand and wing together for a few seconds while the glue sets. Then, carefully pull them apart and you'll have the two magnets positioned at the proper depth. Add a little more super glue to fill in any gaps around the magnets.
And that's all there is to it! With the wing and all the parts together, you can glue the rocks and hands to the base. Then remove the wings and pop the rib cage apart for painting.
The wings can now be placed into a custom tray vertically, and the area taken up by the miniature is 6" x 7" and only 4" high, saving around 280 square inches in your carrying case.
This beast of a model can comfortably fit in the same tray with my Zombie Dragon, Black Coach, and Varghulf. Now to model an appropriate base for him and get painting.
'Til next time!


Great tutorial! I'm not a WHFB player, but your Vampire amry is a thing to behold!
ReplyDeleteThanks, Rob. Really interesting tutorial. Hadn't seen the putty trick to line up magnets.
ReplyDeleteExcellent, I've been waiting for a good tutorial on magnetizing the terrorgheist. Cheers.
ReplyDeleteBest of all, now the Terrorgheist can wave "Hi!" mid-game!
ReplyDeleteYou make it look so easy, Rob. Gonna have to try it out for myself.
ReplyDeleteI mentioned you in my blog :)
ReplyDelete