Making Crates
Here's a quick tutorial on how I build crates using a block of foam, with basswood texture glued overtop. The solid construction ensures that the crates don't run the risk of collapsing during construction or gaming, and the foam keeps them lightweight.

Step 1: Cutting the Foam Blocks
Begin with a section of 1-inch thick insulation foam.
Working from one of the straight, smooth ends, measure out 1-inch increments.
Then, using a snap-off knife and a steel ruler, cut the foam at your measurements.
From there, cut the long blocks into shorter segments. For smaller, flatter boxes, cut the sections in half lengthwise.
Step 2: Coating the Blocks
Use something to hold the block (I've stuck a half-round file into the bottom of it) and apply some Liquid Nails on each surface. Wet your finger and smooth the Liquid Nails over the entire surface. The water will help keep the adhesive from sticking to your finger, but be sure to thoroughly wash your hands with soap and water afterward.
Coating each block this way will allow you to super glue the basswood right to the surface. Why not just stick the wood on using Liquid Nails, you ask? Well, the Liquid Nails takes a little while to dry, and the pieces will slide around. The moisture in the L.N. will also cause the wood to curl slightly.
Super glue alone will eat into the foam without really adhering the wood, and hot glue also runs the risk of melting the foam without creating a secure bond. This is my preferred method for attaching things to foam.
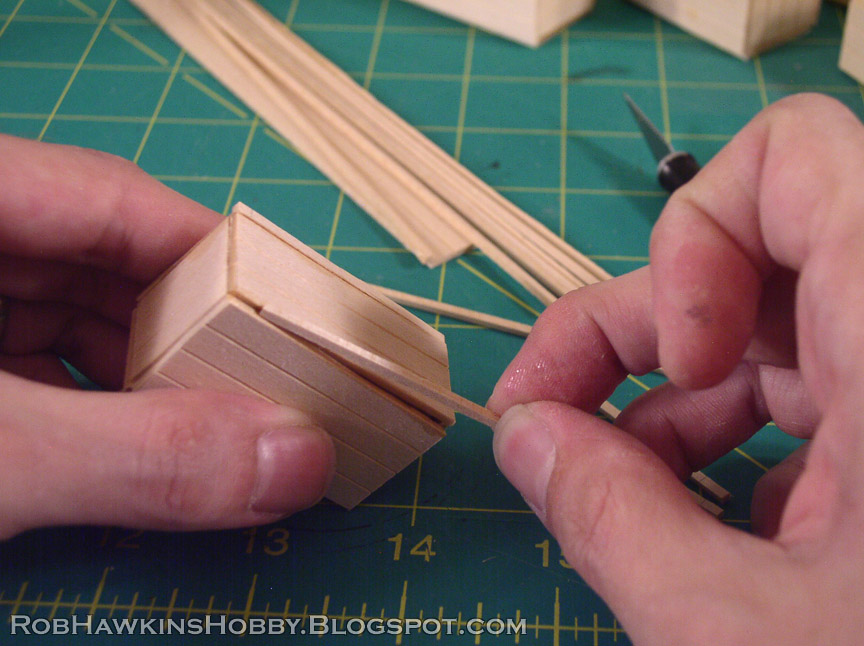
Step 3: Attaching the Wooden Planks
This is where the real work begins. To cover the foam, use basswood. Most hobby shops carry a variety of shapes and sizes, and the pre-scored sheets are perfect, much easier than gluing individual strips. Get the sheet with 1/4-inch planks. You'll also need some 1/8-inch styrene strips (they'll come in later). Each of these is 1/16-inch thick.
Begin by cutting the panel into three one-inch sections, using the grooves as your cutting guide.
Next, cut the long strips into one-inch squares.
Super glue these squares to the ends of the crate.
For smaller crates (like I mentioned above), you can remove sections of the square to fit the height of the crate. If you keep things measured in quarter inches, you can easily use the grooves on the wood as your cutting guide. These two crates are 1/2-inch and 3/4-inch high.
The strips to cover the long sides of the crate need to overlap the wood on the ends, so use the crate to measure out where to cut the panel.
Cut four pieces (one for each side) and super glue them to the crate.
Because the foam is cut to exactly one inch, and the wood is also one inch wide, there will be a slight gap on each corner. To take care of this, cut some thin wooden "runners" from the spare basswood. These runners don't have to be terribly precise, merely cut them around 1'16-inch wide. (I just eyeballed it.)
Trim the runners to the length of each crate. Then run a bead of super glue in the gap and place the runner into it.
Now you have a neatly framed out wooden crate.
Step 4: Building the Metal Straps
Metal straps can be created using the 1/8-inch styrene strips mentioned above. Lay the crate on its side, and mark the crate's width and where the rivet will fall in the center of each plank.
You can make easy rivets using a rotary hand sewing punch. This tool (intended for leather working) will press a divot in ove side of the plastic, leaving a raised bump (our rivet) on the opposite side. Cut the strip and super glue it to the crate about 1/4-inch from the end.
Repeat this to make four vertical strips and then measure the top strip so it overlaps the ones on the side.
There you have it– A wooden crate with metal straps. Because these crates will be glued down on some terrain, I've left the straps off of the bottom so they will sit flat. If your crates will be loose pieces for your battlefield, you can build the straps all the way around and paint all the sides so the crates can be positioned or stacked anywhere.
To add a bit of weathering, use your hobby knife to make some V-cuts between the planks.
Now you can build a pile of cargo for your game table. Perfect for adding detail to factory and shipyard settings, and useful for taking cover from an enemy model's fire!
'Til next time!


Great tutorial!
ReplyDeletePerfect, thanks for sharing! Just the tutorial I was looking for.
ReplyDeleteThanks guys! I'll have to do more short tutorials like this.
ReplyDeleteThanks for sharing, great ideas...
ReplyDeletePhil
Rob,
ReplyDeleteThank you a thousand times over! I have been wondering for years how all of these fantastic crates were made!
Are you going to attend Lock & Load this year? If so, I'll buy you lunch or something... I really can't tell you how much I appreciate the work you do!
You're welcome, and thank you! I'm East Cost now, so I don't anticipate getting to Seattle for a L&L any time soon, regrettably. You can just send me a sandwich in the mail. ;)
ReplyDeleteRob, do you have a guide for painting these (and the similar colored buildings)? I've been toying with some recipes and can't seem to get that old west weathered wood look that you achieve. Seems like a base of dark color (brown/black), heavy dry brush of gray (so that base color still shows through), and then light gray/white for final highlights...that's my guess from looking at the pics, but would appreciate if you could elaborate...
ReplyDeleteSorry for the late reply; this comment must have slipped through the cracks somehow. I don't have a tutorial on painting the wood, but it's essentially just a drybrush of Browns and greys over a black primer coat. I mainly use Battlefield Brown, Gun Corps Brown, Bastion Grey, and 'Jack Bone.
DeleteEs un tutorial fantástico. Muchas gracias.
ReplyDeleteprecioso, me encanta
ReplyDeleteRob;
ReplyDeleteGreat tutorials. I've linked back to five of them as today's modelling picks on the http://HunterValleyLines.wordpress.com website.
Links all point back to your site. Hope that drives a bit of extra traffic your way.
As someone with a youngster getting into Warhammer 40K thanks for the great ideas.
All the best.
Andrew
Thanks for tutorial. Question does the liquid nails dry to a hard coat? Can you coat the foam with liquid nails is my question and does it dry hard textue?
ReplyDeleteThe Liquid Nails dries like a firm plastic. Not rock-hard, so you can't sand it, but it toes get firm enough to paint.
DeleteVery similar to the way I make them but I use a silicone glue called FixIt (most $ stores have it) in place of the two step liquid nails and super glue. Have Nail Polish remover handy when using super glue as it is about the only thing that will unglue your fingers.
ReplyDeletehi
ReplyDelete