

In 2004, GW launched its Warhammer campaign: Storm of Chaos. That was the same year I was working with Jason Buyaki & Chad Mierzwa on the US hobby team. For the campaign, Chad and I were tasked with building a table represening the gates of the besieged Empire city of Middenheim.
Middenheim is a literal mountain of a city– think Minas Tirith, if built in the round, and with miles of bridges and walkways before you even reached the gates. The table Chad and I built focused on the bridge leading up to the city walls at one of the main gates. Basically, the setting for one of the largest siege games imaginable.

Photos were taken along the way (If I recall, Rick Smith was the cameraman, popping in every hour or so to snap a few pics). The entire table took around three weeks to finish with Chad and myself working full tilt on different parts, and putting in lots of overtime.
What follows is a photo journal of the table's construction. I hope you enjoy it and can draw some inspiration & techniques for your own terrain projects!
The Gates of Middenheim
We began with a plywood frame for the table base, bridge, and wall foundation. If I recall correctly, the table was about 5' wide by 4' deep. The walls themselves were fabricated out of foam core. Here, I'm cutting the wall section for the back of the gate house.

The wall features a double gate. The gatehouse interior was one of the first areas to be finished, as once the roof was in place it would be difficult to reach. The Empire Handgunner standing in the gateway gives you a sense of the scale.
Chad and I used brick and stone textured styrene card from Plastruct to cover the walls. For embellishments and trim we used Hirst Arts blocks. The blocks also helped hide the joins between the styrene sheets. (That's Chad's own Vampire Counts fortress in the background.)


Chad built the sides of the bridge...

...and here they are in place as he applies a layer of textured styrene over the castle walls. We went with a double tiered wall because let's face it– no one's getting into this place!
At this stage the cobblestone surface of the bridge was laid down. It's textured wallpaper, affixed with wood glue and then covered with a wash of thinned wood glue to make it a little sturdier. This shot provides a nice view of the wooden table frame.

The gatehouse interior's upper railing came from the Empire fighting platform variant of the old metal steam tank. The banners are all made from thick styrene card, carefully melted with a heat gun to create some folds. Each banner was attached to a dowel with hooks on either end, and hung on the wall via small eye screws.

With most of the card texture in place, we began adding the details. Here I'm building support beams with bass wood strips. Below, Chad is attaching the crenellation with Hirst Arts blocks while I spray prime the gate house interior.


The pink foam was attached with Liquid nails, and then held in place with long screws. Once the adhesive dried, the screws were removed and the foam was carved into the rocky cliffs at Middenheim's feet. Above the foam, you can see the layer of rock-textured styrene forming the stony foundation of the wall.


Here, the foam has been carved, and the gaps filled with wood filler putty. The out buildings are being constructed with foam core.

In this shot, most of the details are in place and the towers have been added. The one on the right is a ruin, with scaffolding for reconstruction. I think I went with that option because I didn't want to build another tower top! On all of the brick face, we added patches of wood filler to create some surface variety and strategically hide any joins or defects.

Most of the details like the tower top, guard rails on the bridge, and windows have been added.
Around the table frame, we applied a thin veneer of plywood, cut to size and sanded. (I'm almost certain we boarded at least one tool or parts bin inside the framework!)

Chad constructed the buildings on the back of the castle with foam core. We also made a 1' wide addition to the table, to allow more space for the fighting to carry on into the city beyond the wall. This was just a flat table, textured with the cobblestones. There aren't any photos of it, unfortunately.


The wolf heads over the doors are the old metal dire wolf heads mounted on 25mm round bases.

In this shot you can see the framework for Chad's buildings, and the added detail below. Basswood, popsicle sticks, textured card, resin windows and plastic model parts went into the construction. The roofs are made from hand-cut shingles as well as shingle-textured styrene card.


The back of the wall, nearly finished.

The entire castle was sprayed with black primer. The sides were left blank, and later coated with black latex paint, like the sides of all the game tables. All of the buildings, and the tallest tower, were kept separate for easy access when painting.

At this stage, it was suggested that we add some extra towers on the sides of the bridge. So we built two towers that would fit over the existing side rails, and then permanently attached them.

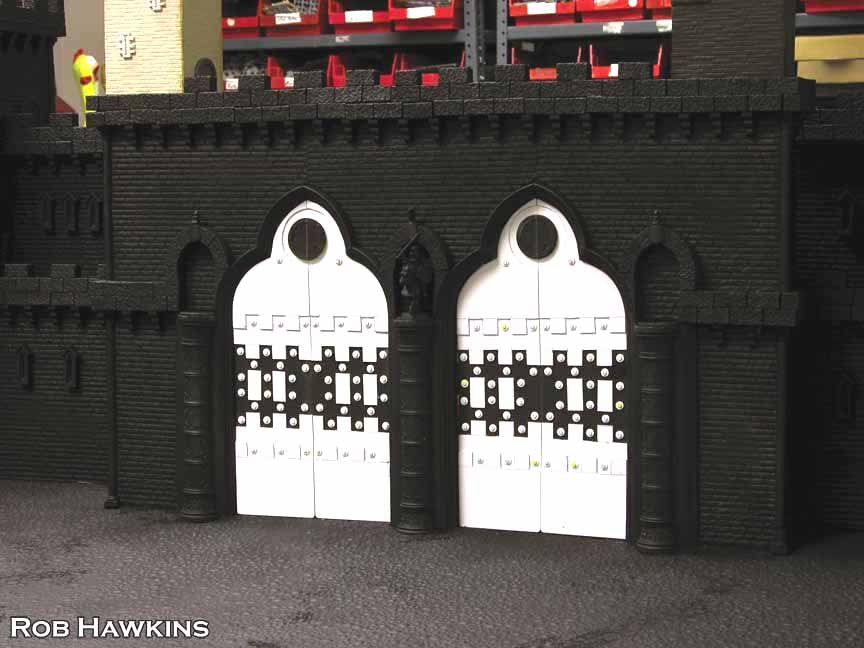
Regrettably, this is the only shot of the doors. I couldn't find one of them painted, or on the finished table. Chad made these with Styrene card and punched out rivets, mounted on foam core.
With the priming done, we laid down a base color using grey spray with a few hits of green and red. When drybrushing, the color shows through a little, giving the stone a much richer tone than if it was just grey.


Here, I'm painting some iconography on a banner. Jason Buyaki lent his talents to the banner painting, as well.

At this stage, the first layer of drybrushing on the bridge, stones, and bricks was complete.

After that came the detail work and weathering, and the table was finished!


Wow... amazing, thank you for sharing! That was a great series of shots.
ReplyDeleteVery very nice, Can i ask how long the building proces was?
ReplyDeleteThe construction took just under three weeks. Painting then took only a few days, since it was mostly drybrushing, and then picking out a few details.
DeleteTruly inspiring, and what a treat to see some of the construction methods the pros use. This was a great read. I love your plog, Rob. Looking forward to whatever comes next!
ReplyDeletebrilliant work...
ReplyDeleteWow, this takes me back. I remember being awestruck when I first saw this in White Dwarf. Thanks for the insights into the construction process.
ReplyDelete