
WWW.SKULLFORGESCENICS.ETSY.COM

Tuesday, February 16, 2016




Tuesday, February 9, 2016
The Return of Korak the Grim, Part 2
Converting the Wraith

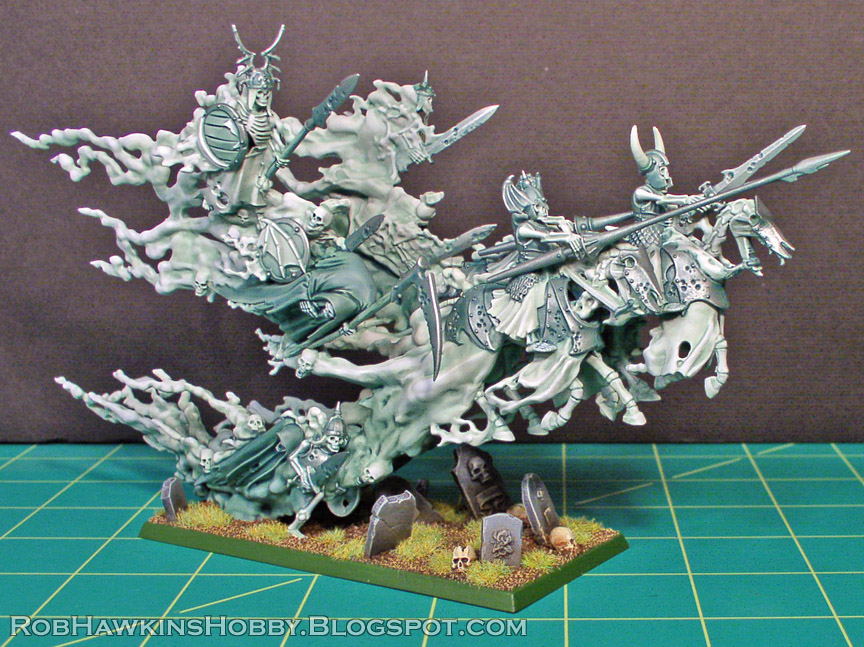
As I mentioned last week, the base model for Korak is this wraith from the Mortis Engine's ethereal swarm:

That wraith is combined with the sleeves from the Corpse Cart's corpsemaster. A plastic skull with the back portion trimmed away is used for the face. At this stage, I haven't yet decided how I'll handle the scythe, other than that I'll add the spirit tail behind the blade. I'm torn between the pitted scythe from the Mortis Engine or the "flowery" scythe from the Empire Wizard kit. Since I first envisioned this conversion, I've imagined Korak with a larger, fancier scythe than the regular rank-and-file wraiths.

I cut the flat portion off of the wraith, and trim the bottom of his robes a little. Where the flat spot used to be, I sculpt some layered robes.


The sleeve is blended into the body with putty. I leave the top of his hunchback a little rough because it will be covered with a second layer for the hood.

The "tail" of the spirit clinging to Korak's back is extended and filled out with more putty to create a base for the model. The spectral cloud continues up under his robes. I also work out the model's positioning on its base. (Although, the base would be changed out later because this one melted under the heat lamp while cooking the putty. It wasn't even in the heat for a long time, only a few seconds, but the base began to warp quickly. The black GW bases have a MUCH lower tolerance for heat than the regular plastic.)

Next, I add the other sleeve and sculpt the wrinkles on the connecting putty.

The hood and shawl come next– a layer of putty over the back, smoothed over and shaped at the bottom. The folds are blended around the neck. The holes are made with a pointed sculpting tool by poking into the putty and pulling down slightly.


The edge of the hood is enhanced with a bit of putty.


At this stage, I notice that there is an indent in the spirit's skull. I think it's part of the attachment point when it fits together with the other parts of the spectral swarm. Either way, it looks odd, so I sculpt over it and added some tendrils that blend into the wraith's robes.

I had removed all the flowers from the Mortis Engine's chassis, under the assertion that nothing would be living in the presence of this much Death Magic. I apply the same principle to Korak, and remove the roses and thorns from the scythe. (I imagine the grass and vegetation withering in his presence as he floats by.) The scythe handle is made from a length of wire, pinned into the scythe head. The hands are from a Tomb King's skeleton, and the wire runs right through them. I leave the hands unglued, and base their spacing and the bend of the handle on the positioning of the sleeves on the wraith.

Once the fit is correct, I glue the hands in place and attach the spectral trail.

I wrap some putty around the wire and smooth it out to create the wooden handle. Some splits and wood grain are pressed into the putty with a knife.

The final step of creating the scythe is to extend the spectral trail with putty, blending it into the blade.


A new base is added and the weapon is glued in place. The last little bit to be added is the hand grip on the scythe, made from a section of a plastic spear shaft. I had planned to add a second handle closer to the blade (scythes usually have 2 hand grips) but, in order for it to be "anatomically" correct, the grip would need to extend up, perpendicular to the blade, and in front of Korak's face, which would look terrible when viewed from the front. It also seems odd to have both handles on the scythe and Korak using neither of them. So, one handle it is! (If anyone asks, Korak will just explain to them how the other handle broke off ages ago, and then murder their soul.)


And that's all there is to it! Now that he's painted, I can't wait to get this guy on the table.
'Til next time!
Thursday, February 4, 2016
The Return of Korak the Grim, Part 1
One of the things I enjoy most about building miniatures for this army is coming up with the story behind my characters and units. One of the first regiments I had built was a block of skeletons, and I painted their wraith champion to match the shield decals. This was the first unit and character I made for my undead army. You can see the history of the army in my post "The Legion of the Infernal Skull: A (not so) Brief History."

In life Korak was a necromancer known for preying on villagers for his grizzly experiments. Eventually, the village elders discovered his lair and slew him, entombing Korak's body in a barrow mound protected powerful spells. The necromancer lord, Nieman Kimmel, discovered Korak’s tomb and released him to serve as his undead lieutenant. Korak returned to the village where he was defeated, and murdered everyone. As The Crimson Reapers, they are now eternally enslaved to Korak and do the wraith’s foul bidding.

Korak the Grim and The Crimson Reapers remains one of my favorite units to this day. I have wanted to update Korak's model for the longest time and now, after a decade of patience and planning, I have finally done it.

This specific conversion has been in the works for the better part of a year. I had been waiting for an appropriate wraith-like miniature to use as the base model, something more imposing than the classic GW wraiths. The new plastic wraith, while larger, isn't really my style of wraith and it's too open on the bottom. I considered models like the Changeling (Chaos Deamons), and the Watcher (Lantern wraith from Kingdom Death), but they didn't fit the bill.
The corpsemaster from the Corpse Cart had some really nice sleeves (and plenty of spare options in the kit). I had used them to make a Curse of Years spell counter, and I could imagine these as part of a larger build with more robes and a scythe. (Check out the post about how I made this counter here.)

I picked up the new plastic banshee and necromancer, and began experimenting with the different parts to kitbash a suitable wraith. Here you can see the banshee's skirt, with the top half of the corpsemaster, the necromancer's cape/ sleeves, and the elaborate scythe from the Empire Wizard kit, which seemed appropriate for a character wraith. These parts sat for well over a year. Every now and then I'd fit them together and consider the build, never quite happy with how it was shaping up.

Then I began working on the Mortis Engine, and this portion of the ethereal swarm jumped out at me:

It had the height I was looking for, and there was room for a skull to fit inside the hood. There was room to fit the sleeves that I wanted to use, and some of the ethereal tendrils would add an element that would tie it to the spectral aspect of my army. I picked up an extra set of the spirits online, and got to work.
These are the parts that went into the conversion: The spirit, the sleeves from the corpsemaster, and a plastic skull.

I took the bit of ethereal smoke from the bottom of the wraith and added it as a trail behind the scythe.

I'll go into the conversion in more detail in part 2, but here's how everything turned out:


'Til next time!
Wednesday, January 27, 2016
Project Log: Morghasts and Dread Abyssal
Morghast Armor
The issue with the Morghasts' helmets has been resolved. I drilled a hole in the back of the skull, aligning it along the angle of the helmet plate.

With a drop of glue, I attached the pin to the helmet. Once the glue set, I covered the pin with a layer of putty.

The putty conceals the pin, and adds a little more stability to the attachment point. Viola! Removable helmets!


The shoulder and chest armor are all attached to a painting stick so they can be sprayed and painted in a single batch.

All that remains is the wings and feet. I'm currently working on a couple scenic pieces to use as perches. The Morghasts' toes will be modified to fit around the perch and the spirits will be removed from the wings.
Dread Abyssal Assembly
Because the Dread Abyssal that Nagash's Mortarchs ride has an anatomy similar to the Morghasts, I am assembling it, so they can all be painted as a single batch. Despite the complexity of this model, it goes together pretty well.
I don't rememer if I've brought it up on this blog before, but I think the days of simply assembling a GW model and painting it as a single piece are over (for the larger ones, at least). There are so many overlapping pieces used to create the depth of detail that it is impossible to paint the visible areas in the interior once fully assembled.

| Undead Seahorse? |
The tail and pelvis and the two body halves will need to be kept separate so I can get at all the little skulls inside.

The legs have three main parts, the interior and the outer covers. Again, the covers need to be left off so the inner skulls can be painted. At the end of the day, I think this model will be in nine pieces when I paint it, and that's not even counting the spirits, heads, armor, and rider.

One neat feature is that the forelimbs of the monster offer a lot of posing options. The upper arm attaches with a peg which allows the shoulder to rotate...

And the elbow joins are a working hinge.
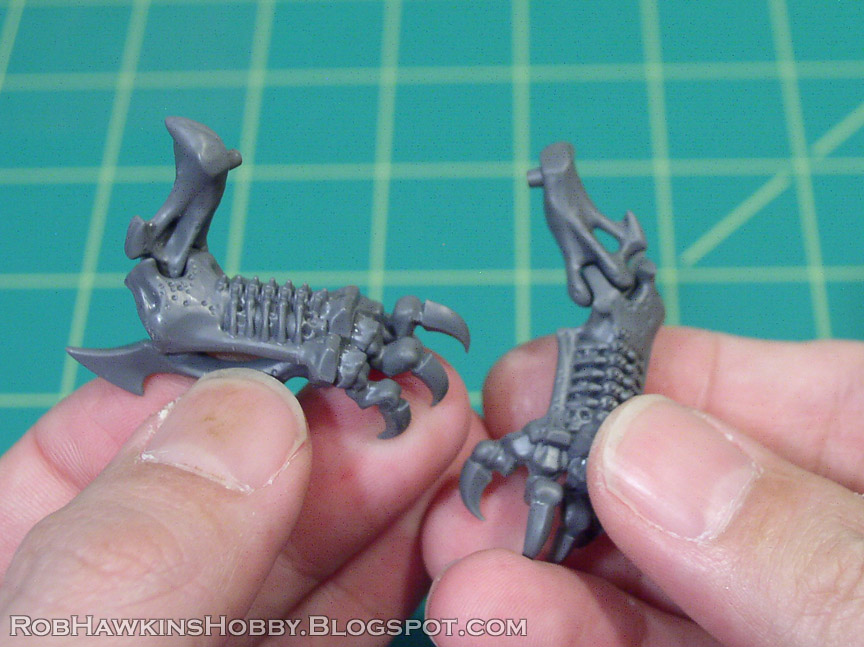
So, even though the monster's back legs are locked in a single position it's front legs can have a wide range of poses, and it looks like the head can swivel a bit on the ball-and-socket joint. If you're fortunate enough to have three kits so you can field all three Mortarchs, you can make subtle changes in the pose so they don't all look like they're riding identical monsters.

I'm still debating how to attach this guy to his base– whether to use the spirits he comes with to hold him aloft, or to use some gothic scenery as a monster perch. I guess we'll see how things shape up as the project continues to evolve.
--Til next time!
Subscribe to:
Posts (Atom)