The mesas were part of a larger project– one of two 2' x 2' demo tables for Outlaw Miniatures. For the full range of detail shots, check out the Wild West Exodus Terrain gallery. Here are a couple of highlights:
Mining Camp
This was built on a GW Realm of Battle board section. All of the skulls were covered, and the sand texture was added using "play sand."
The mine cars were scratch built using sheet styrene, L-strips, and my good ol' sewing punch for rivets. The cart is glued atop model railroad wheels.
The miner's shack was made much the same as the other Wild West Exodus buildings– Foam core with basswood strips glued overtop.
You've seen the tutorial on how the crates were made; here they are, painted.
Warrior Nation Settlement
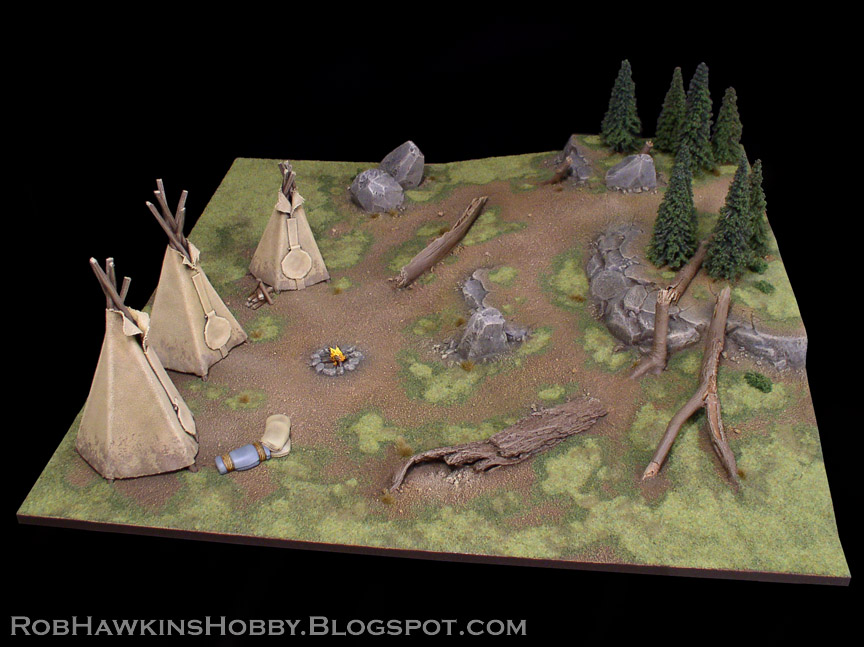
This one is also built on a Realm of Battle board, which is apparent from the rocky hillside.
The skull-filled crevices were covered with wood filler, and extra details like the foam rocks and fallen logs were added.
The organic components like the tree bark and sticks were coated with a layer of wood glue to prevent them from falling apart.
To make the trees removable, I drilled into the table base and glued a styrene tube in place with a magnet at the bottom. Each tree's trunk was then inserted into a smaller tube, with a magnet glued just inside the end. The tree then pegs into the table, and remains secured by the magnets.
The Tepees are constructed from basswood dowels, with fabric super glued overtop. The fabric was coated with thinned wood glue to harden it, and then the doors and front seams were attached.
Like the trees, the tepees are magnetized and removable. The blanket and grain sacks were sculpted with Aves epoxy sculpt. I was even able to put my renown flame-sculpting abilities to work on the campfire!
These tables will be in the Outlaw Miniatures booth at Adepticon. If you're at the show, stop by and check them out (maybe get a demo of Wild West Exodus, too).
'Til next time!
Last week, I showed you how to model desert mesas. This time I'll cover painting and adding vegetation to finish off the terrain.
Painting
The mesas are painted fairly simply using three main colors and a dark brown wash. For reference I'll compare these colors to Formula P3 Bloodstone, Moldy Ochre, and 'Jack Bone, but use a latex paint that closely matches the color rather than actual miniatures paint (unless you want to empty twelve pots of paint to cover the terrain).
Step 1) Start by painting the entire surface of the ground and mesas with Bloodstone. The latex paint will help seal the foam and add a little durability.
Do your best to get the paint in all the nooks and crannies, but a few exposed pink areas are going to be inevitable. This will be addressed in the next step.
Step 2) Mix a wash of P3 Brown Ink, Armor Wash, Battlefield Brown, Mixing Medium, and water. Paint this over the surface of the rocks, making sure to get it in all of the recesses. Blot the wash off the raised surfaces with a paper towel to avoid darkening the color too much.
Where the base of the mesa meets the ground, apply some wash, and feather it outward with a wet brush to create a blend from dark to light. After the wash has dried, give the piece a look over to make sure there are no "bald spots" left in the recesses. If there are, paint more wash, or Battlefield Brown directly into the spot with a smaller brush.
Step 3) Now drybrush over the entire piece with Bloodstone again to recapture the color. I use a 3" brush for a majority of the drybrushing, and a 1" brush when working in tight areas.
Step 4) Next, drybrush the terrain with Moldy Ochre. Go a little heavier with the paint on the ground (but still keep it dry to avoid streaks and brush strokes). Normally I'd say to not worry about any imperfections in the ground painting because you can cover them with static grass or flock, but the desert will be pretty sparse of vegetation, so the ground painting needs to stay clean and controlled.
Step 5) Finally, drybrush everything with 'Jack bone. Brush over the rock faces using a downward stroke to keep this final highlight mostly on the top edges.
Desert Vegetation
To add a little color to this desert scene, use Woodland Scenics "Medium Green" static grass.
Step 1) Apply the grass by first painting in some patches of wood glue thinned with a little water.
Step 2) Sprinkle the grass generously over the glue patches and press it down gently with your hand. Pressing the grass will ensure that it penetrates into the glue and you'll get a nice, thick patch of grass.
Step 3) Once the glue has dried, shake off the excess static grass. Be sure to collect it up to use again. Then, attach some shrubs. (I prefer Woodland Scenics' "foliage clusters" over their "clump foliage." The clusters provide larger chunks of foliage from which you can tear off appropriately-sizes pieces. The clump foliage tends to be more crumbly, and falls apart easily.) Simply tear off a piece and attach it with a dot of super glue.
Step 4) Drybrush the grass and shrubs with Moldy Ochre.
Step 5) Add a final drybrushing of 'Jack Bone, and the vegetation is finished!
Desert Trees
The dead trees are made from Woodland Scenics plastic tree armatures. Trim some pieces and bend them into shape. Using double-sided tape, attach the trees to a stick and prime them black. Then give them a dusting with Model Masters sprays Light Earth and Panzer Grey.
Select a drill bit that matches the diameter of the tree's base, and drill a hole in the table.
Apply super glue to the base of the tree and press it into the hole. (Note: if your table base is plastic or wood, super glue will work fine. If the table is made from foam, use hot glue or Liquid Nails to attach the trees so the super glue doesn't dissolve the foam.
And that's all there is to it! These techniques can be applied to free-standing modular mesas and would be perfect for wild west scenery, or post apocalyptic "Mad Max" style terrain. (Looking at you, Ork Speed Freaks!)
'Til next time!
Given the time crunch I'm usually under for the terrain commissions, I don't know if I'll get to post another start-to-finish project journal like I did for the Wrath of Kings diorama. The idea of posting a series of short terrain tutorials appeals to me, and there was some positive response to last week's crate tutorial. So, here's another one recreating the style of mesa that I used for the Wild West Exodus table.
Start with stacks of 2-inch insulation foam. Stack them as high as you like for your mesas. When attaching them, use a bead of Liquid Nails construction adhesive around the edge, and some hot glue in the center. The hot glue will provide an immediate bond so you can work without the foam pieces sliding around. Once the Liquid Nails dries (usually overnight) it will create a more permanent bond.
To texture the rocky surface, begin by making horizontal cuts in the foam about 1-inch deep using an extendable knife. Vary the spacing between cuts and angle the blade to make some V-cuts in a few places.
Then, pick at the foam to pull out chuncks and vary the surface.
You can also make some vertical or diagonal cuts to make pulling the foam apart a little easier.
Work the surface to get a nice mix of raised and recessed stones.
As you approach the top, make the horizontal cuts deeper so you can crack off portions of the foam and create some stepped, flat stones.
Here, the stonework is just about finished. The horizontal seams between the pieces of foam have been obscured among the layers of stone cuts, but the vertical seams where the pieces butt together are still visible.
To camouflage the vertical seams, cut a deep section across the seam and pull out a piece of the foam.
Get an appropriately sized piece of foam from the off-cuts and glue it in place so it straddles the gap.
Do this along the length of the seam until it blends in with the rest of the mesa's surface.
Finally, rub your hand gently over the surface to knock off any loose pieces of foam. Any bits that fall off wouldn't have stood up to vigorous drybrushing. Better to get rid of them now than in the middle of painting.
To make freestanding mesas, the same techniques apply. Just stack the foam, and make the cuts all the way around.
When texturing the table with sand and gravel, add some to the tops and "shelves" of the mesas.
'Til next time!