It's been a while since I've had a long scenery build, or played a new game for that matter, and Demon Ship by Black Site Studios gives me the opportunity to do both. Follow along as I scratch build a small game board for this solo-play micro game!
Demon ship comes in a small box with a rulebook, a token sheet, and a sprue of miniatures. If you want to see a rundown of the game itself, check out Witty's YouTube channel Wittle Goblin and her playthrough with the game's creator Malev. (I've taken a quick look through the book, but haven't read all the rules yet; I'll make sure to do a full battle report once I've finished the terrain and miniatures.)
The miniatures are 3D printed on a single frame and they look really nice with sharp detail. some 25mm bases were included, but I'm going to base them on my Skull Forge Scenics Industrial Bases.
The (I'm assuming resin) material the figures are printed in is pretty flexible, almost rubbery, so there is a little "give" to the figures, making them a little more resilient. Although, I did press my luck bending the Survivor's gun arm too far, and snapped the gun off of his hand. It stuck right back on with super glue, though, and is no worse for wear.
The Survivor miniature comes with the option to either have a bare head or wear a helmet.
The whole gang went together quickly, and there were very few support pock marks to clean up– These are some pretty tight prints, and I'm looking forward to painting them!
The game is played on a 6-inch by 6-inch board, with a set number of elements like walls, doors, and crates that can be set up in different room configurations. Black Site Studio sells a kit of MDF terrain for the game, but I wanted to scratch-build my own.
The primary material for this build is sheet styrene in a few different thicknesses:
I'm going to build the ship to match the aesthetic of my Skull Forge Scenics industrial bases, and to achieve this I'll be using some bits from the bases themselves, salvaged from some of my miscasts. I've also got some 40K and Necromunda accessories and objectives that I'll try to incorporate as the crates and computer consoles.
But that's getting ahead of myself– First things first.
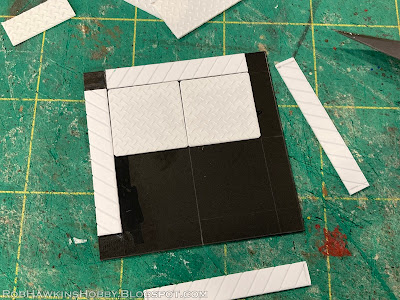
I measured out a grid of one-inch squares on a piece of 1mm styrene and added a border all the way around for a perimeter of caution stripes. I'm still working out what the floor details will look like, and I need to order more magnets so I can magnetize each square, allowing the room elements to stick in place, so I put this aside for later.
To make the caution stripes, I marked out some strips on .75mm styrene, and drew a grid of diagonal lines through them.
I went over the diagonal lines with a Tamiya plastic scribe...
...and then the rows were cut apart, leaving me with several uniform strips with the caution stripes etched into them.
The first complete component I built was the two-inch platform. I cut out a piece of 0.75mm styrene for the top, and used Plastruct diamond grid textured styrene to make the floor tiles.
I attached two sides of the caution stripes first, and used them as a guide to trim the shape of the textured card.
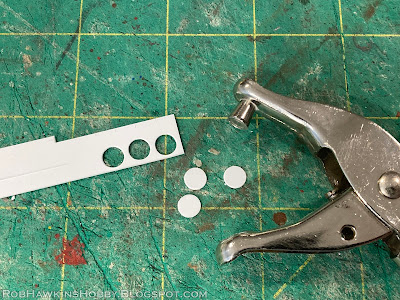
To decorate the corners of the platform, I used a hole punch to cut some circles out of 0.75mm styrene.
These were glued onto another layer of 0.75mm styrene...
...and drilled out to accommodate a large bolt made from styrene hex-rod. When drilling the holes, I started with a small drill bit, and used successively larger bit sized, up to 1/8-inch to slowly widen the hole and make sure the plastic didn't torque or tear. I cut the piece of card a little large so I could align the inner corner, and then trim the excess off of the outer edge.
The bolts were cut from the hex-rod and glued into the holes, trimmed so they would be flush with the surface.
For the detail on the sides of the platform, I cut some pipes from one of my 40mm resin bases. The width of the pipe channel and the deck plate determined the height of the platform. I trimmed the components and squared off their ends.
For the corners of the platform, I used 1/4-inch L-strips, trimmed into a sort of "T" shape. These were glued in place flush with the edge of the surface and sanded to create a smooth, seamless join.
Then I used square tubing to fill out the corners and fit the resin pipes into place. One thing I needed to consider was that the walls and platform often but up against each other in the room layouts, so I couldn't have any elements stick out beyond the plane of the two-inch square. I'll have to be careful and check the fit of everything as I proceed with this project.
I used the deck plates, trimmed to fit the unique shape, to cover the join between the resin bit and the styrene.
On the opposite corner, I added some square rod and another deck plate.
With the platform built, I trimmed up the bottom as best I could and sanded the underside to make everything smooth and level. (I used wet sanding to keep the resin dust to a minimum.)
The platform would work fine as-is, but I need to add magnets in the bottom. So, I cut a piece of 1.5mm styrene to fit in the recess underneath, and super glued it to a piece of .5mm styrene. I also added some foam core board to fill in the rest of the gap inside the platform.
The platform was glued down over the card, and once the super glue had dried, I carefully trimmed the edge of the card to conform to the shape of the platform, and marked out the position to drill out holes for the magnets.
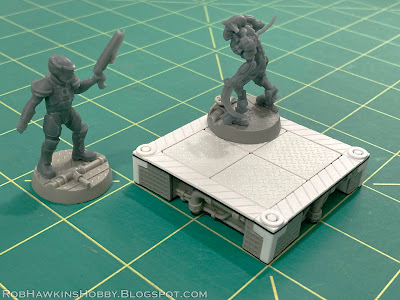
Here's the completed platform:
I've picked up the magnets I need, so now I have to finish up the floor for the platform to stand on.
'Til next time!


.jpg)


Thank you so much Rob, thanks so much for picking up Demon ship. I can already tell this is going to be masterful!
ReplyDeleteThank you, Malev! This looks like a fun game and I'm looking forward to playing it!
DeleteThat looks like the start of a very interesting build. Thanks for sharing. Its nice to see a mix of 3D-printed and scratch-built parts. The existence of ready to slap-paint-on stl's has been making me lazy lately, I should start a fresh project of my own.
ReplyDeleteThanks! The resin parts aren't 3D printed, though– All my bases are hand sculpted and resin cast (and then cut up to use in this project).
DeleteThanks for showing us in detail how you go about this, I always feel like I learn something or see some interesting techniques.
ReplyDeleteThank you! :)
Delete