Lair of the Boneripper, The Second Attempt
After Selketta met an untimely fate at the hands of the Boneripper, I decided to take another crack at the Solo Campaign with a new hunting party:

Check out my previous post: Solo Campaign Battle Report: Lair of the Boneripper. I made some changes to GW's Troggoth Slayers campaign to accommodate my available miniatures, swapping the Troggoths for Skaven monstrosities led by the Boneripper. (My first battle report explains the changes).

The initial attempt to slay the Boneripper didn't go well for my first hunting party– They made it to the final battle, but never returned.
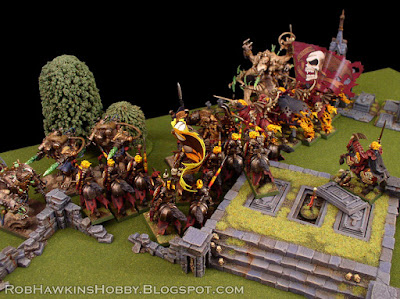
The hunting party for this second attempt is led by the Wight King Oren Koth, riding a skeletal steed. Under his command is a "regular" unit of 10 Black Knights, the Hellfire Knights and an "elite" unit of 5 Blood Knights, the Crimson Inferno, led by their champion Viktor von Harkon. The game plan is to strike fast and hard, eliminating each enemy unit one at a time. In the second scenario, the high-speed cavalry should allow me to cross the field quickly. For their allegiance, I've chosen Grand Host of Nagash.

Battle 1: The Treasure of Strangleweed Swamp (aka: The Treasure of the Soggy Cemetery)
In the center of the battlefield is an open grave containing an ancient relic that will help Oren Koth in the fight to come. I'm using the same rules for the Troggoth campaign, but assuming that the graveyard is flooded, and that the Murky Swampland rule represents the restless dead grasping at my hunting party through the soggy earth if the models are not on the center hill or the mausoleum bases.

Because of the size of the units, there is no chance of fitting the black knights onto any scenery to keep them out of the soggy earth, so I'll get them into combat as soon as possible, and keep the wight king on the center hill near the objective.

Round 1
I win the roll for first turn and have the wight king use his Lord of Bones command ability on the black knights to grant them an additional attack. As the units move forward, the blood knights suffer one mortal wound from the soggy earth. Oren Koth takes his position on the center hill and both units charge.
The blood knights of the Crimson Inferno are the first to attack– One of them slays a rat ogor, and the rest attack the hell pit abomination, inflicting 6 wounds. The stormfiends attack next, targeting the hellfire knights. The multiple damage of their attacks is devastating– 3 knights are killed by the grinderfists, and one more from the shock gauntlets. Two of the black kights attack the rat ogors, but the rats' armor protects them. The rest of the Helfire Knights strike at the stormfiends, inflicting 6 wounds with their lances, which are allocated to the stormfiend wearing warpstone-laced armor (granting him 7 wounds), and an attack from their steeds finishes him off! The rat ogors and hell pit abomination put everything they have into the blood knights, killing four of them! Only the champion Viktor von Harkon survives, and he heals one outstanding wound with their "hunger" ability, because the unit slayed an enemy model during the combat.
During the skaven turn, the stormfiends "hold' but the rat ogors "rampage" allowing them to fight immediately! They kill 3 more black knights, and I pull the casualties closest to the stormfiends, keeping them from being able to fight in the combat phase. The hell pit abomination, however, is "spooked!" After taking such a devastating blow from the wall of cavalry, the creature thought it was best to get out of there– It must retreat, and if it cannot, then it is slain. I roll for the abomination's 2D6 random move, plus an extra dice for running and barely came up with enough for it to get clear of the remaining blood knight, squeezing itself between the two mausoleums.

In the combat phase, the rat ogors finish off the remaining black knights.

Yeesh! This hunt might be over before it even begins! Only the Wight King Oren Koth and the blood knight champion remain.
Round 2
Fortunately, I win the roll for first turn. Oren Koth uses his command ability on himself as Viktor retreats and runs as far as he can. Then, Oren moves around to the rear of the hell pit abomination and charges, suffering a mortal wound from the soggy earth. The wight king's attacks score one normal hit and a 6 which results in a "beheading strike" for D3 damage– and I roll a 1. So the abomination suffers 2 wounds. The beast unleashes its avalanche of flesh, and inflicts a mortal wound to the king, and does 2 more with its gnashing teeth.


In the Skaven turn they all hold, and the hell pit abomination finishes off the wight king.
Round 3
The skaven go first this round, and they all hold in position. Then Viktor moves behind and charges the abomination, slaying it and healing himself completely with his hunger ability.

Round 4
The blood knight gets to move first, and steps up onto the mausoleums to avoid the soggy ground. The objective is in sight, but any hope of recovering the artefact is slipping away. The rat ogors hold position and shoot futilely as the stormfiends advance behind them.

Round 5
Viktor maintains his position, hoping to lure the skaven away from the artefact, but the rat ogors charge and despite only being able to fit one model between the mausoleums, kill the vampire.

Not a very good start. We failed to recover the artefact, and in the after-battle suffer 1 blood knight casualty and lose FIVE black knights! The event roll however, results in "Ghyranis Wellspring," so we are able to resurrect 3 of the black knights.
Battle 2: Clash at Blackrock Pass (aka: Clash Amongst the Crypts)
For the second battle, the entrance to the catacombs where the Boneripper has made his lair is at the far end of the board, but more Skaven monstrosities stand between Oren Koth's band and their goal.

I'm starting to think that maybe the hell pit abomination should be the main boss instead of the Boneripper! I need to get my party out of here before I lose any more troops.

Round 1
The mistake I made last time was engaging everything at the same time and charging when I had the first turn, robbing myself of the potential for a double-turn fight. This time, I bank the wight king's command point to save for increasing my run rolls, and maneuver my units without getting too close.
The stormfiends and abomination hold, but the rat ogors move and charge, killing 4 of the black knights! The knights only inflict 2 wounds in return.

Round 2
The skaven win the roll for first turn, but the roll on the action chart for the rat ogors results in "spooked!" So they retreat back up the field. The other units advance and run, closing off my avenues of escape.

There's still an opening in the middle, so the wight king banks his command point again to use for run rolls. The blood knights roll a 6 to run, but can't fit through the gap between the rat ogors and hell pit abomination while staying outside of 3" of either unit, so they run to the side instead to keep as far from the abomination as they can. The black knights charge the rat ogors, as does Oren Koth, who needs to use a command point to re-roll his charge. needing a CP to re-roll the charge. The pitiful attacks from the knights only inflict 2 wounds, and the rat ogors then wipe them out. (That -1 rend and 2 damage just cuts right through the knights' armor and every attack that gets through kills a whole knight!) Oren Koth does his best to avenge his fallen comrades, but only inflicts 2 wounds. At the end of it, only a single rat ogor has been killed!
Round 3
In the skaven turn, the rat ogors and wight king continue their struggle, the ogors inflicting 2 wouds, and the king inflicts one, which still doesn't kill the second rat ogor.

In my turn, the blood knights run, but even with the wight king's command point allowing them to run 6", they still can't make it close enough to leave the battlefield. The wight king, however, makes it to the edge, and escapes.

Round 4
In the fourth battle round, I win the roll for 1st turn, and the blood knights run off the field. Since the general has made it off the battlefield, we win a major victory, but it was a lucky escape.
After the battle, 3 black knights become permanent casualties, leaving me with a 5-man unit. On the event table, I roll "Lost in the Woods" (aka, Lost in the Catacombs), which means I won't generate a command point in the first battle round of the final battle. Because I won a major victory, I select the command trait Chosen Champion for Oren Koth, granting him +1 damage when attacking enemy heroes, which will come in handy when fighting the Boneripper.
Battle 3: Wrath of the Troggoth King (aka: Wrath of the Boneripper)
The stage is set for the final showdown in the catecombs. My remaining force is deployed in the center of the battlefield.


Round 1
I don't generate a command point this round, so I have my entire force run over to the unoccupied corner. The skaven units hold, and the hell pit abomination advances.

Round 2
No sign of the Boneripper yet, but I get to go first. The wight king uses his command ability on the black knights, who charge the stormfiends. The knights lances strike true, inflicting 10 wounds, but the stormfiends' armor deflects every single one! Orin Koth failed his charge, so he doesn't get to contribute to the fighting. The stormfiends roll terribly for their attacks, but still manage to kill one knight.

In the skaven action phase, I roll "spooked" for the stormfiends, and since they are surrounded in the corner with nowhere to retreat, they are destroyed! The hell pit abomination is dumbfounded by what just happened, but the rat ogors advance toward the blood knights.
Round 3
I roll to see if anything emerges from the lair– a 2, so no new units appear, and there's no sign of the Boneripper. The skaven take the first turn and the hell pit abomination holds. The rat ogors move and attempt to charge the blood knights, but roll a 5, which is not enough to reach their target.
In my turn, I have the wight king hold his command point, and move my lines to prepare for a charge with the blood knights.

I only roll a 5 for the blood knights' charge distance. Their hornblower allows them to charge at least 6" which is enough to get all but one into a position whee they will be able to attack. I spend the wight king's command point to re-roll the charge, but only score a 4, so the Crimson Inferno charges 6" and leaves room for the wight king, who (thankfully) makes it in to fight alongside them. The knights inflict 9 wounds, killing 2 rat ogors. The ogors retaliate, causing 6 wounds, but the knights make 5 of their save rolls, so they only suffer a total of 2 damage (from the ogors' 2-damage attack profile) and they heal one wound with their "hunger" ability. The wight king Oren Koth connects with all his attacks, and inflicts enough damage to kill another ogor.
Round 4
Nothing emerges from the catecombs. In my turn, the wight king banks his command point and retreats over behind the black knights. The blood knights stay in the fight with the remaining rat ogor, but fail to inflict more than 2 wounds. The rat ogors score 2 wounds in return, which is enough to kill one of the blood knights. In the skaven turn, both the rat ogor and hell pit abomination hold. The rat ogor does 2 wounds to the blood knights, but the blood knights kill it and heal one of those wounds.

Round 5
No sooner had we killed the rat ogors, another group emerges from the caves!

The skaven move first, and the rat ogors charge and kill the remaining blood knights! The wight king banks his command point and uses his invocation ability to resurrect one black knight. Then the entire group moves over to the corner, trying to stay as far from the enemy as possible.

Round 6
The Boneripper emerges from his lair! We go first, but I don't want to repeat my mistakes from the first battle. I'll hold out until I can go second in the round, allowing me the potential for a double turn, or at least denying the skaven two turns in a row. Oren Koth banks his command point (he's up to 3 now). The skaven units hold in their action phase, the rat ogors are dumbstruck, probably reveling in the destruction of the blood knights.

Round 7
The skaven move first– The hell pit abomination and the Boneripper hold while the rat ogors advance and run toward the black knights. It's now or never– Oren Koth spends 2 command points to use his Lord of Bones command ability on himself and the knights, granting +1 attack, and everyone charges the Boneripper. At the start of the combat phase, Oren spends 2 more command points to use the All Out Attack command ability on himself and the knights, allowing everyone to re-roll 1s to hit, and it's a good thing he did, because out of 16 attack dice, the black knights rolled EIGHT ones with their lances! The re-rolls hit with all but two. The unit rolls 10 wounds and the Boneripper's armor saves 4 of them. Because the knights had charged, the 6 wounds that get through do 2 damage each. The Boneripper's Protection of the Horned Rat negates 3, bringing him down to 5 remaining wounds. Then the horses manage to get 3 wounds through the behemoth's protections, bringing down to 2 remaining.

I positioned my models so that the knights would be the closest target, and the Boneripper atacks them next. Its warpstone braziers hit twice but fail to wound, and its crushing blows are down to 2 attacks because of all the damage it has suffered, but the beast still manages to kill one knight. Wight king Oren Koth attacks next, getting only 1 wound through the Boneripper's protections, however, his loyal steed stomps on the downed beast, inflicting the final wound that slays the might behemoth!

|
VICTORY!
|
The wight king Oren Koth and his remaining Hellfire Knights emerge from the catacombs, victorious. With the Boneripper slain, the skaven infestation has been dealt a fatal blow and the remaining beasts are easily hunted down and exterminated. The remains of the fallen blood knights and the tomb king Selketta are returned to their proper burial chambers where they begin their restorative slumber. It will not be long before they once again stalk the land if the living, and the Skaven will pay a terrible price for the damage they have wrought!
Overall, I think the Skaven-themed game plays pretty well. I've been playing it on "hard mode" with three Skaven units in each game, and every game was hard-fought– right where it should be. I was considering assembling a Skaven hunting party to go in and clean up their mess, but I might save the Skaven for the other solo campaign Glymmsforge Catacombs. First I need to finish up a few Grimghast Reapers and a Spirit Torment before I will be able to play. I might even build a small catacomb chamber for the playing area. We'll see how things shape up.
'Til next time!


No comments:
Post a Comment
All comments are moderated. Any comments containing links will not be approved and will be marked as spam.