Ghastly Reinforcements
With the core of my Nighthaunt army finished, It's time for some reinforcements– Grimghast Reapers and Myrmourn Banshees, and I'll show you an easy way to prep the banshees for painting in sub-assemblies.

Grimghast Reapers
I picked up another box of these, so I can round off the batch from my Soul Wars starter sets to a whole number. I've got 20, plus a spare that I can use to replace the bell ringer and combine the two 10-man units into a single unit of 20.

While the Nighthaunt models paint up fairly simply, a lot of extra work goes into the assembly because every model has a seam across its back that needs to be filled with putty and smoothed.

I added sand and skulls to their bases, and as of writing this, all the The Grimghast Reapers have been primed and are officially in the painting queue.

Myrmourn Banshees
These models gave me a little pause, because they looked more complicated then they actually are. I was dreading the multi-layered paint job, and wondering how much sub-assembly I would need to be able to paint them properly.

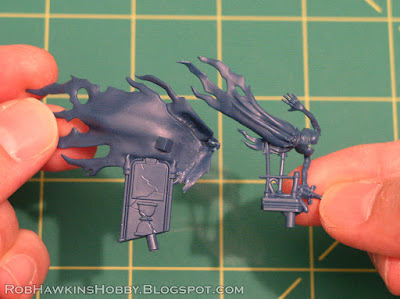
As it turns out, each banshee can be built as two parts (three, if you count its base). The hood and cloak can be glued together, and painted as a single piece. Then the body is also its own separate piece.

Both components have a peg on the bottom that can be used as an attachment point for painting.
Once the painting on each part is finished, the body can be glued into the cloak, with no visible seams. Then the model gets pegged into its base, which was also painted separately. Easy-peasy!

The Myrmourn Banshee bases were fully modeled like the Glaivewraith Stalker bases, so I needed to rework them to match the rest of my army. I'm a stickler for matching base themes, and don't like having some bases in an army with sculpted leaves and roots tangled everywhere, while the majority of units came with blank bases and therefore are only textured with sand, grass, a few skulls, and tombstones.
I've also never been a fan of modeled plastic vegetation. I like my grass to be fibrous static grass, my leaves to be clump foliage, etc. So, all the roots, stumps, and leaves have been scraped away and those spots have been covered over with sand and ballast that will match the rest of the army.


The model with the big tree stump gave me the most trouble. There's a piece of the log (highlighted in red) on the figure that I needed to leave in place for stability. The body would only have two thin rails holding it up otherwise. Once the figure is painted though, I'll be able to trim away that log and touch up the cuts and everything will be fine.

For painting stands, I used my trusty 1 1/4-inch dowels. I drilled holes in the top to fit the pegs, and lightly glued them in place. Each sculpt is paired up, so that I can paint all the matching details at the same time. The bases are all affixed to a painting stick so I can prime and paint them in a single batch as well.

My goal is to not let these linger on my painting shelf for too long. I still have six half-painted Spirit Hosts that I've been neglecting since 2018 that I need to finish first. Once they are out of the way, it's on to these reinforcements!
'Til next time!


I've just painted four of these myself and thought they were excellent models - really well designed. I kept the scenic bases, but I'm impressed at how you've removed a lot of the scenery without damaging the miniatures. Looking forward to seeing them painted!
ReplyDeleteThanks! Yeah, the poses on them are really dynamic.
DeleteYou got bitten by the mortal realms bug too eh?
ReplyDeleteYup, At least– I've found a way to carry my army's story forward into the AoS.
DeleteThis comment has been removed by the author.
ReplyDeleteKathybluetn said...
ReplyDeleteHi. I am into miniatures and much appreciated your post on styrene tubing. I have a question unrelated to this post which I hope you don’t mind me asking. I need two 24” Styrene strips. I’m on the Evergreen site, and I can only find them in packs of 14. Is there any way to buy individual pieces, instead of a whole pack? I know this is probably a dumb question, but I’m poor. 😊
Sorry, I don't know if they sell them in smaller quantities.
DeleteThanks for the reply! I decided to just shorten the staircase instead. Thanks again for the tutorial on the tubing. It seems everyone wants Victorian dollhouses, but I want a modern one
Delete