Tools and Techniques: Making Rivets
I've been posting terrain tutorials for a while, but one of the things I tend to gloss over are the specific tools, and how they can be used to achieve different effects. There are also techniques like making foam stones and bricks that really deserve their own dedicated post. This is a new tutorial series called Tools and Techniques. Each post will focus on one tool or technique and how I use it in my scenery building process.
This week:
Making rivets with a Rotary Hand Sewing Punch

The rotary hand sewing punch is a tool designed for leather working, and it's normally used to punch different size holes in leather. There is a company called Tandy Leather that sells them, and this little tool has been invaluable when working with plastic card.
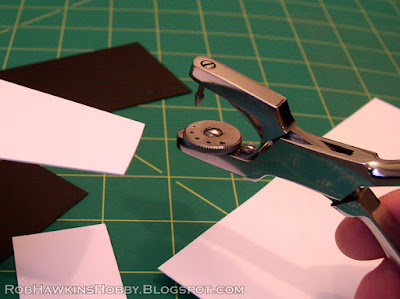
The punch has a dial with different sized holes, and a sharp "tooth" that presses down to punch holes in leather or whatever material you happen to be working with– styrene plastic card in our case.

With the right amount of pressure, the tool can be used to press a divot into the card, leaving a raised "pimple" on the opposite side.


Punch a row of these and you've got instant rivets.


It takes a little practice to get the "feel" for the amount of pressure, and that varies depending on the thickness of the card (I've gone up to about 2mm thickness on the card).
The tooth is also very sharp when brand new, so it might need to be filed down a tiny bit to keep it from poking all the way through. *Experiment with the fresh point before taking a file to it; it may only be a matter of letting the point wear down naturally, or filing just a touch to eliminate the sharpness of the point. You don't want to shorten its tip.
The larger holes can be used to make larger rivets. I mainly stick to the first three, and only use the larger hole in thicker card. Sometime the rivet will split, which is a neat effect because it looks like a screw rather than a rivet. It's difficult to get it to split like that consistently though.

One drawback is that the reverse of the card has indented divots where the rivets are, so this is best used for plates that will be attached to another surface. Or, you will need to attach something else to the back of the card (a beam or another plate) to cover the holes and represent what the plate is riveted to.

This technique is really effective for making sheet metal roofs, and putting all of your card scraps to good use as bolted-on armor plates or patches.


I usually just eyeball the spacing of the rivets, but if precision is need, they can be measured out. Start by drawing a line where you want the row of rivets...

...then mark out the spot for each rivet at measured intervals.

Then you can punch precisely spaced and aligned rivets.


Some of the most common uses are for metal strips and corner framing. For straight pieces, I'll use a 1/4-inch styrene strip, and punch a row of rivets.

For the corners, I'll use styrene L-strips (3/16", 1/4", or 3/8") and punch the inside of the corner so the rivets are on the outside.


If you need an interior corner, you can do the reverse:


The brackets on the ladder are also made using L-strip, cut small and punched with the smallest rivet size:

You can even punch rivets around the rim of a model's base. Just punch the inside of the base to pop a rivet on the outside. You just need to take care not to crack the lip, and watch your spacing as you complete the circle so the first and last rivet aren't too close or too far apart.


I hope this article has given you some ideas that you can put to use in your own scenery projects. Say goodbye to the days of hand-gluing individual rivets cut from styrene rod all over your terrain, and use that time for more painting and playing!
'Til next time!


Very useful--thanks!
ReplyDeleteAwesome outcome! Great tutorial!
ReplyDeleteFantastic tutorial, thank you!
ReplyDeletePositively riveting tutorial!
ReplyDelete......
Ok... I'll just.... sit over here....
Thanks guys! Glad you enjoyed it :)
ReplyDelete