Modeling: Banners
Back in the day, before all these new-fangled plastic kits with 3D-modeled flags and totems, metal miniatures came with empty banner poles that needed to be filled out with a paper banner of sorts. There were images of banners in the books that could be photocopied and glued to the models (or one could bring his army to the table fielding naked flagpoles like some kind of savage).
Having a background in art, I decided to draw and color my own banners, specially themed for the Legion of the Infernal Skull. My original banners were colored with prismacolor markers, but these days I color them in Photoshop.
I still draw all of my Vampire Counts banners by hand, using the same process as for my comic work. In this tutorial, I'll show you the techniques to make your own unique banners.
Drawing the Banner
The first step is to measure the length of the banner pole, and transfer this measurement onto your paper. This will serve as your starting point and insure that it fits properly.
Start by sketching out the banner and hold it next to the model to make sure it's the size you want. Then draw the image in pencil. Don't forget to account for the tabs that will wrap around the pole. I'm drawing this one a little smaller than the available pole length so it will match the original version.
When you are satisfied with the pencils, go over the lines with ink. I use Koh-i-noor India ink, and either a Windsor & Newton Series 7 sable brush or Hunt 107 crow quill nib for my inking. Brush pens and Pilot Pens are fine too, and white out can be used to correct mistakes. I use Pentel Presto! Jumbo Correction Pens with a fine point. The idea is to get solid black lines in the final art. If you prefer a rougher "sketchy" appearance, or have really tight pencil lines, you may opt to not ink the banner at all.
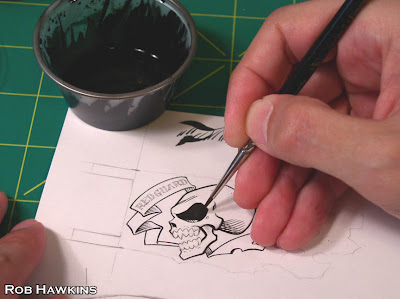
When the ink is dry (doesn't take more than a minute), you can erase the pencil, leaving the sharp black lines. The ink doesn't erase, but different types of pens may smudge, so always make a test piece before going onto your final banner. (Those black squiggles at the top of the page are where I twist the brush to a point before putting down the line. They are in the margin, and won't appear in the final image.) Notice that I haven't inked the edges of the banner. I'll show you why further down.
Coloring the Banner
With the line art finalized, scan the image at 300 dpi (greyscale) and import it into Photoshop (I'm using PS Elements, here). Adjust the Levels to balance out the white and black and eliminate any grey "fuzz." If your pencil lines were tight enough, you could skip the inking step and use the Levels to darken the pencil lines (and somewhere another comic book inker dies). Switch the image mode from "greyscale" to "RGB" or "CMYK" so you can add color.
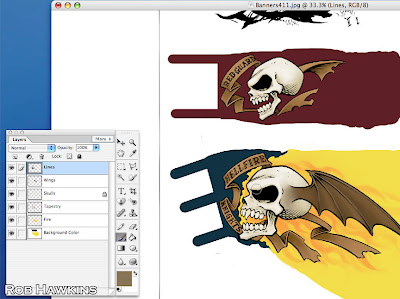
I'm working on two different designs to replace my older marker-colored banners. One for the Red Guard skeletons, and a flaming banner for the Hellfire Knights. They are both based on the original designs. The Hellfire Knights banner is drawn at an angle because the poles are thrust forward, as you'll see when I attach it to the model.
Different comic colorists have different ways of applying colors and making line adjustments, but here's how I do it: Select the "Background Eraser" tool and make it as large as it will go. Then mouse click in the white area to erase the white background, leaving the black lines. (If you're unfamiliar with or new to Photoshop, the checkerboard pattern is the transparent negative space.)
If your black lines appear as though they have some transparent spots, it's because they weren't black enough. Undo back to the Leveling step, zoom in really close, and adjust the leveling sliders until the white is white, and you can't see any grey specks in the black areas.
Next, create a new layer below the lines, and fill it with white. Then lock the transparency of the line layer. This does two things: It allows you to color "under" the lines on the white layer below, and it allows you to color on the line layer itself to add color to the line art without your brush bleeding out into the background space. Here, I'm adding a Shadow Grey-ish tone to the black part of the Hellfire Knights flag. (The other banner peeking out from underneath is the file for my Grave Guard banners, which I'm using for color reference.)
On the white layer, paint in the base color for the flag. The Skeleton flag will just be Scab Red, and the Hellfire Knights flag has a yellow base for the flames. Color the background a little larger than you think you'll need. The excess will be trimmed away when cutting out the flag.
Create multiple layers above the background color layer as you work. One for each element of the banner. This will allow you to color freely on the separate layers (even going outside the lines) without marring the work on the layer below. Since the line art is always the top layer, your coloring won't obscure the lines.
As you can see here, I have the orange flames, tapestries, skulls, and wings each on their own layers. When I colored the skull, for example, I painted it in with a bone color using a hard brush, and then rendered the shadows and highlights with a softer edged brush, similar to the way you would apply shading and highlights to a model. Then I erased the stray color marks outside of the skull's line art.
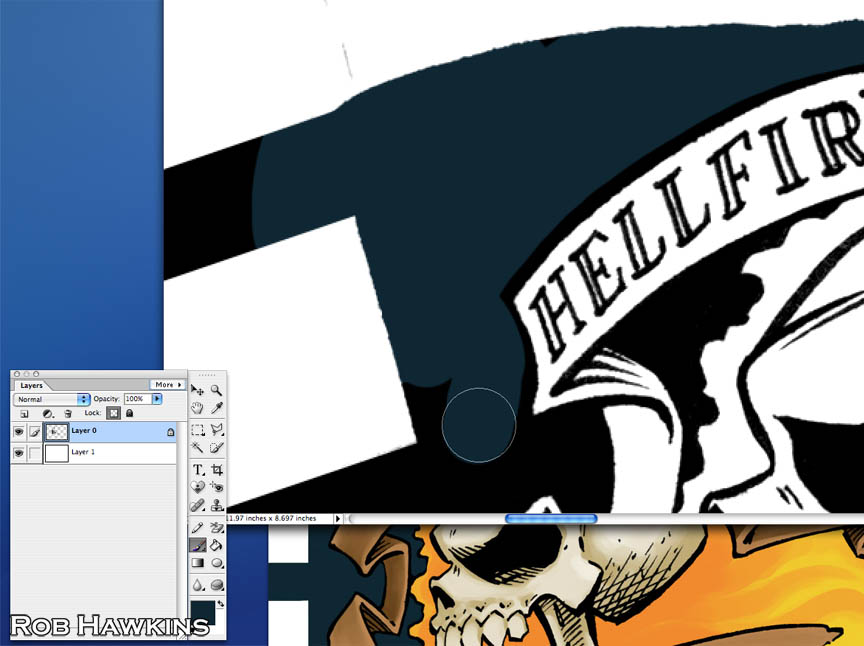
This final step is a bit tricky– Duplicate the line layer, turn off the layer transparency lock, and erase any text on the layer. Merge this new line layer (without text) with all of the color layers, leaving the original line layer separate. Duplicate the merged color layer and flip it horizontally. Then slide it over to the side so both the original banner and the flipped banner are visible. If the image is bleeding off the canvas, select "Resize, Reveal All" to extend the canvas to fit the art. You now have both sides of the banner, one side with the readable text, and one side with no text.
On my banners, I lassoed the readable text, copied it, and used the rotation and transformation tools to fit it onto the other side. If you don't want to bother with that, you can just write the text onto the banner by hand after it's printed. In fact, you could leave the text boxes blank altogether and do all the writing at the end. That would make duplicating and flipping the banner much easier.
At this point, you can flatten the file and save it for printing. If you're lucky, you've got a quality printer at home. Or, if you are like me, you can take it to Kinkos where they will give you the runaround about why they cannot match basic colors like red and yellow despite presenting themselves as a professional printing center. (Having worked at a Kinkos, I know that's BS. So if you hit any snags, try talking to different staff members because someone there will know how to use the machines properly.)
Be sure to print the image at 100% and uncheck the "scale to fit" box. If the printer scales it even a little, the banner will be the wrong size and won't fit on the model.
Attaching the Banners
With the banners printed, it's time to glue them on the model! Make sure you have a brand new, sharp blade in your hobby knife so you can get precise cuts without the paper tearing. Use a steel ruler to cut straight lines around the front end and tabs. The rest of the banner can be loosely cut, because it will be trimmed after gluing the two halves together. One side should keep its tabs, but cut them off of the other side (it doesn't matter which).
Before gluing the tabs, paint the white edges of the paper with a matching color (in this case, GW Scab/ Khorne Red with a little P3 Sanguine Base. Thin the paint a little and run the flat of the brush along the edge, making sure any white is covered.
Then paint some white glue on the ends of the tabs.
Wrap the tabs around the banner pole and glue them to the inner side of the flag. For taller banners, you'll want to add more tabs for security.
While the tabs dry, lightly draw the tattered edge of the flag on the side without the tabs. Keep the lines light. (Mine are so light the camera can't pick them up.)
This is the reason the edges weren't drawn in the first place– If there was a black outline around the flag, it would be difficult to cut out the rough edge, and ensure they were both perfectly aligned so no black would show. By having plenty of background color, the outline can be cut anywhere and both sides will appear properly aligned even if they are off by a few millimeters.
Coat the back of the banner with thinned white glue and attach it to the opposite side. Make sure the front edge is lined up, and smooth the paper toward the back of the banner.
While the glue is still wet, a slight curve can be given to the banner, and it will hold the shape once dry. The two layers of glued paper will be very sturdy. Careful not to add too much curve, or it will be difficult to cut the outline.
Once the glue has completely dried, cut out the edge, using your pencil line as a guide. Try your best to cut on the inside of the line so no pencil marks will appear on the flag. They can be erased, but the erasure mark may be visible. Take your time and make small cuts to avoid tearing the paper (or cutting your fingers).
Here's my second banner completely cut out. If there are any spots along the edge that didn't glue, and are splitting, apply some thinned white glue and gently press them together.
As with the banner tabs, paint the white edges of the paper with a matching color.
For the flaming banner, the same principles are used, but the edge is cut to the shape of flame licks rather than tattered cloth. The angled front of the banner discussed earlier allows the banner to flow backward more, rather than standing straight up.
Here are the completed Red Guard banners in all their glory!
'Til next time!


Excellent tutorial. I wish I had such graphic skills, both for pencil drawing and coloring this drawing in graphic program... Sigh...
ReplyDeleteI am available for commissions... :)
DeleteGreat work!
ReplyDeleteVery good article. I play Warhammer Fantasy from the fifth edition and use in your Dark Elves army, only this type of banners, which showed (https://www.facebook.com/media/set/?set=a.419119728107360.104347.417377494948250&type=3), reprinted from the old armybook.
ReplyDeleteAwesome tutorial. I always wondered why more people don't make their own banners like this with the technology today.
ReplyDeleteGreat tutorial - I was wondering if you'd be amenable to maybe posting your .psd files for it?
ReplyDeleteI'd love to practice the coloring steps - but I don't have a lick of artistic skill and couldn't draw a decent flaming skull to save my life.
Brilliant rob! I rarely use paper banners as always felt they looked static but your look amazing and very realistic. Will have to give it a go.
ReplyDeleteThanks for sharing these images. These are wonderful.
ReplyDeleteLogo Flag
I'm gonna modify my Battle Masters set to add banner-bearers instead of using the slot in the base for the gigantic banner poles. This tutorial will come in very handy! Any recommendations on what type of paper to use?
ReplyDeleteI just use a slightly heavier weight printer paper, printed at Kinkos, so I don't know the exact weight or brand.
Delete