Star Wars Scenery Showcase: Sullust
The other scenery board I made for Fantasy Flight's upcoming miniatures game Star Wars: Legion was this Imperial mining facility, set among the sulfur flats and lava flows on the planet Sullust.

I took plenty of photos while building this table, so I can talk about the construction process a little more:

The landscape was made from insulation foam, layered on top of a 3' x 3' wooden frame. More foam was stacked up to create a cliff face and rocky mesa. Another 3' x 3' board was also made so the two could fit together as a 3' x 6' battlefield.

The walls of the mining complex and hangar were made from foam core board.

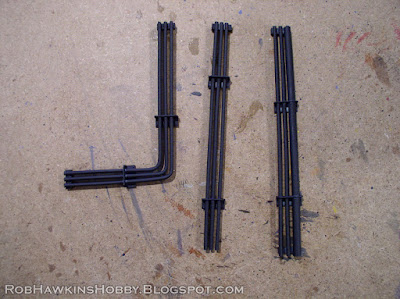
Inside the hangar, I built some details like the doors and pipes. The piping was made with styrene rods that I bent with a heat gun (check out my pipe tutorial for more detail on how these were made).

Because it would be difficult to reach after all the foam was set in place, I painted the hangar insides separately and then covered the opening with paper to protect it while I modeled and painted the rest of the table.


The two boards were designed so they would fit together on either side. The rocky cliff face was cut into the foam using an extendable snap-off knife. I also cut channels for the lava and used a fork to rough up the texture.

Some platforms were added on top of the rocks. These were made with foam core board and the edges framed with styrene L-strips. Another platform was added at ground level and all of the seams around the foam core structure were covered with L-strips and flat strips. I also added some resin doors that had been provided by Fantasy Flight.


Toward the front of the table, I sliced off layers of foam to create a stepped surface that would represent the sulfur flats. A few depressions were also cut in where I could add clear resin for areas of water.


The last step before painting was to cover the seams in the foam with wood filler putty. Once the putty dried, I coated it all with a thin coat of wood glue and sprinkled sand and gravel over the ground.
The lava itself was made with lines of Liquid Nails construction adhesive, applied with a caulking gun along the channels that I cut. In the level areas I smoothed the Liquid Nails into a flat, even "river" and where the lava runs down the rock face, I used the natural shape of the "bead" from the caulking gun so the lava would look like it was dripping down the side of the cliff.

The entire board was sprayed black and then again with grey, and the rocks were drybrushed with various greys and a little brown. The ground received more brown and ochre colors, up to a straight yellow ochre and cream color highlight in the sulfur flats. Then, I sprayed a dark red along the lava rivers. Over this I built up the brightness with orange and then yellow in the center, and then blended the edges with more red. The final step was to wash some rust color in the recesses of the rocks and sulfur flats.


The gantry over the hangar was made using black plastic canvas mesh for the deck grille. The mesh comes in various colors, but black is the best because you don't need to worry if the primer doesn't get into every nook and cranny. The stairs are Plastruct styrene stairs, and I used a ladder on its side for the railing. The framing around the mesh grille is made from small U-strips and larger L-strips, with some quarter-inch flat strips for the separations. The support truss on the bottom was also from Plastruct.


The bridge out to the landing platform is made from a length of foam core board with styrene trusses along the bottom, U-strips to cover the edges, and sheet styrene punched with rivets for the trim.

The outer work gantry went together in several parts– For the lower platform, I built a foam core box and covered the corners with L-strips. Some trusses were used as supports for the stairs.

The walkway over to the tower was also made form foamcore with styrene trim, trusses, and stairs.

The stairs fit over the top of the lower platform and I used some diamond plate-textured plastic card and parts from resin moisture vaporators to add some tech details.


Styrene rod and tubes, along with thick gauge floral wire, were used to add pipes under the walkway.

A heavy cardboard tube was the base of the tower. Into this, I cut out a recess for the door and added a frame, cut from sheet styrene, to conceal the gap. Some other model parts and half-circle styrene rods were used to make pipes on the side of the structure.

The machinery on top was made from a dollar-store watergun which was embellished with other bits and pieces. The railing was made from floral wire.

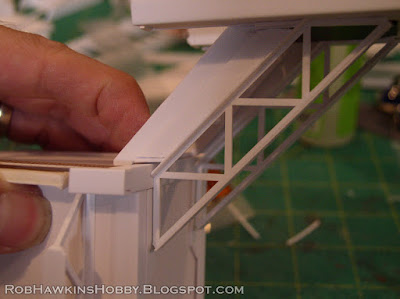
Under the lip of the tower top, pieces were cut from the trusses to create support brackets.

Care was taken to make sure the heights of the platforms lined up with the stairs.


Lastly, I made a few modular bridges that could be put in different places to allow safe passage over the lava.

The structures were painted dark grey and drybrushed with lighter highlight colors and some browns. Patches of rust and chips were applied around the edges and all the metallic parts were picked out with silver and washed with rust colors.
Here's the finished board in all its glory!


'Til next time!


That's some gorgeous work. Great to look at, can only imagine how it's going to play.
ReplyDeleteMan, that looks great. I always love seeing your WiP stages as well. They always give me ideas that I can scale down to my own skill level.
ReplyDeleteSuperb work. Thank you for the tips contained within the post. I like the idea of using a fork to roughen terrain.
ReplyDeleteAmazing table, concept and execution!
ReplyDeleteFrank
http://adventuresinlead.blogspot.com.au/
Awsome! Thanks for showing.
ReplyDeleteBrilliant work! I really like your site because it make me want to build scenery again which is something I stopped doing in the late 90s.
ReplyDeleteNice table! Thanks for sharing.
ReplyDeleteImpressive. Most impressive!
ReplyDeleteThanks everyone, glad you like it! I appreciate all the kind words!
ReplyDeleteLooks GREAT! Thanks for sharing!
ReplyDeleteI played on this board today. It was in Eindhoven The Netherlands at a game fair... It looks amazing!
ReplyDeleteMy son and me got to play on this board over the weekend,(it was at UKGE). It's very impressive and we loved the elevation provided by the walkways. It's inspired us to have a go at making our own terrain board, so finding this blog is very useful.
ReplyDeleteAwesome! One of my regrets is that I never get to play on the boards I make; they need to ship out as soon as they are finished. So it's nice to hear from people who actually get to play games on them!
ReplyDelete