I've been on a Warhammer fantasy kick lately, focusing on my Skaven for the campaign and all the new End Times models, so I've been neglecting the Terminators. Brother Claudio's sculpting is finished and he's primed, just waiting for paint. This is just a quick update to give everyone a look at him.
I've already selected the models for March and April: Brothers Zael and Goriel.
Their bases are finished and feet magnetized, but I still need to sculpt the Black Templars detail on them. The plan is to work on the batch together and finish them all by the end of April, which will put me back on track.
'Til next time!
With the conversion work on my Stormfiends nearly complete, all that remained was to scratch build a few rattling cannons so I could equip four of my six Stormfiends with the deadly blasters.
Body Assembly
In the previous posts I mentioned how I cut the arms apart to place the "stock" rattling cannon mounts on the unarmored pose.
They were simply sawed apart and glued in place on the other model.
With some quick putty work, I added bandages to cover the joins where the cannons were grafted to the Stormfiend's arms and to patch up the fur. I also sculpted the missing shoulder strap in the area where the shoulder pad would have been.
Next the heads were added. To add variety to the helmets, I used one of the Skaven icons from the windlauncher to to replace the spikes on one head, and removed the hanging tassels from the other one.
Attaching the Grinderfists
These were straightforward; magnets were added so the grinderfists could be removed and swapped for the other weapon options.
Since I wasn't using any of the chest mounts, I put the the two small grinders on flying stands with some putty to build up the earth piled around around them.
These would be my tunnel markers. Stormfiends with grinderfists can enter the battle through tunnels, and that is represented by a marker, placed when the army deploys. When they arrive, the marker scatters and the Stormfiends emerge at its final location.
Attaching the Weapon Hoses
The rattling cannons were assembled and magnetized like the other weapons.
This pose would also accommodate the warpfire projectors.
Since the hoses attach to the cannon mounts themselves, I didn't need to bother with making cables for each weapon.
But, since these are from the "rattling cannon" pose and are getting attached to the "windlauncher" pose, the hoses would need to be modified to reach their new attachment points. I cut them apart and pinned the pieces back together so they could be trimmed, twisted, and attached as necessary.
I added connecting collars using styrene tubing.
The hoses were then glued in place, and fit neatly into the collars.
Here are the final models, with their gauges, valve handles, and brain rats in place. They just need to go on their bases and they would be ready for priming.
Scratch-Building More Rattling Cannons
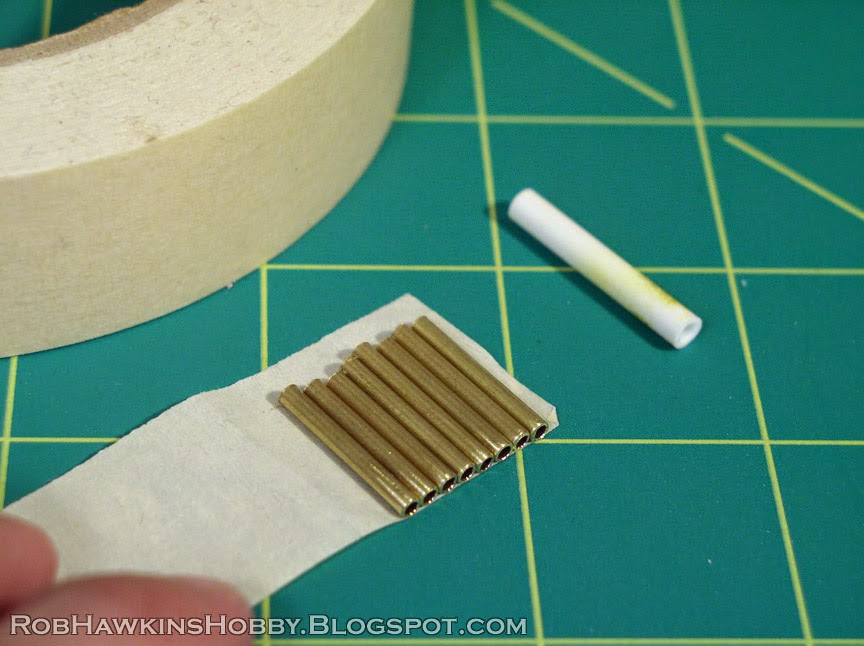
I had two more models that needed rattling cannons, so I needed to build them from scratch. I found some brass tube that was the same diameter as the plastic cannons. The Styrene tube matches the central core.
To start, I cut the brass tube into sections matching the length of the cannon.
Each gun has eight barrels, so I lined up the pieces of tube on a piece of masking tape. The tape kept the tubes from rolling around, and allowed me to keep the ends flush as I attached them to the core.
I wrapped the tape around the styrene core, and made sure the tubes were straight, and flush on the front end.
A few drops of Thin Zap-A-Gap were applied to affix the brass tubes to the styrene core. I took care not to let it run out to the tape.
Then, the tape was peeled away and I had a nice set of gattling barrels.
I added a flange of putty around the back end and, once that was cured, began adding the ring around the barrels. A thin strip of styrene was first glued around the barrels, then a square rod of styrene was glued over top of it. (When working with the thin styrene pieces, I use regular super glue rather than the Thin Zap-A-Gap, because the thin zap makes the styrene brittle, causing it to crack.)
For the bottom rail, I used a thicker square rod. It was trimmed at the end to sit flush with the beveled putty. I cut a space out of the ring and glued the rail in place.
A thin disk of plastic was glued to the front, along with a vertical piece of rod. The rod was then shaved down to create the swooping point.
The final touch was to add a few rivets around the ring and drill some rivet holes in the putty flange.
The cannon housing is made from parts scrounged from my 40K parts bin. I used Chaos vehicle flamers and pieces of the rocket launcher mount. There's a rod taken from a Warmaster Screaming Bell in there as well. These were magnetized to fit the Stormfiend's arms and I sculpted more bandages over the graft point.
The last bit was to glue the barrels in place and add a cable connecting to the power pack.
The finished Srormfiends with Rattling Cannons, ready for painting:
Let's see how Waaagh Blackfang likes these apples!
'Til next time!
When I left off with the Stormfiends, I had converted the two rattling cannon poses into swappable, warpstone-armored melee monsters:
Now to finish them up by converting some doom-flayer gauntlets and magnetizing their remaining weapons. Two of the models will use the original gauntlets. The other two will wear converted gauntlets made out of the cover plates from the warpfire projectors.
Magnetizing the Original Gauntlets
To start, I needed to magnetize the gauntlets so they could be interchanged between doom-flayers or shock gauntlets. The attachment point within the gauntlet for the two options was too small to house a magnet, so I cut it out and fit a plastic tube inside. It is thick styrene tube with an interior of 1/8-inch (perfect to hold the magnet) and an outer diameter of 1/4-inch.
One magnet went in the tube and the other in the doom-flayer mace ball.
For the shock gauntlet, the 1/8-inch magnet barely fit, so I built up some material around it with modeling putty.
To keep the parts from spinning I added a small pin that would lock the part in place when attached.
Viola! Because of slight variances in the magnet positioning, some of the parts were a tiny bit crooked if improperly matched up. I numbered all the gauntlet parts to ensure the correct pieces fit together.
Scratch Building the New Gauntlets
I rounded the corners of a length of square basswood, and then glued it into the warpfire projector covers to form the core of the gauntlet. This was then carved with a hobby knife to create the tapered shape.
I glued a piece of etched brass to the underside.
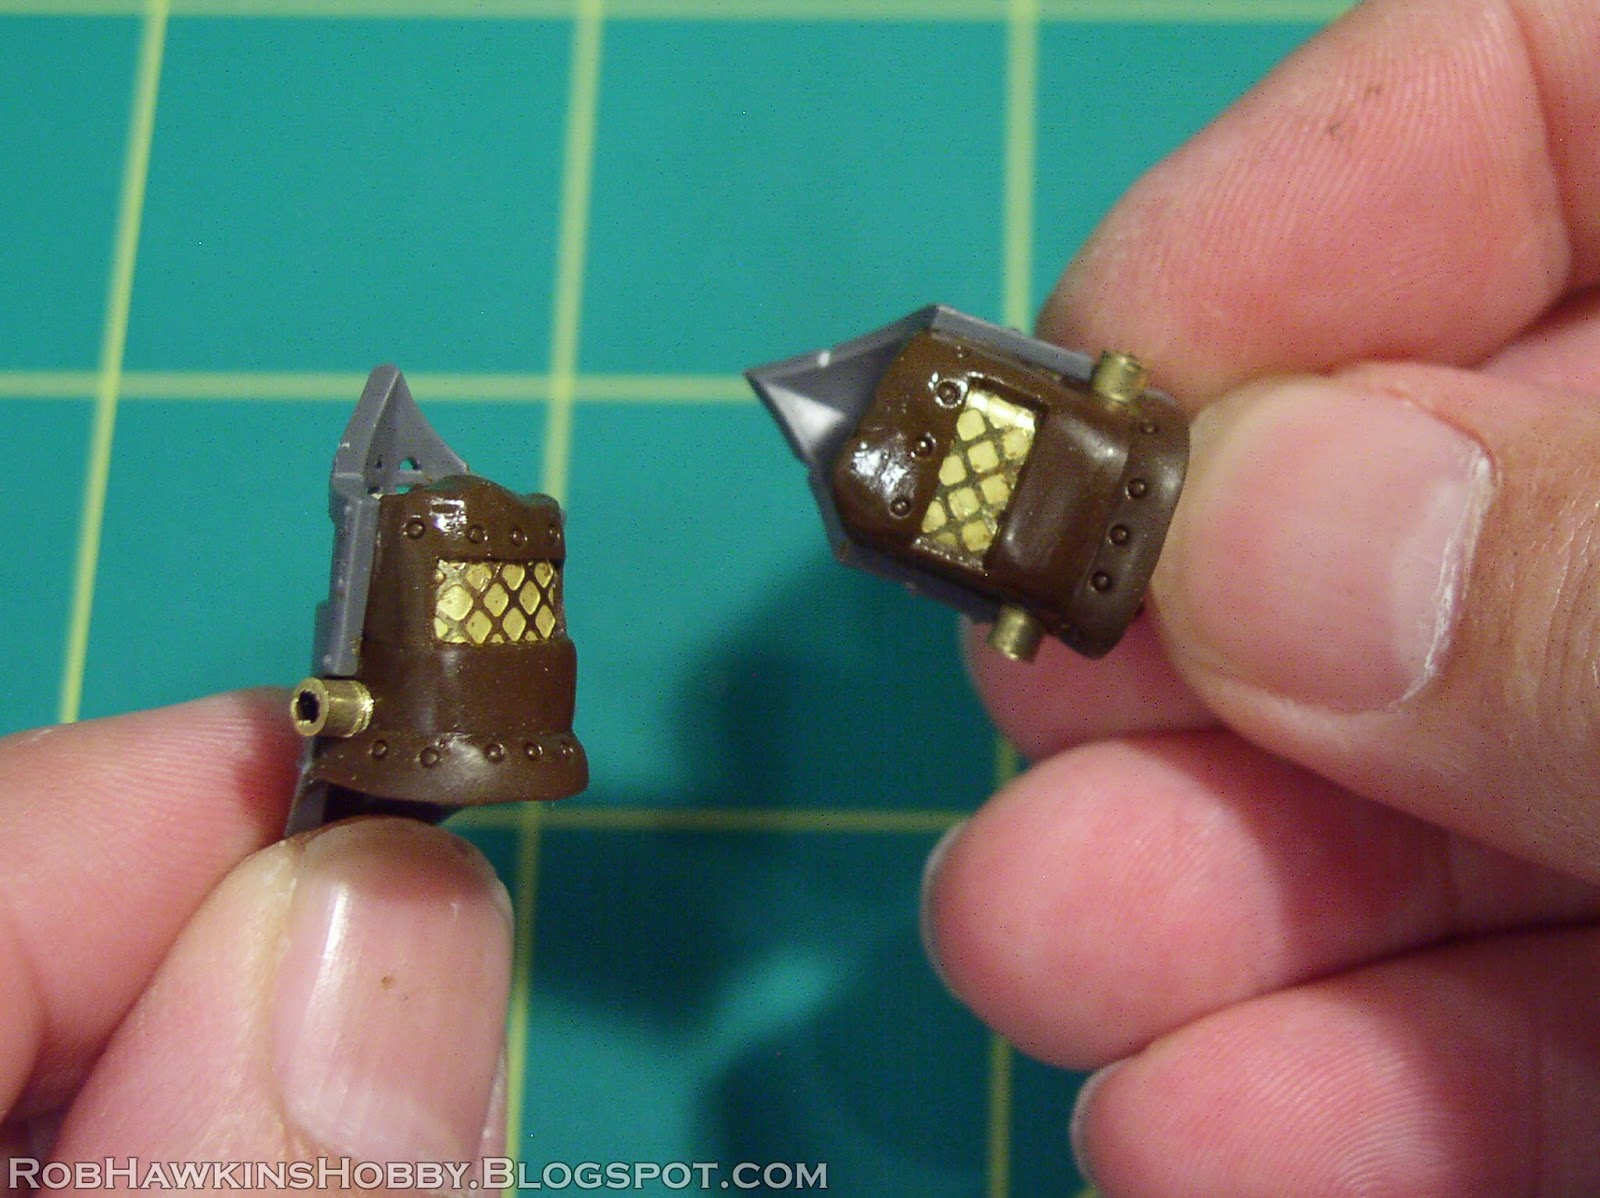
The shape of the gauntlet was then sculpted around the grill with modeling putty. I built up the basic shape and then added the flange at the end once the first layer of putty had cured. The rivets were made by pressing a mechanical pencil (with the lead removed) into the putty. In this photo, the front end needs to be trimmed flat, and I have also added some brass tubing to either side. The tubes will be the attachment points for the whirling blades and hoses.
On the top of the gauntlet, I added another tube and covered the outer edge with putty to blend it into the surface of the armor.
Here are the finished gauntlets. Magnets were added into the back end where it would attach to the arm of the Stormfiend.
The mace-balls were a little tricky. I thought about using marbles, but couldn't find any the right size. In the end, I used a simple press mold to replicate the detail, one half at a time. They turned out a little rough, but they're of Skaven design, so that's okay. Between the two kits, I had enough whirling blades to fill out all four pairs of gauntlets.
The largest set of blades went into my parts bin. They are perfect for the sides of a doom-flayer weapon team, so I'll hang onto them until I decide to scratch-build one.
Attaching and Wiring the Weapons
Hobby Tip: When making a magnetized attachment that will accommodate multiple weapons, position the magnet in the arm first. Then fit the weapons' magnets to the arm. This will ensure that the weapons all sit correctly. (If you put magnets in the weapons first, you may find that their corresponding positions on the model are all slightly off center. Then, once you have the magnet in the arm, one of the weapons will be correctly positioned and the others will be slightly shifted.)
Once the arms and weapons were magnetized, I set about building the cables for them. I used 16-gauge floral wire for the cables. The wire fit perfectly into the brass tubes, and I drilled corresponding holes in the attachment points on the Stormfiend's back.
One set of cables fits the gauntlets. The windlauncher and warpfire projector's attachment points are further forward, so a sexond set of cables was made for them.
The warpfire projector's three-pronged splitter was further separated and rebuilt with thinner wire.
This setup will allow me to remove the splitter and attach the projector directly to the cannon mount on the third pose in the event that I want to field four models, two with windlaunchers and two with warpfire projectors.
Brain Rats and Basing
With the weapon combos finished, I attached the brain rats to the back of the Stormfiends and glued their tails in place.
Then, it was time to attach the models to their bases and make sure they rank up properly. This step was an absolute nightmare! These models are so bulky it was almost impossible to get them positioned so they would rank up base-to-base, and not be facing completely sideways. The best I could come up with was to either have their shoulders facing front, or their heads looking to the front, but not both. I know that the unit Skirmishes, and can move around in a loose formation, but the models need to rank up when engaged in combat. (And this unit should be spending most of its time in combat if used effectively.)
It might be a little while before I have these guys painted. First, I need to finish them off with some rattling cannon options.
'Til next time!