So we're closing in on the end of the year. October and November seem to have flown by, and Christmas is right around the corner. I've had my hands full with terrain commissions, which can't be discussed until the material has been released to the public by the respective clients. But rest assured– there will be some cool terrain pics coming down the pipe early next year.
I've also got another round of Iron Kingdoms RPG conversions in the latest issue of No Quarter Magazine, so check out the article (NQ#45 hits the shelves today). I'll have pictures up on this site in a bit.
Skaven Update
My opportunities to work on personal projects have been few and far between, but I've been able to squeek out a few hours here and there to paint up my Skaven Globadiers.
More detailed shots can be found in my Skaven Gallery.
Kickstart My Heart
There have been some Kickstarter campaigns popping up in the past week, that I'd like to help promote:
Sam Sedghi and the guys at Games & Gears launched their Kickstarter project for their line of modular game tables, with interlocking textured panels and felt borders. They can be built to size for your gaming needs, whether it's a small RPG table or larger wargame board. Check out the Kickstarter and their Facebook page!
Adam Poots has also begun his Kickstarter for the Kingdom Death game which, to me, looks like an interesting hybrid of RPG and tabletop game, and has some of the nicest miniatures in the industry. Here are links to his Kickstarter and Facebook pages.
With the Kingdom Death environment represented as oasis of lantern light in the never ending darkness, I think it would be sweet to see the game played on a Games & Gears table with that solid black border representing the darkness surrounding the encounter area.
So throw these guys some love (or, you know, cash) if you dig these projects!
The Liebster Blog Award
I've been nominated for a Liebster Blog Award! What's a Liebster Award you ask? It's a favorite blog award for up-and-coming sites with fewer than 200 followers. If graced with the honor, you're supposed to nominate 5 more blogs. Not quite as nefarious as a chain letter, since you're basically spreading the love and promoting other blogs that you like and that your readers may find interesting. But I heard about this one girl, who's blog was nominated, and she didn't pass it on, and the next day, she drove her car off a dock, and a shark ate it. True story.
So, thanks to John at 1000 Foot General for the nomination! (Now I feel guilty about not updating the blog as often as I should.)
My nominees for the Liebster Award (and some of the blogs that I follow) are:
A Spanish blog with some fantastic terrain and spectacular miniatures for the game 1650.

This is a great site for terrain inspiration. Lots of tutorials, great photography of the finished pieces. Some of his work puts me to shame; I can't believe he doesn't have more followers.

Another pretty cool hobby blog, featuring a lot of 40K Ork conversions and scratch built vehicles.

I've been a fan of Robert's work on the IDW G.I. Joe comic for years. His art blog is pretty frequently updated with sketches and whatnot. Always good stuff.

Lots of cool terrain, models and great photos of it all. I can't see how many followers he has, so I'll just assume it's under 200.

Good luck, guys, you're all winners in my book!
'Til next time!
Welcome back! It's been a long two weeks, filled with commissions, freelance work, and disaster recovery. I appreciate the concern some of you have expressed through Facebook and email. My wife and family have been fortunate to come through the storm with no damage, and we didn't even lose power. Still, it's difficult not to be affected by such widespread destruction, and I took some time out to donate supplies and volunteer with the cleanup effort.
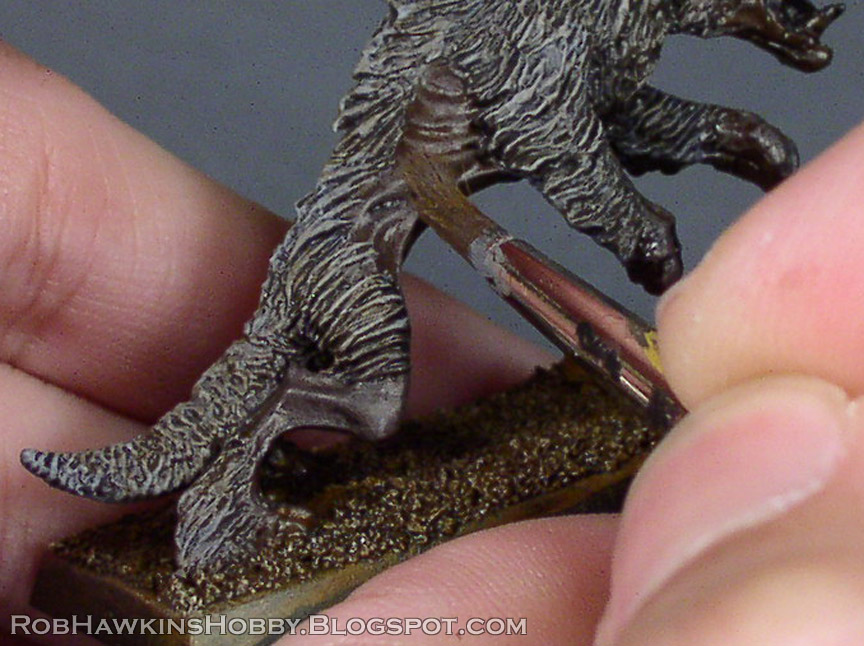
This week, we've got the second half of the dire wolf tutorial: the painting.
In this painting guide, I use the classic GW Brown Ink quite heavily. I experimented with the Agrax Earthshade, but it just didn't have enough pigment to get the effect I was going for. If you're trying to replicate the process described here, in lieu of GW Brown Ink, I'd recommend thinned brown india ink or a chestnut ink, darkened with a drop of black (just enough to cut the chestnut red tint and make it brown).
For each color listed, I label it as a P3 color or a GW color (with it's classic name and new name). This is intended to be an assembly line process for painting large units, so I'm painting all three converted models, side by side in each step.
Basecoating and Washing
Start by priming the models black.
Basecoat the sand with a thin layer of GW Snakebite Leather/ Balor Brown.
Basecoat the Fur with GW Codex Grey/ Dawnstone, mixed with a little black (something like a 70/30 ratio.) Basecoat the skin on the legs, ribs and faces with a 50/50 mix of Codex/ Dawnstone and P3 Battlefield Brown. Basecoat the Skulls on the base with GW Bleached Bone/ Screaming Skull.
Next, wash the entire model with GW Brown Ink. Add some spots of P3 Armor Wash, thinned with a little water into the fur.
When the ink is completely dry, finish the base sand by drybrushing with successive layers of P3 Gun Corps Brown, Snakebite/ Balor Brown, and Bleached Bone/ Screaming Skull. Don't worry about the skulls on the base at this point; we'll address them when finishing off the wolves' faces.
Painting the Fur
The fur can be simply drybrushed, but it's too easy for the paint to become chalky and clog up the texture. I prefer an organic process using a series of thin drybrush layers and washes to get a rich, varied tone to the fur.
It's important that you don't let the paint get too dry in your brush; that's how the chalkiness occurs. If you find the drybrushed highlights getting too bright or filling in the recesses, you can always add a thin wash overtop to darken it. Then dryrush back up. I think on my first batch of wolves I went back and forth a dozen times, but after 30 wolves, I've got it dialed in:
Drybrush Codex/ Dawnstone over the fur, recapturing the grey color.
Add a little Bleached Bone/ Screaming Skull into the grey and drybrush some highlights over the fur.
Add a thinned wash of Brown Ink over the fur, and then spot in some thinned Armor Wash. You don't want to darken the fur as much as the initial brown wash did.
Drybrush lightly with the Codex/ Dawnstone and Bleached Bone/ Screaming Skull mix. Then add a few hits of GW Fortress/ Administratum Grey.
Painting the Skin
Mix 50/50 Codex Grey/ Dawnstone and Battlefield Brown. Drybrush this over the areas of skin (ears and faces, too). Use a small drybrush to keep things pretty controlled.
Then paint highlights with straight Codex Grey/ Dawnstone. Use a sharp brush, and just hit the raised edges. Paint the edges of the torn flesh on the wolve's faces, and add a highlight line on the edges of the ears.
Painting the Faces
Basecoat the bone areas with Bleached Bone/ Screaming Skull. Get the skulls on the base, as well.
Wash the bone with a mix of Brown Ink and Snakebite Leather (about 70/30). After the ink dries, Drybrush the edges with a mix of Bleached Bone/ Screaming Skull and P3 Menoth White Highlighht. As with the fur, don't let the highlights get too bright; it they do, wash on some thin brown ink to shade it.
Paint straight P3 Skorne Red into the meaty areas, and around the edge of the exposed skull and torn flesh. Don't forget the tongues. Keep it pretty spotty; you don't want these to be too bloody. (Or do you...?)
Then, wash over the bloody areas with Brown Ink to shade it.
Finally, add a dot of P3 Khador Red Base in the eyes, and paint the claws and any intact noses with Black Ink or Armor Wash. (I use the ink rather than black paint because it has a slight translucency that eliminates the need to highlight it.)
Finally, paint the sides of the base with Model Masters Medium Green, add static grass, and they're finished!
Here's a close-up of the face, step-by-step:
The new Doom Wolves are finished as well. Here's a before and after comparison of the sculpted head detail:
And the running wolf:
I can't tell you how much of a relief is is to finally have these off my painting table, and to be able to field multiple units of dire wolves. Now it's off to war!
'Til next time!
I've discussed how my dire wolf units have evolved into the current iteration. Here's how I go about converting the miniatures themselves.
The first portion of this tutorial focuses on conversions using the classic metal Chaos Hounds. I don't think you can get these anymore, but maybe you can find some on Ebay. In the second portion I show a similar conversion using the plastic Fenrisian wolves, which might be a little more accessible for anyone trying to replicate this conversion.
Chaos Hound Dire Wolf Conversion
For anyone who doesn't know, The Stuff of Legends website has scanned copies of all the Citadel catalogues and pictures of models dating back to the early '80s (as well as other manufacturers' ranges. My go-to page is the 2004/2005 catalogue section, which in my opinion represents the height of the metal Citadel range (and the most recent catalogue TSOL has in its library).
There were five distinct sculpts for the Chaos Hounds, but I only use the three pictured below; the two with their mouths wide open and tongues hanging out didn't appeal to me. The calalogue page only shows four sculpts, however, and the wolf with its head lowered isn't featured (although his leg sprue is). I suspect a printing error in the original book.
Anyway, two of the models have ripped open faces and exposed skulls, making my job of converting them into undead wolves pretty easy. Their spikes and clubbed tails need to be removed (the red-shaded portions), and I also take off the ears on the really spiky wolf on the bottom for consistency.
Here are the models, spike free, with mold lines cleaned.
For the tails, I use the plastic tail from the old plastic wolf head sprue.
The tails get roughed up a little with clippers and pinned to the model. The legs are glued in place.
Next, the areas where the spikes were clipped away get fur sculpted overtop to repair the damage. I try to match the existing fur pattern on the miniature. (The fur sculpting is shown in a little more detail on the Fenrisian Conversion below.)
I also add some fur to connect the back hair to the tail, and add some on the legs. The ribs and portions of the legs are left bare to enhance the emaciated, mangy appearance of the wolves.
The ears are the trickiest part. Originally, I would clip the ears off of the plastic wolf, shave the back of each ear into shape with my knife, and then glue them in place on the wolf's head.
My sculpting has improved since then, so I can simply sculpt the ears.
Either way, once the ears are in place, I add more fur around them to blend the parts together.
The completed Chaos Hound dire wolf conversions:
Fenrisian Dire Wolf Conversion
Now, I'm fortunate to have enough of the old Chaos Hounds to make all the dire wolves I'll ever need. But if I were starting from scratch today, I'd use the Space Wolves' Fenrisian wolf models over the current plastic dire wolf kit. I'm just not a fan of those miniatures.
The old metal Chaos Hounds came with a few extra undead heads, intended to turn a few of the hounds into double-headed creatures. These heads are perfect for a Fenrisian head-swap, and might be a little cheaper than tracking down complete classic Chaos Hounds.
Clean and assemble the Fenrisian wolf body, and super glue the metal head in place.
Because of the head's design, there will be a larger gap on the left side. Fill this with modeling putty and allow it to cure.
The wolf will still needs some ears, and if you don't want to sculpt them, the pointy ears are easily clipped off of the plastic Fenrisian head.
Clean them up and glue them in place.
To model the fur, begin by adding a roll of putty around the ear, and a small ball at the base of the head.
Beginning at the top, use your sculpting tool to press lines into the putty. Vary the thickness a little, and twist the tool slightly to create a wavy effect.
Work your way around behind the ear and press the fur lines into the ball of putty. Try not to flatten it against the body; you want the putty to add to the mass of the head.
Here he is from the front. Remember to match the style and direction of fur on the plastic wolf body. Let this putty fur cure before moving on so it doesn't get damaged while working on the next step.
Add a roll of putty around the head seam and along the join atop the wolf's back.
Just as before, press lines into the putty to blend it into the existing plastic fur so the neck seam and join along the back are covered up.
And he's finished!
If you can't find any of the metal Chaos Hound heads, you can just use the plastic Fenrisian wolf head, and add damage like I showed in the doom wolf tutorial.
Speaking of the doom wolves, I've converted two more using the plastic Thunderwolf models:
These five new models will join the other 20 WIPs (Wolves In Progress– Ha!) that I've been pushing around my painting table since I failed to finish them in GW's 2004 Iron Painter challenge. They'll finally be completed, totaling out the Doom Hounds of Marduk at three 12-man units, each with its own doom wolf!
Next up in part two, I'll go step-by-step through the painting process I use to mass-produce the wolf units.
'Til next time!