This project has been moving at a fairly decent pace. As of writing this, the model is sitting on my table, waiting to be painted. This week, I'll go over the final details that were added to finish off the base.
Bones and Stones
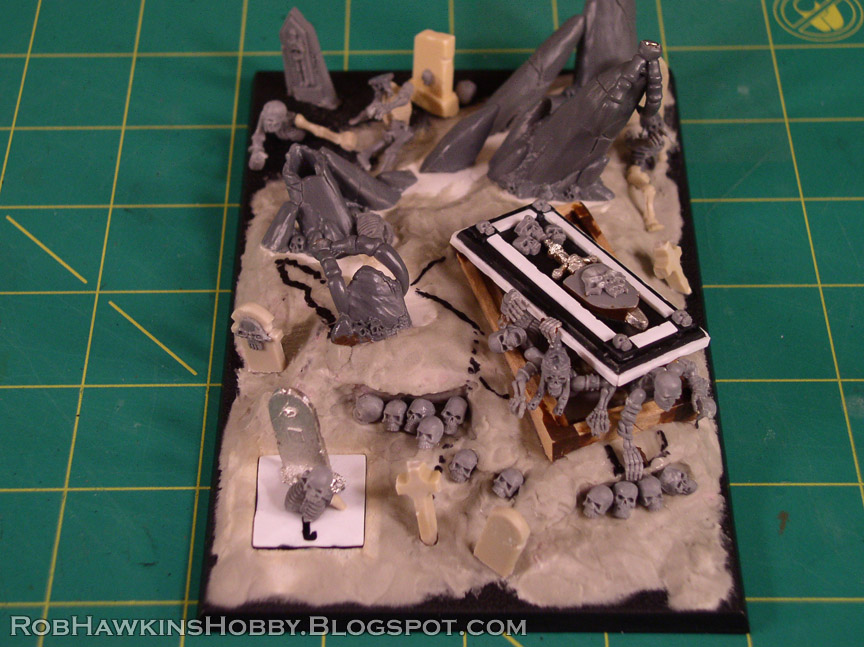
I finished up last week by puttying the barrow mound. Once the putty was cured, I added the tombstones, skulls and risen skeletons.
The tombstones are a combination of classic metal parts, and the plastic stones from the old skeleton kit, cut into unique shapes and detailed with shield icons and little skulls cut from a Tomb Kings banner. The small crosses are made from the intersection on a plastic sprue.
The skeletons are a combination of new and old plastic kits, cut up and posed to appear as though they're pulling themselves out of their shallow graves.
The tombstone on the plug serves as the "handle" for pulling it out of its recess, and adds some extra detail when Marduk is not on board.
Final Putty Work
With the skeletons in place, I built up the ground around them with more Aves Apoxie® Sculpt. The guy on the right also had the top of his skull replaced where the helmet had been cut away.
The skeleton in the crypt is pushing his hand against the ground, so I needed to press it into some putty, textured to match the ground.
Adding the Sand
The final step was to add the sand. I used a combination of fine ballast, with some talus rocks and larger ballast for variety and to blend the transition from the large stones into the earth.
The final model, broken into its individual parts for painting:
And, here's how it will look once assembled, albeit much less grey:
Marduk the Ghoul King fits nicely in his spot on the base, sort of mirroring the pose of the Terrorgheist:
That's all for now. Somebody's got a date with a can of black spray paint. If you'd like a peek at how this will be painted, check out my tutorial Modeling & Painting: Graveyard Bases. The Terrorgheist's base will painted with the same process and color palette shown there.
'Til next time!
Magnetizing Marduk
The rare earth magnets I used are 1/8" diameter by 3/36" thick, the perfect height to fit under a 20mm GW base. I began by drilling into the center of the recess on the Terrorgheist's base, and gluing the magnet in place. Then I added the corresponding magnet on the insert.
To make sure there was no exposed foam, I coated the interior sides with a thin layer of Aves Apoxie® Sculpt.
Before adding the magnet to Marduk's base, I finished off the rest of the base sculpting and let it all dry (more on that in the following section).
To accurately position the magnet on Marduk's base, I placed the magnet on top of the one in the recess.
On the underside of Marduk's base, I added a blob of modeling putty ("brown stuff" in this case). I pressed a small hole in the center so it could mold around the magnet without having to press very hard.
I put a little Chapstik on the magnet so it wouldn't stick to the putty. Then, I fit Marduk's base into the recess...
...leaving the putty with a depression at the correct position and depth for the magnet.
Once the putty dried, the magnet was glued in place.
Modeling the Barrow Mound
As mentioned above, Aves Apoxie Sculpt was used to smooth over the surfaces, cover the pink foam, and build up the burial mound.
It was a simple matter of rolling out the putty over the seams and smoothing it out with a sculpting tool.
It doesn't need to be very smooth because it will be covered with sand.
The small recessed "shelves" in the front are for rows of skulls, which would have been buried encircling the main crypt, and are now partially exposed.
Next up, I'll be adding the skulls, skeletons and other tombstones.
'Til next time!
Finishing this Terrorgheist is going to be one of my side projects in between freelance and commission work. I'll be focusing on it over the the next few posts, and hopefully I'll have some significant progress to show off each week.
The Crypt
I wanted to make the Terrorgheist a centerpiece, even more elaborate than the Varghulf. I decided on a crypt with skeletons bursting out, surrounded by more tombstones and skeletal detritus.
The lid of the crypt is made from a cavalry base with some strip styrene embellishments. The plastic skulls are from various Tomb King and Vampire Counts kits. The metal sword is the "Mounted Wight's Sword" from the classic range. The side walls of the crypt are built from thick basswood, filed and polished smooth, with its seams covered with epoxy modeling putty.
The Barrow Mound
The mound was built up with some pink insulation foam, and a slot cut for the crypt to fit into. There's also a spot, cut into a scrap of foam core, to accommodate Marduk the Ghoul King's base if I ever decide to mount him on the Terrorgheist. He'll not be riding it so much as fighting side-by-side with his "pet." It's all secured in place with Liquid Nails construction adhesive.
I had the Terrorgheist's rocks lightly glued to the plastic base for positioning of the wings (see the magnetizing tutorial). They were popped off and superglued to a piece of thick cardstock that I could position as necessary on the foam incline. (I knew I would be building up the base, so in hindsight I should have done that from the beginning.)
The Risen King
I tried to come up with a story for the skeletons in the crypt, and why there would be three bodies in what is essentially one large coffin. So: It's the crypt of a fallen king and his personal bodyguard who were laid to rest with him (I guess they weren't very good at their jobs). Once resurrected by the Legion's necromantic power, he'll become a Wight King and the bodyguard will be added to his skeleton retinue.
The models took a little time to position correctly, and I still need to fill a few gaps around their necks and repair some missing thumbs (theirs, not mine).
They're glued right to the lid, and that will all be painted as a separate part before I glue it into place on the finished base.
Here's Marduk in his slot. Magnets will be added so I'll avoid sending him flying across the table (in horrible, horrible slow motion, of course) when I inevitably pick up the Terrorgheist, forgetting Marduk was standing on the base.
The plug was made from an inverted 20mm base with a piece of styrene glued to the bottom. It will be textured to match the rest of the surface for when Marduk isn't there.
There is still a lot of smoothing to be done, using modeling putty, to get the barrow mound rounded off. But that has to wait until the Liquid Nails has dried.
'Til next time!
No Quarter Magazine #47 has been on the shelves for a few weeks, and it features part three in the IK RPG conversion series. This one shows how to convert Warmachine and Hordes models into a variety of Gobber character archetypes. Here's the finished models and parts lists. Check out No Quarter for the step-by-step tutorials.
Gobber Field Mechanik/ Soldier
The gobber from the Cygnar Field Mechanik unit was a pretty easy conversion. It's just an arm swap for the Trencher Commando's weapon hand. The arm itself is brass wire, with putty sculpted overtop. The gun hand also needed a little work to beef it up to match the scale of his other hand. The tricorn hat is made from putty, and replaces the model's original, floppy hat.
Parts List:
Field Mechanik Goblin Bodger #2
Trencher Commando Grunt #3 Left Arm (Gun)
Mk 2 Trenchers Backpack
Gobber Duelist/ Cutthroat
This guy's not a gobber at all, but a dwarf. Sculpted on the Rhulic IK model Maulgrun Boldridge, this conversion is a simple arm and head swap The main sculpting is on the sleeve, hand, and scarf. The dueling sword came from a Legion of Everblight Hex Hunter.
Parts List:
Maulgrun Boldridge Body
Hex Hunters Grunt #3 Sword
Swamp Gobber Bellows Crew Gunner Head
Gobber Alchemist/ Thief
This last guy is my favorite, and I wasn't sure if I'd be able to pull off the conversion. The body is the IK model Gajun Vasco, with his limbs cut away and replaced with wire armatures and resculpted. I imagined this guy as a mini Gorman Di Wolfe, throwing open his cloak to reveal an array of knives and alchemical grenades. The gas mask is inspired by Puck's mask from the Bodgers line. If this conversion didn't work, my fallback idea for the Alchemist/ Thief would have been to use Reinholdt as the base model.
Parts List:
Gajan Vasco
Swamp Gobber Bellows Crew Gunner Head
Durgen Madhammer Grenades
'Til next time!