
WWW.SKULLFORGESCENICS.ETSY.COM

Tuesday, August 9, 2016


Wednesday, August 3, 2016
Skull Forge Scenics: Ruined Graveyard Walls
Ruined graveyard walls are available now in my Skull Forge Scenics shop: https://www.etsy.com/shop/skullforgescenics Pick up your set today!
Earlier in the week I painted up some of the ruins for my personal graveyard collection:


The ruined walls fit perfectly with my other graveyard wall sets, so you can put together different configurations of ruined and intact walls.


I'm currently working on an entryway for the walls; parts that will line up to form a gateway. Watch for that in the coming weeks.
In other hobby news, I finally got my hands on the General's Handbook for Age of Sigmar. I've only taken a brief glance through it, but the book looks like it has a lot of great information for narrative scenarios, campaigns, and warband leagues, as well as the matched play point system. There's a really great map-themed campaign in there as well. I'll post a more thorough review of the book once I've looked it over in more detail.
'Til next time!
Monday, July 25, 2016
New Resin Terrain and More Dreadfleet
Skull Forge Scenics: Ruined Graveyard Walls
I've added a new set to the Skull Forge Scenics online store:

These are ruined walls, designed in the same style as my other graveyard walls. The set includes three crumbling wall sections and two wall posts.

The posts work as corners or ends that the walls insert into.


I hope to have my own set painted soon, and I'll definitely post some pictures.

Dreadfleet Final Assembly
The end is finally in sight for this project. Painting is underway on the three sea monsters...

And with only four ships remaining, I decided to assemble the hulls and get them primed and ready to go. The Heldenhammer and Flaming Scimitar went together very easily. I was concerned about getting at the detail on the Heldenhammer, but it's really accessible as a single part. For the Scimitar, I left the tower with the djinn and efreet separate. It will be primed white for the brighter colors.

The Shadewraith was kept in a few parts so I can paint the insides and outsides of the hull halves, since the interior will be visible through the ship's skeletal framework. These are getting primed grey with a white zenith spray.

And then we come to the Bloody Reaver. I'm saving the most complicated ship for last, and I don't know how this is going to work. The join between the ship halves will need to be puttied...

...but there's a sail that needs to be inserted in between the two halves before they are glued together, meaning that the parts should be painted separately.

The outer layer of the hull has detail in the inside that will be difficult to reach once assembled.

But the outer half also includes a portion of the castle that will need to be puttied, so it's another situation of pieces that need to be painted separately. I might be able to separate the castle portion and attach it to the center, but I still don't know what to do with that front sail.

And to top it off, the masts all have ball-and-socket attachment points that need to be inserted before the halves are glued together and no locking key to make sure they're oriented in the right direction.

It may be an assembly nightmare, but this ship is huge– almost five inches long– and I can't wait to see it painted.

'Til next time!
Friday, July 15, 2016
DreadFleet: Tools of the Trade
My attention over the past few weeks has been on a large terrain commission, so I haven't been able to blog as frequently. I'll be able to post pictures of it in the coming months, but now that it is out of the way, I can get back to painting and sculpting. Yesterday I knocked out the measuring tools for my Dreadfleet set.

The ship's wheels, used for making 45 degree turns:

The wind gauge, which moves around the perimeter of the seascape to indicate wind direction:

The flip side of the wind gauge is the vortex marker, use to mark the center of the maelstrom in one scenario. I was concerned about having a part lay "painted side down" on the board, but the seascape mat is a soft material, so it probably won't be too rough on the counter.

Finally, there's the navigation rod, which functions as a measuring ruler, and can be bent up to 45 degrees to check facings when firing broadsides.


Next I have the three sea monsters to paint. The Bone Hydra and Sea Giant needed their bases extended a little because they were so top-heavy. (Once the head with the sail was attached, the hydra would tip over at the slightest touch.) I glued the models on some plastic card and sculpted matching waves with some brown stuff modeling putty.

Once they are painted I'll be able to play a game with fully painted components, ready for whatever game effects the fate cards deal– well, except for the little auxiliary ships, but I have something special planned for them.
'Til next time!
Friday, July 1, 2016
Dreadfleet: The Seadrake
I'm right in the middle of a large terrain commission, so I haven't been able to keep up with the blog or the Dreadfleet project. (I expect to have some pictures of the finished table in the coming months). I have been slowly picking away at my Dreadfleet queue, some water here, a sail there... The Leviathan Island (or as I like to call it, the remains of Morla) is finished at last.


The giant turtle island is the last bit of the Galleon's Graveyard terrain for the game. I also finally crested the halfway mark on the ships, by completing the Seadrake. Only four to go!
I've got a couple of progress shots– The ship's hull was sprayed with a bone color, and the dragons were painted first. The highlights on were achieved by mixing a little flesh tone into the red.

Then I finished off the hull details and masts. This was the most painstaking one yet, because I had to carefully paint all the gold trim and details without messing up the white hull. The masts were glued in place before attaching the sails, which were painted separately on the sprue. I kind of like this image because it almost looks like the ship could be at port with its sails down.


Here's the finished Seadrake in all its glory, including a shot of it's back side, which you never see in the books. This is the only whip with a dedicated photogenic side; I had the row of finished ships facing to the left on my shelf but I had to turn them so the Seadrake's "good side" would be visible.


Now that I've got three ships for each side, I'll have to get in a proper game and see how it plays.
'Til next time!
Thursday, June 23, 2016
Dreadfleet: Swordfysh and Painting Sails
The Swordfysh is the first of my Dreadfleet ships with sails. In this post, I detail the process I used for painting its sails.
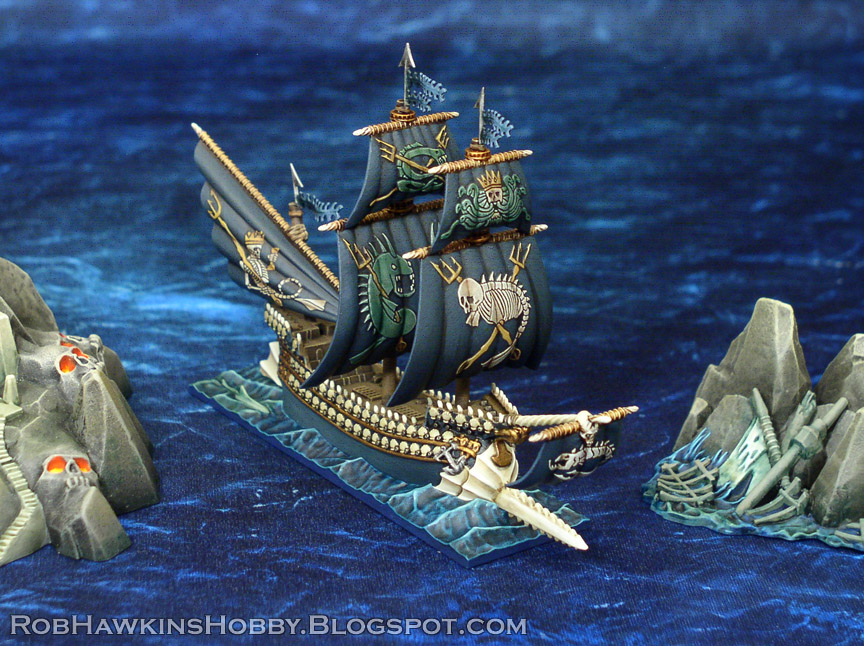
The ship's hull and masts were all painted first.

For the sails, I primed the fronts white and the backs black. The white allows me to keep the icons bright, while the reverse side can be drybrushed up from the dark undercoat. I kept the sails on the sprues so I had something to hold while painting them.

The skeletons were basecoated with GW Screaming Skull, and drybrushed with Formula P3 Menoth White Highlight. The Tridents were basecoated with P3 Rucksack Tan.

The fish and snakes were basecoated green. The specific color is a mix of P3 Gnarls Green, lightened with some P3 Thrall Flesh.

I washed the bones and tridents with brown ink, and the green areas with GW Coelia Greenshade. The fish teeth were then picked out with white.

GW Nuln Oil was carefully washed into some of the recesses and over the rest of the sail.

With the washes dry, I drybrushed all of the iconography with a very dry brushing of Screaming skull, just enough to accent all of the edges and high points. The bones were further highlighted with Menoth White Highlight, and a little more Coelia Greenshade was thinly washed over the green portions.

With the icons on each sail finished, I painted the background color. This was a mix of black and P3 Coal Black.

The sails were further highlighted with a mix of P3 Coal Black, GW Fang Grey, and P3 Menoth White Highlight. The highlighting was brought up witha series of fine cross-hatching, brighter than it needed to be, then I brought the color back down with a thin glaze of Coal Black.

The masts were glued in place and the spars were painted. These were simply a basecoat of Screaming Skull and a wash of brown ink. The tips were drybrushed with a little Menoth White Highlight to punch up the color.


The last step was to clip the sails from their sprue frames and touch up the edges. They were all pegged into a piece of wood and sprayed with Testors Dull Cote before finally gluing them onto the ship.


'Til next time!
Subscribe to:
Posts (Atom)