Counting Toward DOOMSDAY, Part 1
I've been keeping a journal of my daily progression as I work on this pair of Doomsday Arks–

DAY 1
This kit is quite a task, and as I began clipping and cleaning parts, I feared that much of the assembly time would be spent cleaning mold lines that ran down the center of each part, rather than along the corners. It wasn't quite as bad as all that; only the thick "rib" pieces have that problem, most of the parts have the lines along their edges. I started with the cockpit assembly and was able to get the main crescent built and cleaned all the parts for the driver and his chair. I stopped short of gluing him into the chair because it looked like the cables on his back weren't going to line up properly with their attachment points on the crescent...


DAY 2
And we have a new contender for the category of "most frustrating kit to assemble!" Step aside, Spirit Hosts and Grave Guard– Your parts all fit properly, and are merely "fiddly" with tiny attachment points. The Ark driver just plain does not fit. His pelvis has no alignment key, so it can go in at any angle, making it impossible for the rib cage to fit over the spine with enough room for the cables on his back to fit against the crescent. My solution was to drill out the attachment points so the cables could be inserted, allowing more play with the spacing. I glued the chair and legs in place, and then struggled to fit the rib cage and spines in place. The fit was so bad on one of them that I separated the driver's spine from his rib cage, and glued the spine in place. Then, I attached the rib cage. It was much easier, and I'd recommend going that route if you read this before building one for yourself. In fact, I'm disappointed that the directions didn't lay out the steps like that. After finishing the drivers, I built the remaining parts for the cockpit, keeping the major parts separate for painting.


DAY 3
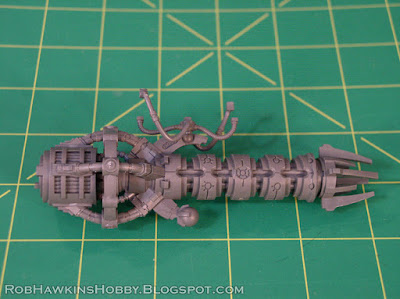
With the cockpit out of the way, I began work on the Doomsday Ark's cannon assembly. This was fairly straightforward... until I came to the hose attachments. To their credit, they all fit, but there's no directional key to ensure they are glued at the correct angle. So, I needed to keep the cannon dry-fit in place, and attach the cables on each side individually so they would plug in at the correct angle.

DAYS 4 and 5
My hobby time over the course of these two days was spent cleaning mold lines off all 24 rib components for the two Arks. So... Many... Pieces...

DAYS 6 and 7
When it came to the Ark's array of gauss flayers mounted between the ribs, there were two issues I had to deal with– First, the guns were molded with solid plastic barrels, and in order for them match the rest of my army, I needed to replace the barrels with green rods. Second, when swapping between the Doomsday Ark and Ghost Ark, the rib cages will be inverted, meaning that the guns will be upside down in one of the configurations. So, the guns needed to be universal, without a definitive top or bottom. On each gun, I cut away the barrel and hose, and then attached styrene plastic strips to create rails on the top and bottom, mirroring the details so it will look correct at either orientation. After painting, the green rods will be inserted between the rails, and the rails will be trimmed to the correct length and capped with the gun's muzzle piece.


And with that, I can begin priming some of the parts and finish the assembly of the warriors in the repair bay.
'Til next time!


No comments:
Post a Comment
All comments are moderated. Any comments containing links will not be approved and will be marked as spam.