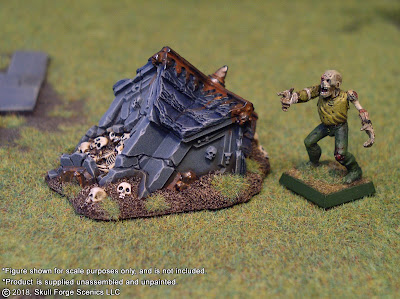
New Ruined Crypt and Painting Tutorial
The new ruined crypt is available from Skull Forge Scenics! This piece is perfect for enhancing the base of a large monster, or for representing the gravesites in a Legions of Nagash army. Below is a tutorial for painting the crypt.


The new ruined crypt is available here in the Skull Forge Scenics online shop. The ruined shrines are available again as well:

Ruined Crypt Painting Tutorial
I use a mix of Formula P3 and Citadel colors, with a few paints from other ranges. Here is the complete list:
P3 Greatcoat Grey
P3 Ironhull Grey
P3 Coal Black
P3 Menoth White Base (or GW Screaming Skull)
P3 Menoth White Highlight
P3 Battlefield Brown
P3 Gun Corps Brown
P3 Pig Iron
P3 Cold Steel
P3 Bloodstone
P3 Khador Red Highlight (aka Orange)
GW XV-88
GW The Fang (aka Fang Grey)
GW Nuln Oil (don't spill it!)
GW Lahmian Medium
Army Painter Ash Grey
Army Painter Matt Black
Liquitex Burnt Umber Transparent Ink (aka Brown Ink)
Preparing the Model
As with all resin models, wash the part with warm soapy water. Using liquid dish detergent like Dawn is more effective when removing any mold release because it cuts grease and oil more effectively than hand soap. The mold release I use is not very greasy, and hasn't ever given me any issues when painting, but I still recommend that the parts be washed and thoroughly dried before painting.
Attach the crypt to a painting stand. I use a scrap of wood because it can double as my drybrushing palette while I work. Use a piece of double-sided tape to stick the model in place.


There is a lot of talk online about spray primers for miniature painting. I highly recommend Dupli-Color Sandable Primer. It provides a solid coverage, sticks to everything, and I've never had problems with it making the surface "fuzzy" or filling in any detail. Give the crypt a complete coverage of black spray.

Painting the Model
Basecoat the slate roof with Coal Black. Then, drybrush the stone with a 50/50 mix of Greatcoat Grey and Ironhull Grey. It doesn't need to get in every nook and cranny, but should achieve a mostly even basecoat on the flat panels.

Then, drybrush the stone with straight Ironhull Grey. Mix in some Ash grey and apply a lighter drybrush to bring the color up.

Finish the stone by applying an edge highlight of straight Ash Grey. Use the side of the brush when painting along the sharp corners.


Touch up any overbrushing onto the roof by basecoating the slate shingles with Coal Black.

Use a small drybrush to drybrush Fang Grey on the slate. Take care not to brush over onto the stonework.

Mix a little Menoth White Base (or Screaming Skull) with the Fang Grey and drybrush the slate again. Apply successively lighter layers, adding more Menoth White Base, to make the edges more prominent.


Then, wash the slate with Nuln Oil. Keep it from pooling on the shingles. Use a fine brush and paint Nuln Oil directly into the cracks on the stone to deepen their color.


With the slate and stone finished, it's time to move onto the bones and the base. Apply a basecoat of Battlefield Brown to the cround and the bones. Thin it with a little water so it flows into the recesses of the sand more easily. Apply a little XV-88 brown to the bones.

Next, drybrush the sand and basecoat the bones with Menoth White Base.

Add some Lahmian Mediam and a touch of water to the Brown Ink and wash the sand and bones. Bring the wash up onto the stone a little to weather it. Let the wash dry thoroughly.

Drybrush the sand with Gun Corps Brown, and then with a little Menoth White Base. Drybrush Menoth White Base onto the bones. Some of the eye sockets or teeth may have filled in, so carefully darken them with a mix of Brown Ink and Matt Black.

Finish up the bone by highlighting the edges with a 50/50 mix of Menoth White Base and Menoth White Highlight. Use a fine brush and pick out the teeth as well.

If the stones got too "dirty" from the brown wash, you can recapture the grey color by spot-applying a thin layer of Ironhull Grey where necessary and highlighting the edges with Ash Grey.

Basecoat the metal framing on the roof and the plaques with Pig Iron darkened with a little Matte Black.

Then apply a wash of Bloodstone, thinned with Lahmian Medium. Add a few spots of straight Bloodstone and Bloodstone mixed with Orange to vary the rust pattern. Apply some thin streaks running down the slate and stone to simulate rust drips and weathering.

Finish up by hitting the edges of the metal with Cold Steel.

And that's it! Add a few tufts of static grass to the base, and the crypt is ready for the battlefield!


'Til next time!


Another great tutorial thanks!
ReplyDelete