Runewars Terrain, Part 3: Ruins and Arches
Last time, I took you through the construction of the tower. Next, it's on to the back half of the castle and the tall arches. Here's a shot of how everything was shaping up, including two modular pieces of ruin to go on the side boards. (You may notice a slight difference in the proportions or architecture; Fantasy Flight had commissioned me to build two of these, and this is a shot of the second table, which has subtle variations in its construction.)
You can check out the Runewars Miniatures Game here, and here are the links to the other parts of this build:

After creating the rocky base...

...I attached the tower, again covering the PVC pipe with a layer of foam core board.

A stone texture was cut into the foam that makes up the walls of the large platform.

The tower was covered with similar foam stonework which blends into the rough rocky texture of the base. While the first tower had a full parapet top, this tower has collapsed, so the top has a concave surface that I textured with sand and stones. Wood filler putty was used to conceal the seams between the layers of stacked foam on the rocky base.

A doorway arch similar to the first tower was added, a little more damaged than the doors on the intact tower. Then, I began applying some areas of paving stones on the surface of the bridge and the platform.

With the major structures finished, I added a "foundation" layer of foam for each of the larger pieces. This would allow me to paint everything separately and have a natural-looking connection between the ground and the buildings. The three small platforms would be easy to paint around, so they were attached directly to the board.

Plenty of rocky rubble was added, and the surface was covered with sand.

The Arches
The concept art Fantasy Flight had provided showed lots of tall, ruined archways, and they really helped set the environment apart from other fantasy castles.

The arches needed to be sturdy enough to stand up to travel and the occasional bump, so I constructed them using a wooden core, cut from thin sheets of luan.

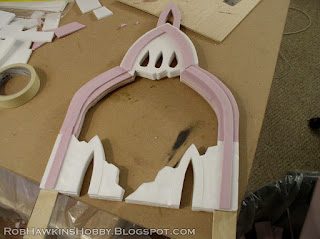
The wooden core was skinned with a layer of foam. In these photos, the pink parts are insulation foam, and the white parts are cellfoam. Cellfoam is essentially foam core board without the paper "skin" on the outside. I made two large archways, and a little one that's attached to the small platform on the table base.


Once these arches were skinned with the foam, and another layer was added to cover the edges, stonework texture was cut into the foam and I added some chips and breaks. The arches plug into slots on the large bridge section of the ruin, but I kept them separate for painting.


All of the structures were painted with a layer of thinned wood glue to seal and protect the foam. Then it got a layer of black latex paint for further protection and a solid undercoat. After that, I gave them a spray of dark grey primer and a zenith spray of a lighter grey. This gives the stonework a grey color and minimal highlighting that I can use as a base to work from, which greatly cuts down on the amount of brushwork I'll need to do when I finish up the painting.
'Til next time!


This is an amazing piece of work, excellent stuff!
ReplyDeleteThe photo with the fork is making me hungry...
ReplyDeleteI should go eat lunch.
Great work as always, man!
Absolutely smashing stuff sir! Keep it coming.
ReplyDeleteA wonderful and spectacular job, congrats!
ReplyDelete